
Hello, today I want to share with you a method to send emails with Power Automate by using a REST API available in SharePoint. There is a method called “sendMail” in SP.Utilities.Utility that can be used to send emails to users.
Some attention points:
- Recipients must be authenticated SharePoint users.
- Attachments cannot be included through this API method (You can include inline attachments likes images uploaded in the same SharePoint domain).
- It doesn’t send emails to distribution groups or lists.
- “To” field must be an array.
Build flow
In this article, I’m going to create a cloud flow that can be run manually. Of course, you can use any trigger that you need, or you can incorporate a SharePoint HTTP request to send an email wherever necessary.
To send mail you should simply add “Send an HTTP request to SharePoint” connector:

So, you must use there parameters:
- Site address: SharePoint to use to make call
- Method: POST
- URI: /_api/SP.Utilities.Utility.SendEmail
- Headers:
{
  "accept": "application/json;odata=verbose",
  "content-type": "application/json;odata=verbose"
}- Body:
{
'properties': {
'__metadata': {
'type': 'SP.Utilities.EmailProperties'
},
'To': {
'results':[ 'email address']
},
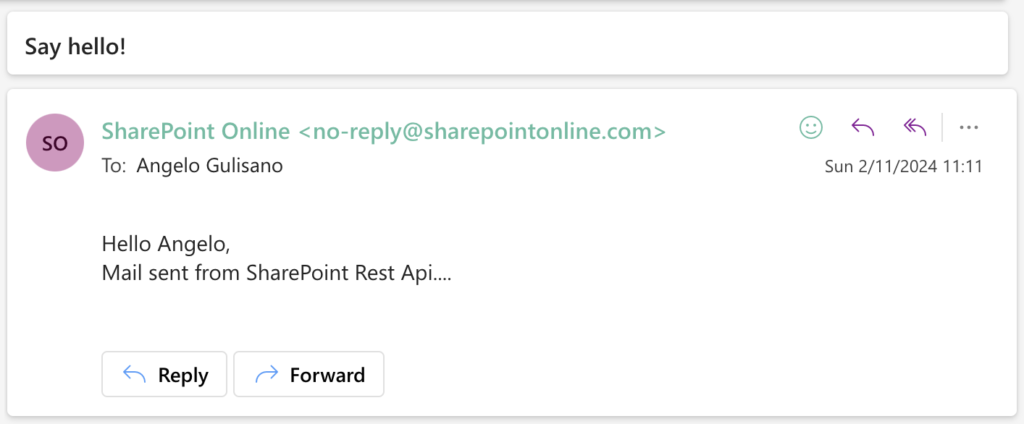
'Body': '<p>Hello Angelo,<br>
Mail sent from SharePoint Rest Api....<br>
</p>',
'Subject': 'Say hello!'
}
}In the body section, you should add “TO” as an object with a result property that accepts an array of email addresses. Similarly, if you want to add “CC” or “BCC“, you can also include “Body“, which can contain HTML, and “Subject” as a string.
This is result:
Considerations
Some people ask me, “Why should we use this option?” I wrote this article inspired by a recent training course on Power Automate that I delivered for a customer. In this instance, my client needed to send emails, but we didn’t have the option to use a service account to send emails with the standard Outlook 365 connector, and he didn’t want to send them from his email address.
I hope these information can help you.
Contact me for questions! Have a nice day!