Here my interview with Christian Buckley, Microsoft Regional Director and MVP.
Thanks!
Visit his site: https://buckleyplanetblog.azurewebsites.net/
Here my interview with Christian Buckley, Microsoft Regional Director and MVP.
Thanks!
Visit his site: https://buckleyplanetblog.azurewebsites.net/
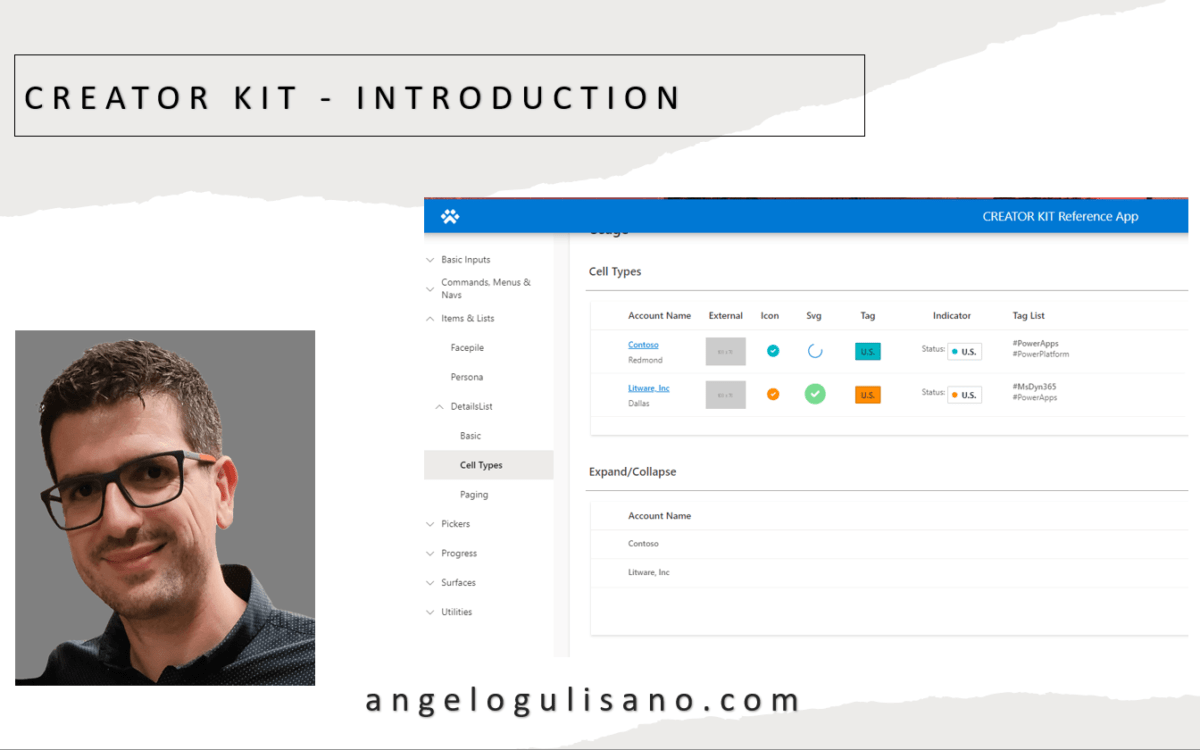
Hello, a new update of Creator Kit is availalbe. If you don’t know what Creator Kit is, you can read my article here.
Has benn fixed some bugs:
I hope these information can help you…Here you can find official release page on GitHub for this update.
Contact me for questions! Have a nice day!
In this article, let’s see how you can catch error during flow executions and send information via email. My way to catch error is by incorporating error handling , and track in log table or SharePoint list on you can also send and email with error details. First of all, if you didn’t , you should read my old article “Power Automate – Try Catch”.
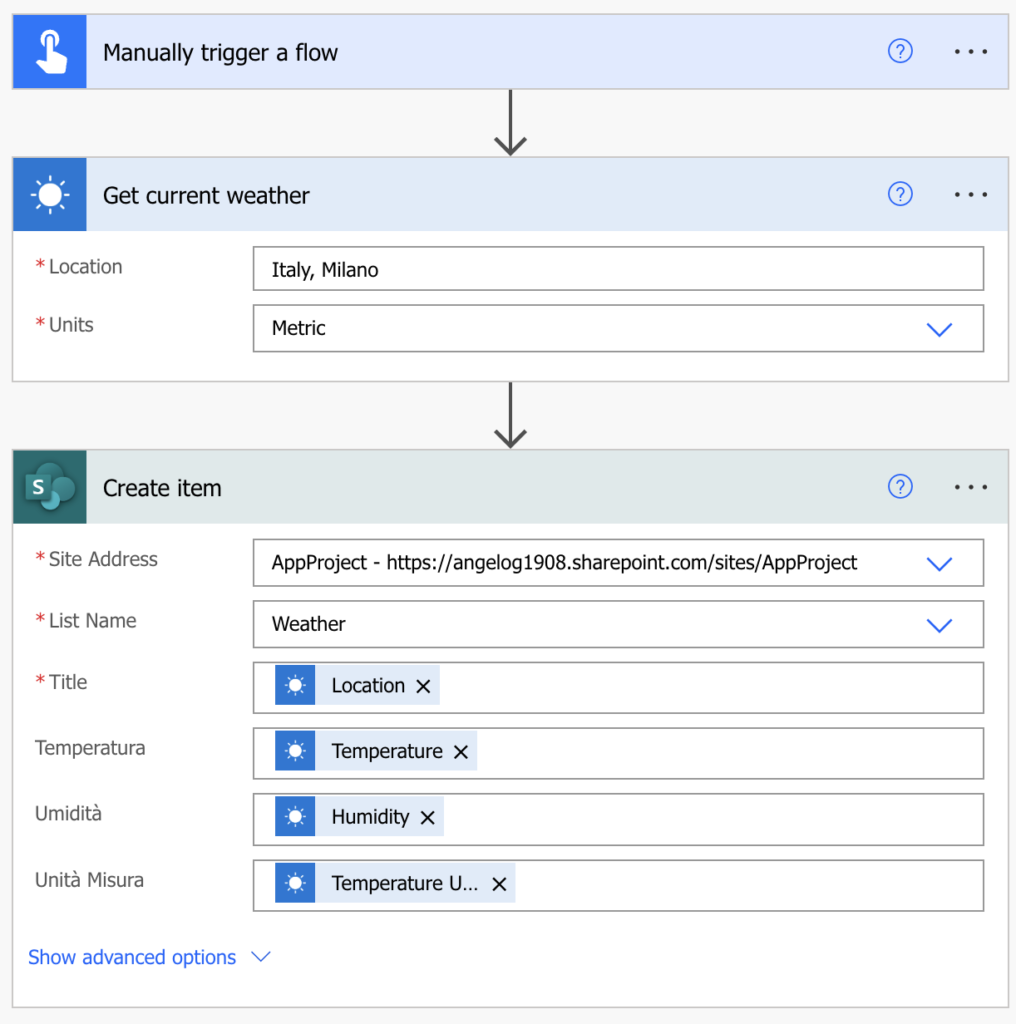
Basically, we have a Power Automate flow with manually trigger who catch wheater informations and log them in SharePoint list.
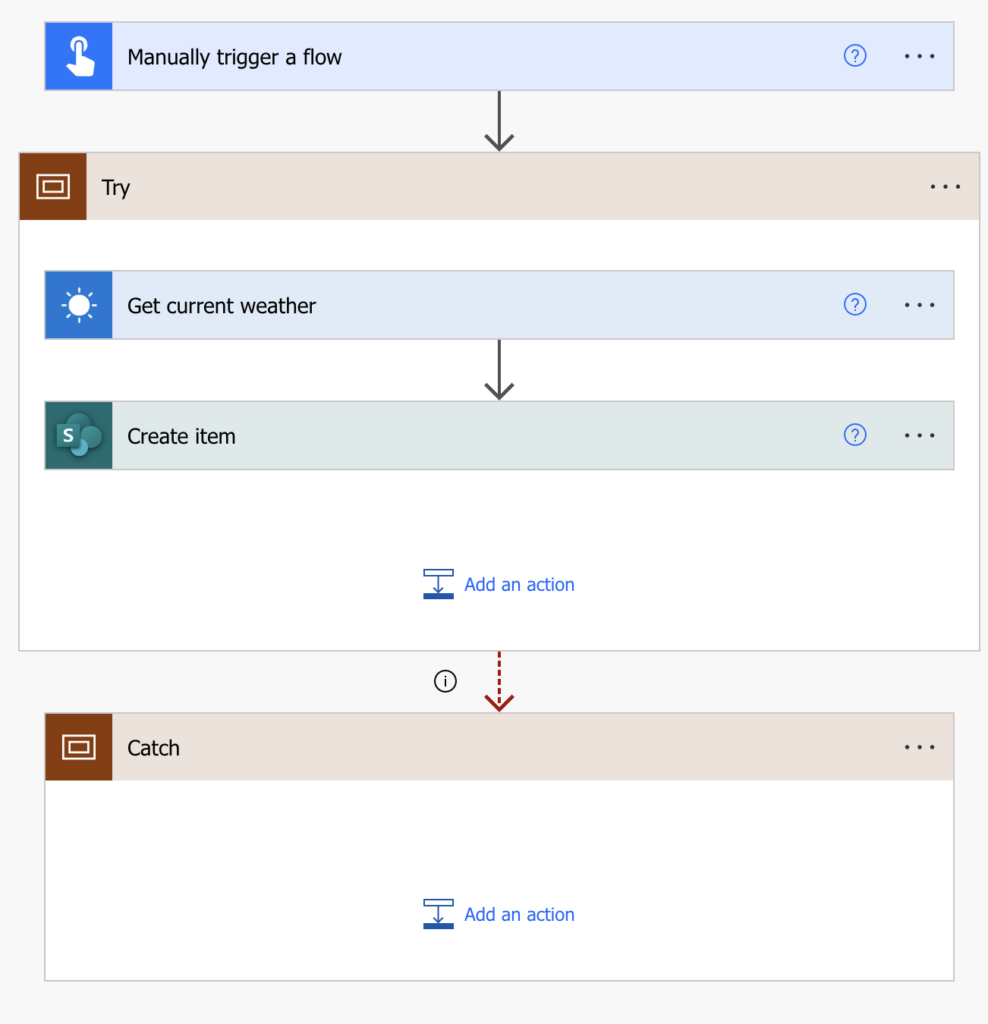
According, to my old article. Add “Try Catch” scopes. Our flow became:
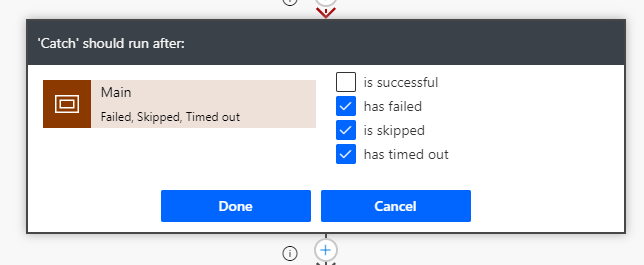
In this case, my “Catch” scope, is configured to execute only in case of:
Basically, now you can add some action to track if your flow going in error and send alert to users. By, let’s do a little additional step, and get error details.
How can we get error details?
In our “Catch” scope, we shuld add “Compose” block to get output result of our “Try” scope, then, we should filter result to extract error details.
Key Point:
Get “Try” scope result, with compose: (you must use “Get result” action)
result('Try')
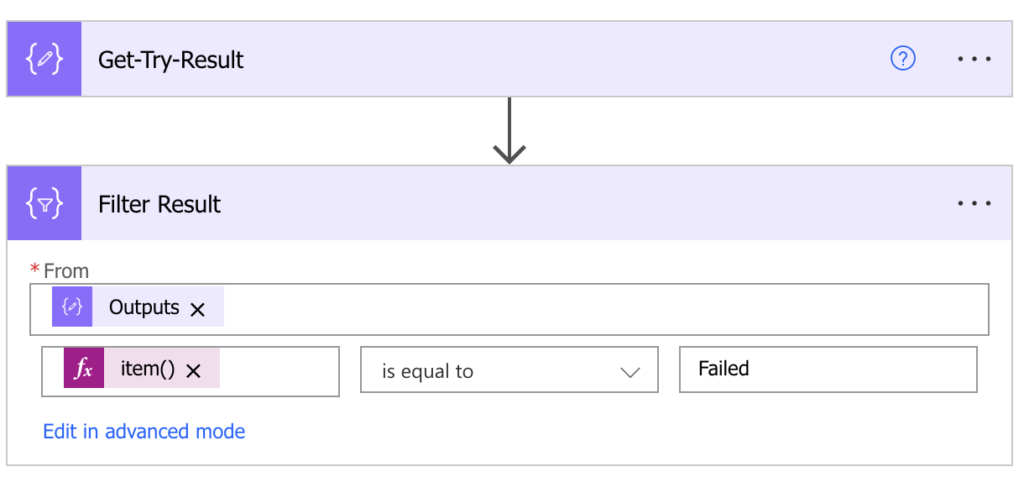
Now, use “Filter array” action, to filter “Get-Try-Result” result action. In filter, I added this:
item()?['Status']
and filter for “Is Equal” to “Failed”, so final result is:
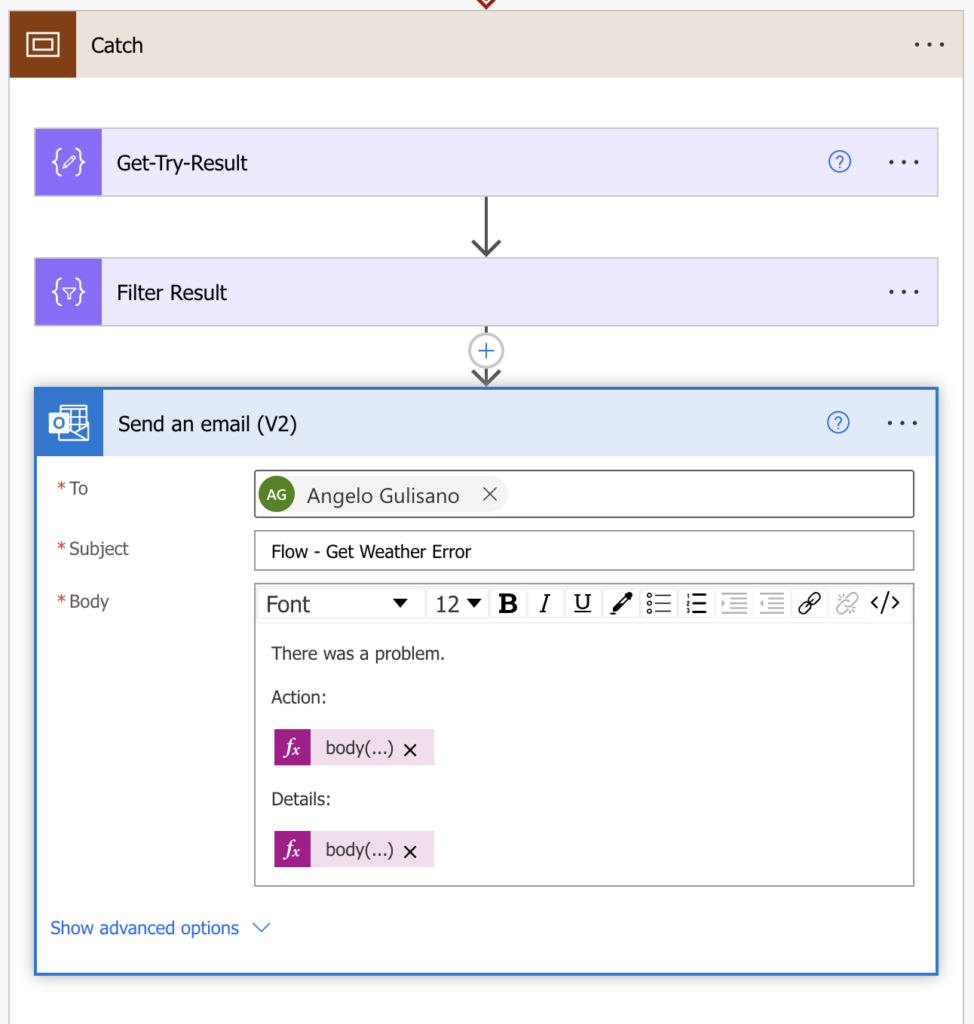
Now you can send email with details or track them on list (or both 🙂 ). You can get Action Name, with this expression. To try , I added bool variabile, and set to null in “try” scope.
body('Filter_Result')[0]?['Name']
And error details:
body('Filter_Result')[0]?['Error']
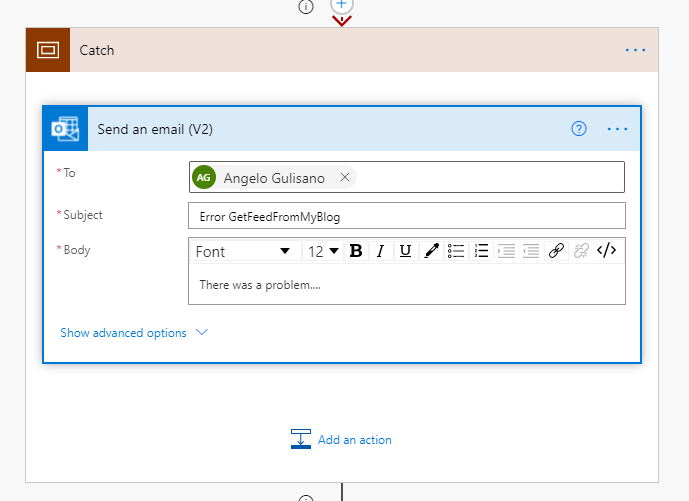
So , final result of “Catch” scope is:
Final Flow:
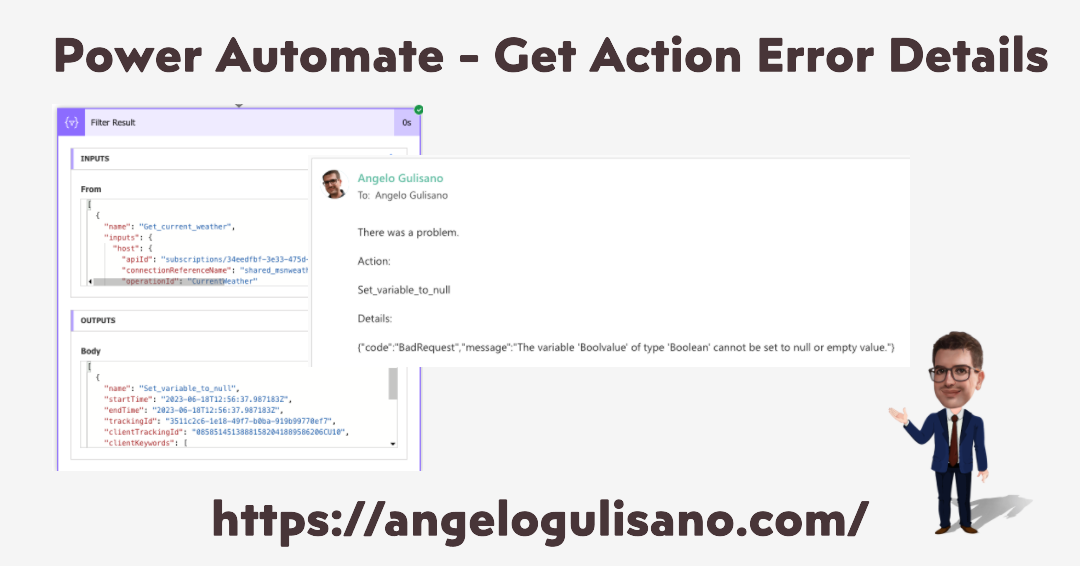
Finally, in case of error, here is the detail:
I hope these information can help you! Leave me a comment to let me know what you think, or if you have a better idea to handle this case.
Contact me for questions! Have a nice day!
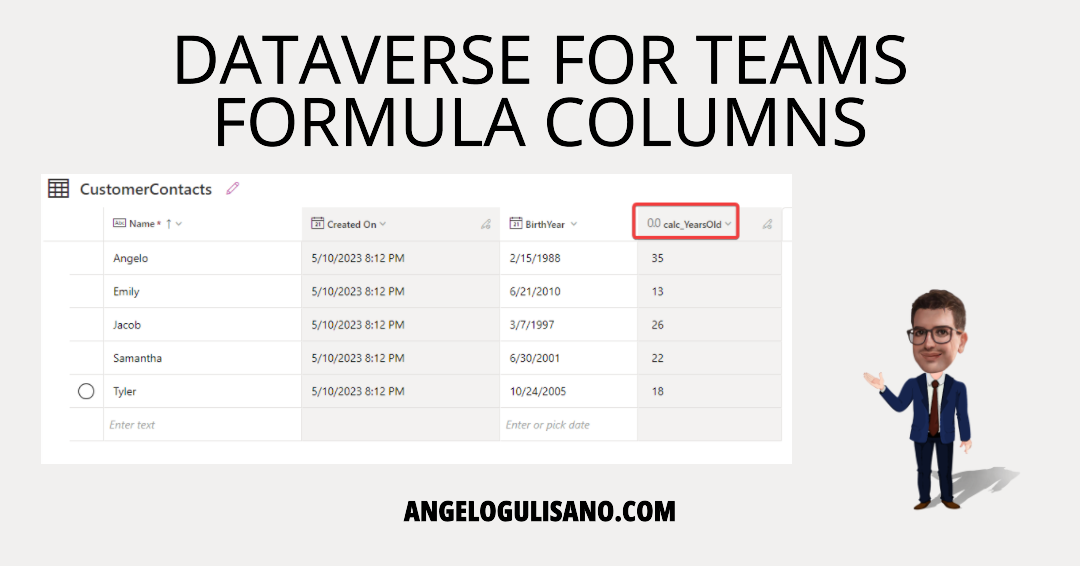
Formula columns are a powerful feature of Microsoft Dataverse for Teams. With this data type, you can quickly add a calculated column to your table. This is made possible by the Power Fx, a language that enables you to write formulas and expressions that can be used in Dataverse for Teams.
If you still using it, but you have problem with Data columns, go directly here.
Supported data type:
Supported operators:
+, -, *, /, %, ^, in, exactin, &
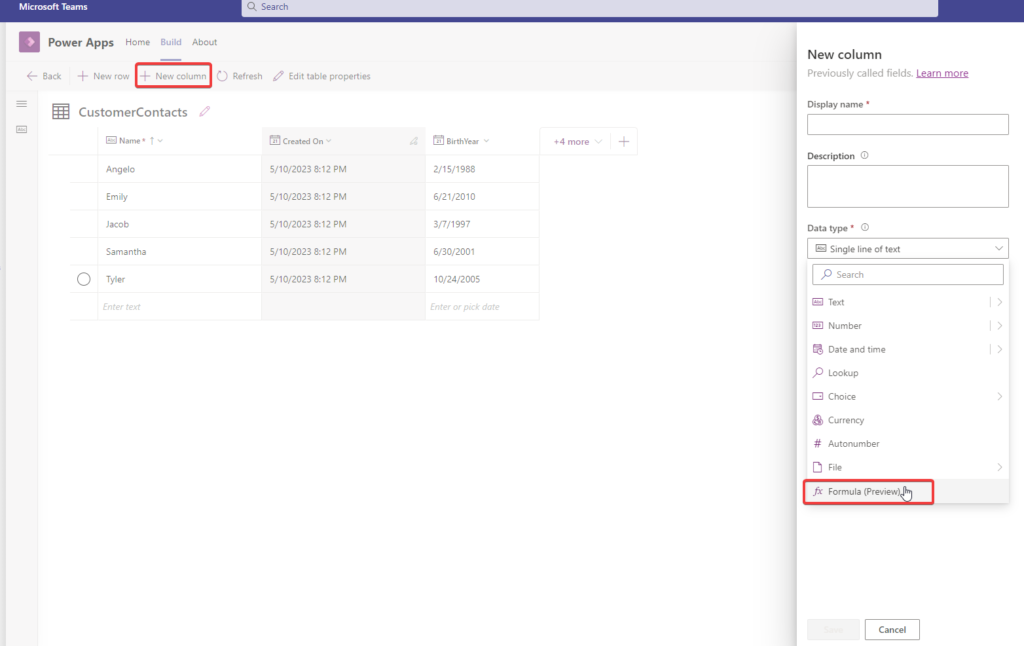
Let’s start! Go to edito your Dataverse table, and create create new column:
Select “Formula” Column. In my Example I want to calculate how old employees are. So:
Formula:
DateDiff('BirthYear ', UTCNow(),TimeUnit.Years)
Result:
If you get some error, when using Datacolumn , for Example errors about “Time zone conversion”. You should try to edit your Data column and set “Time Zone Adjustment” property to : “Time zone Indipendent“
There are about 54 function available at time I’m writing this article, for Example:
DateDiff, DateAdd , If , UTCNow, Abs ecc…
Keep mind this attention point from MS: “The Text and Value functions only work with whole numbers, where no decimal separator is involved. The decimal separator varies across locales. Since formula columns are evaluated without locale knowledge, there’s no way to properly interpret or generate the decimal separator.”
I hope these information can help you! Here link to official documentations.
Contact me for questions! Have a nice day!
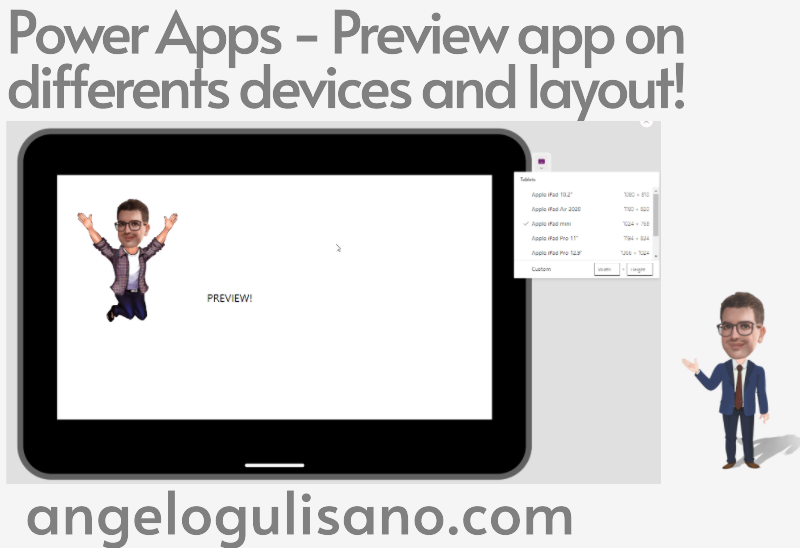
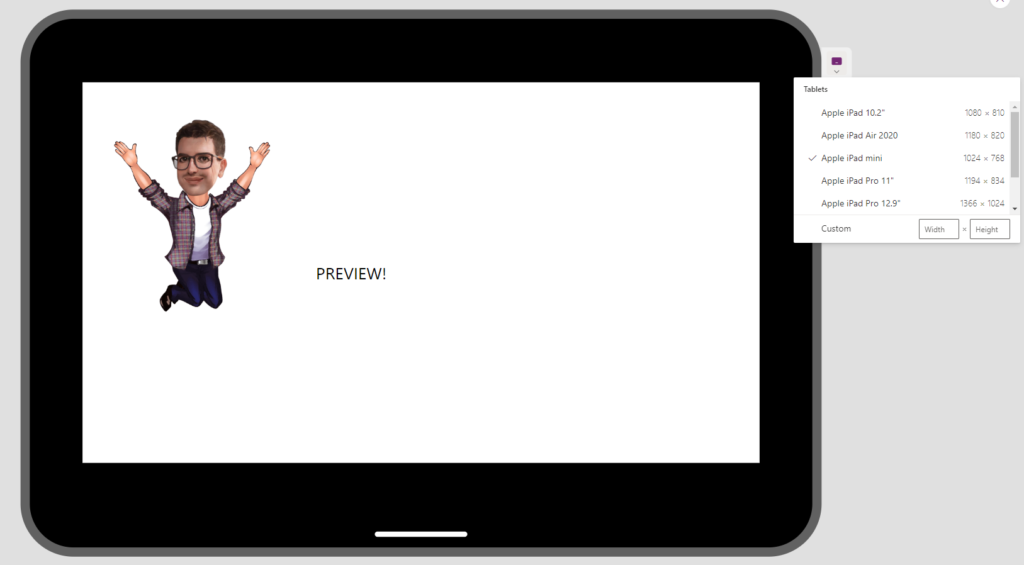
Power Apps have now a great feature that allows you to preview your app on different devices and layouts. This is an incredibly useful tool to allows us to test our apps on multiple platforms and make sure that the user experience is consistent across all of them. With this feature, developers can make sure that their apps look great no matter what device or layout they are viewed on.
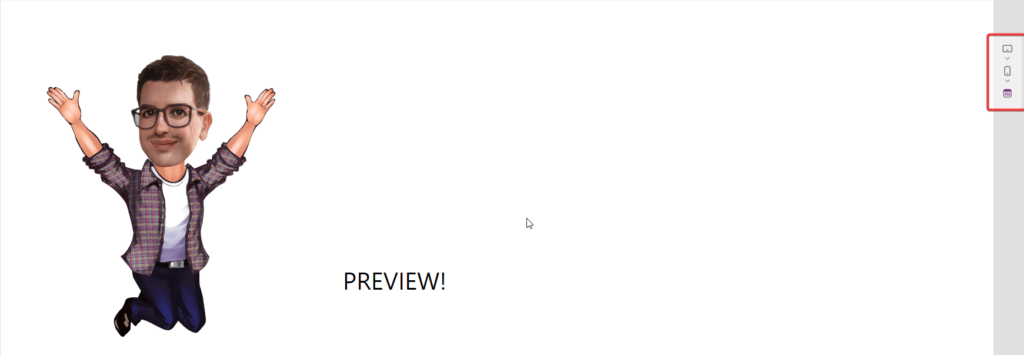
Press Preview App (F5)
When you click on option, you can choose Device:
Available Options:
If you don’t find devices you need, you can put custom Width and Height properties.
To enable preview, you must enable set authoring version to last one available 3.23053.23 (save and refresh app):
I hope these information can help you! If you need more information, you can go here.
Contact me for questions! Have a nice day!
Dataverse is a secure platform used for managing and storing data used by business applications. If you’re using Dataverse (or Dataverse for Teams 🙂 ) and your’re trying to creare (or update) row with lookup field, you may can find useful this article.
We have two tables:
In our table “CustomerContacts” we have two field: Name and Customer, wich is Lookup Column who refers to Customer table.
I created three record for customer:
Table CustomerContracts is empty:
Let’s assume we need to create through Power Automate (eg for an import from Excel File) our Customer Contacts. How should we do that?
Our Excel File:
Let’s see our Flow.
NB: We use “Microsoft Dataverse” actions for both Dataverse and Dataverse for Teams.
This flow don’t need to much explications. We get our Excel File and for each row, we use “Add new row” action to create row. But it doesn’t work. We got this error:
URL was not parsed due to an ODataUnrecognizedPathException. Resource not found for the segment provided in the URL.
We can’t create row using text field (from Excel) in Lookup field.
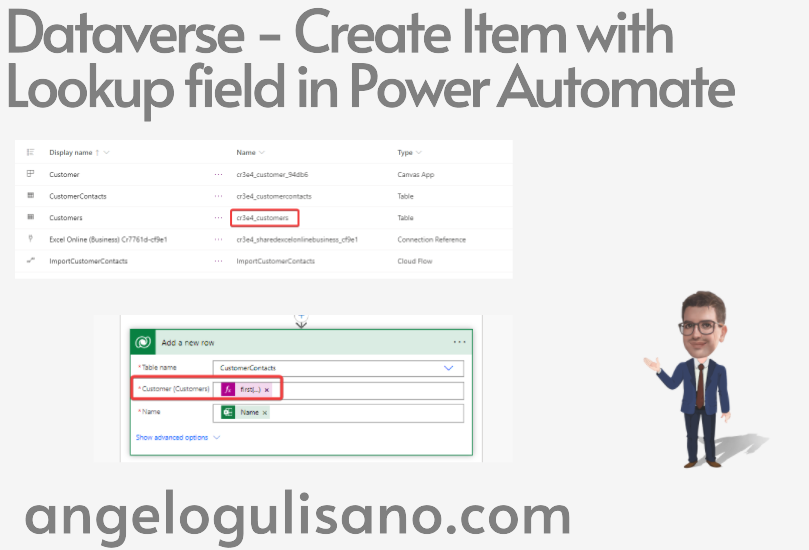
We need logical name of table and RowId of record we want to refer:
Now we can update our flow to use this costruct using Row ID:
cr3e4_customers([ROW_ID])
Or @odata.id directly:
@odata.id
To get row id, we need get correct items to refer. To do that, we should get logical name of field, before:
So our flow become:
In Customer field i wrote:
first(body('List_rows')?['value'])?['@odata.id']
To get first row form “List row actions” (filtered by customer name) and use @data.id value.
I hope these information can help you!
Contact me for questions! Have a nice day!
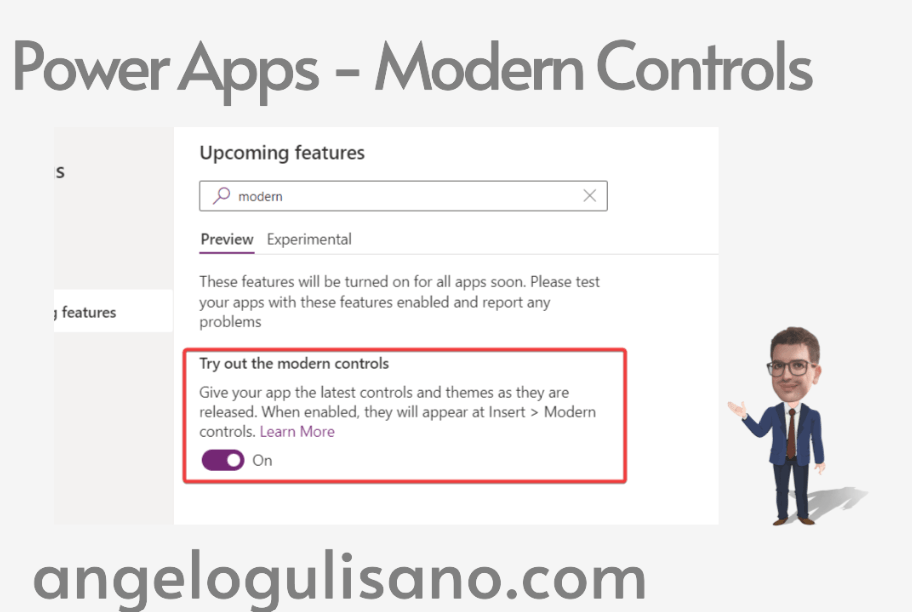
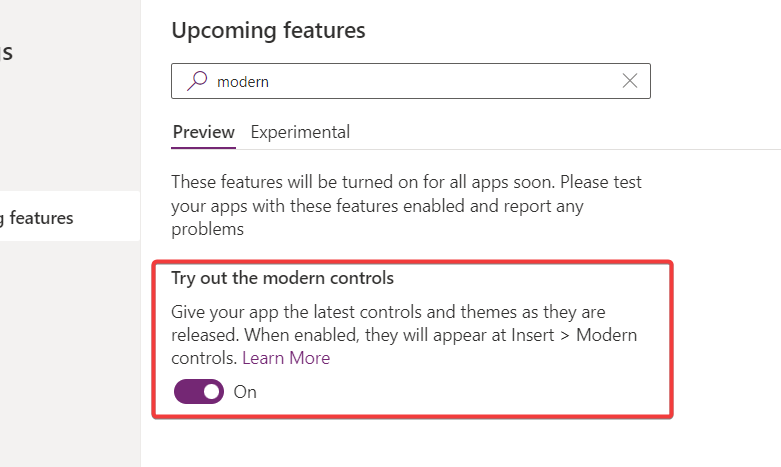
If you don’t like standard canvas app control, you can enable this new (experimental) feature to enable a new set of controls , called “Modern Controls”.
NB: This is Experimental Feature, as an experimental feature, do not use it in production apps.
Modern Controls has about 13 new controls wich you can use for your applications:
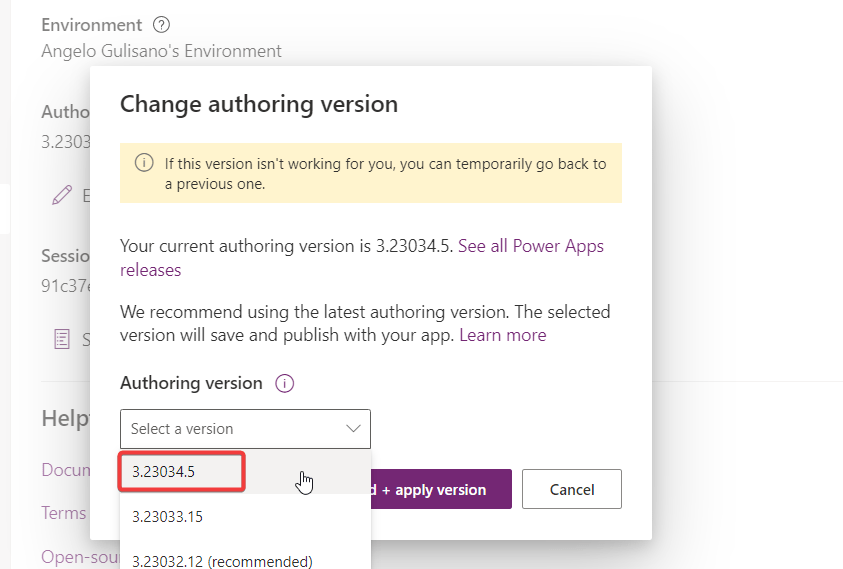
Firs of all, you must enable set authoring version to last one available 3.23034.5 (save and refresh app):
Then, you should find , in experimental features, “Try out the modern controls”:
Save, refresh and you should see new group of controls called “Modern Controls“.
I hope these information can help you! I didn’t find much documentation about it at the moment I’m writing this article, I’ll add some information as soon as I find out 🙂
Contact me for questions! Have a nice day!
At the time of writing this article, when you add Library Component of Creator Kit, you may find some errors. If you don’t know what Creator Kit is, you can read my article here.
Add one of Library control to your app. If you didn’t have installed Creator Kit in your environment, you can read this article to do it.
Let’s see how to use this control.
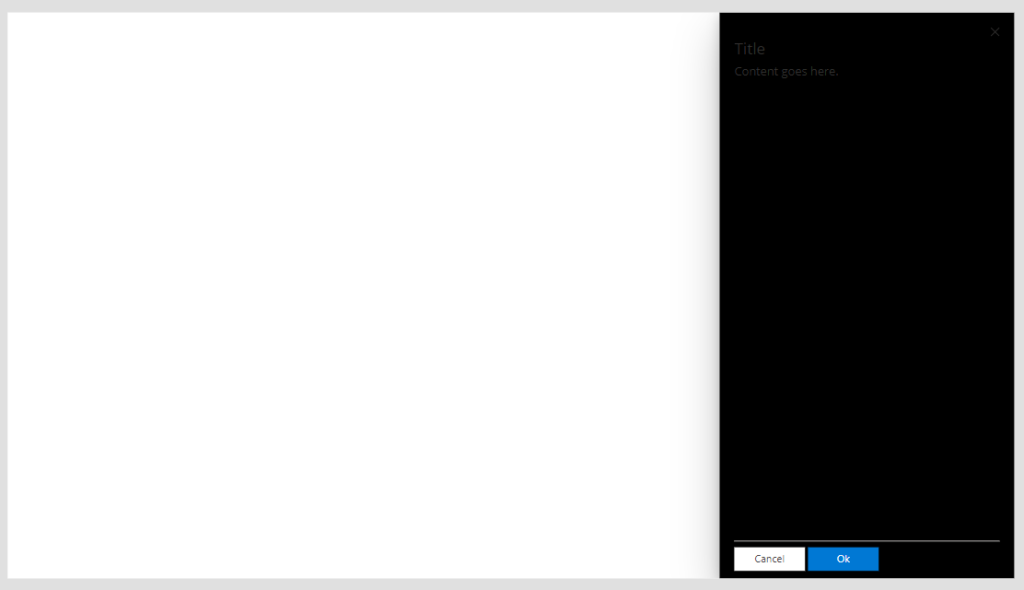
As you can see, now you have 10 errors on your app. All errors are relative to our Panel Control:
Our control should look like this:
To fix, you should follow these step:
Let’s start to create local copy. Click on Edit and then Create Copy:
Now you have local copy and you can fix errors:
In this case (But the errors will change depending on the control you have), I fixed:
Button:
If(ThisItem.ButtonType = Primary, ColorValue(Panel_2.Theme.palette.themePrimary))
To
If(ThisItem.ButtonType = 'Microsoft.CoreControls.Button.ButtonType'.Standard, ColorValue(Panel_2.Theme.palette.themeDark))
Font:
'Segoe UI'
To
Font.'Segoe UI'
Semibold
To
FontWeight.Semibold
Transparent
Color.Transparent
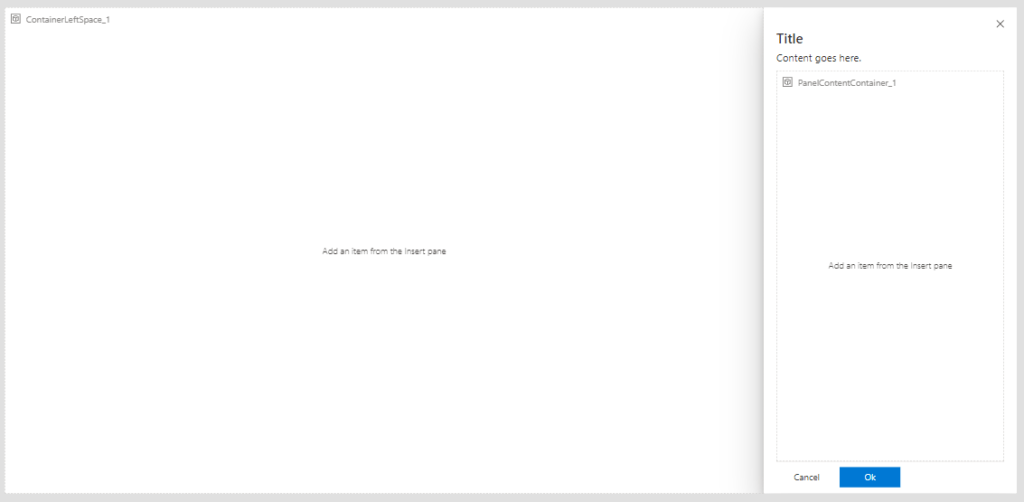
Now your control should work. You should see like this:
We can use our version of control:
I hope these information can help you…Here you can find official documentations on GitHub for this control.
Contact me for questions! Have a nice day!
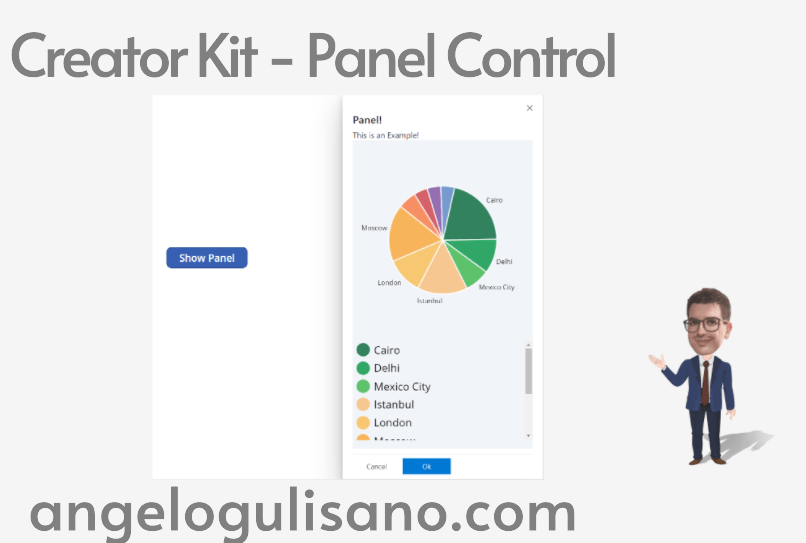
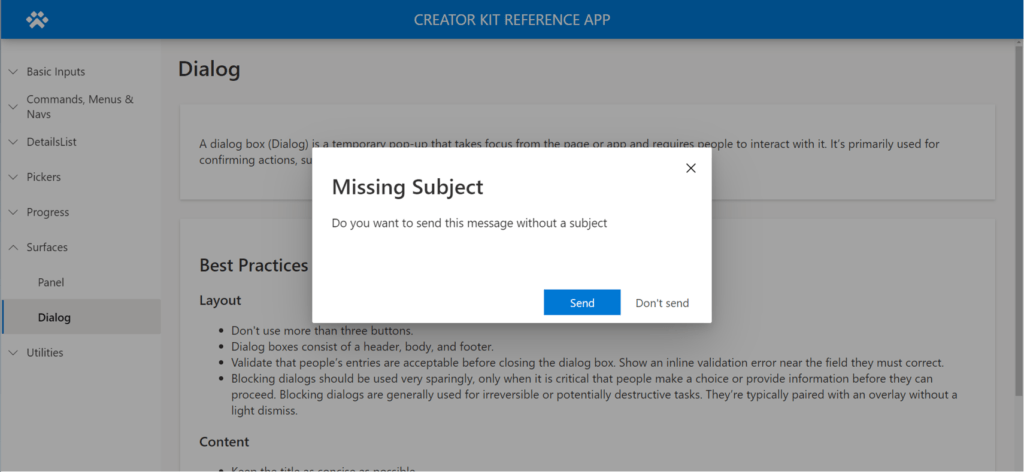
Today , we’re introducing one of the “Surface” controls group of Creator Kit: “Panel Control“. Let’s see What is it and how it works. If you don’t know what Creator Kit is, you can read my article here.
Before use it, you should add it to your app. If you didn’t have installed Creator Kit in your environment, you can read this article to do it.
Let’s see how to use this control.
This control is usefull to create complex creation, edit, or management experiences of items or settings. Let’s understand how can we use it. When you add it on your app, you should see something this:
At this time (16/04/2023) when you add Library component of Creator Kit you may find some errors. Use this link to understand how to fix it.
We should set some properties:
Create Table with these attributes:
Try to put this on OnButtonSelect property:
Switch( Self.SelectedButton.Label,
"Ok", Notify("Ok button");
);
// Closes the panel
UpdateContext({ showHideDialog: false })
Basically, if you click on “Ok” button, you’ll see Notify in this example and your then panel will hide.
Set “Visible” property:
showHideDialog
So, to show your panel, you must set true “showHideDialog” variable:
UpdateContext({ showHideDialog: true })
You can’t put controls inside your Panel control, but you can use a container. Let’s se an example with Vertical container.
To align container to panel, we must set these properies , to same properties of panel:
Container Properties | Panel Properties |
---|---|
X | myPanel.ContentX |
Y | myPanel.ContentY |
Width | myPanel.ContentWidth |
Height | myPanel.ContentHeight |
Visible | myPanel.Visible |
Just to show you result, I set different background color:
Now you can put others controls inside container and use your panel.
I hope these information can help you…Here you can find official documentations for this control.
Contact me for questions! Have a nice day!
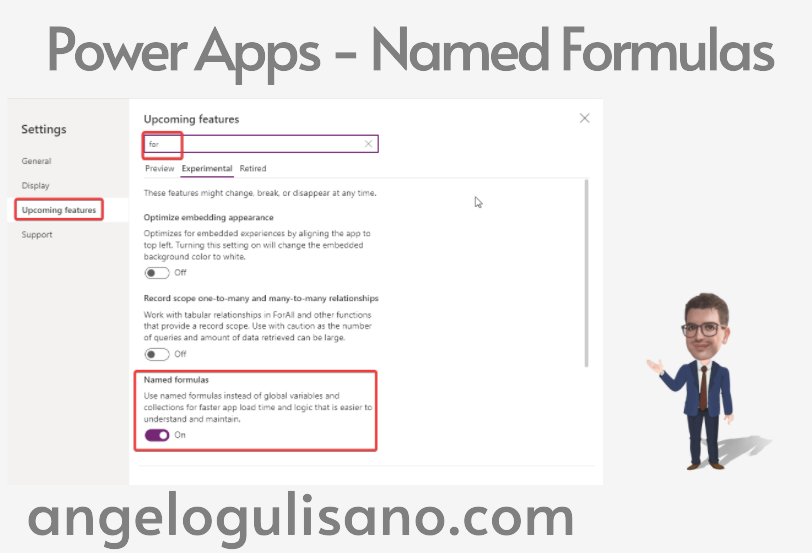
Today , I want to explain a really cool feature, in order to improve performance of your app and make it “code” more tidier.
NB: This is Experimental Feature, as an experimental feature, do not use named formulas in production apps.
We can use App.OnStart to inizializiate variables, load data and do some operations. These actions my be cause slow starting of your application. Sometimes we use , for example hidden button to write “reusable” code.
Now , we can write formulas and reuse it in any part of our application.
Firs of all, you must enable experimental feature. Click on “Settings” and enable it:
Now, you should see new property of your app, called “Formulas”. Here you can add your formula!
Here you can add your formulas. For example:
ParamID = Param("ID");
UserEmail = User().Email;
But, of course, you can add more complex formula.
Why we should use named formulas? let’s see some advantages:
I hope these information can help you! Here link with additional informations.
Contact me for questions! Have a nice day!
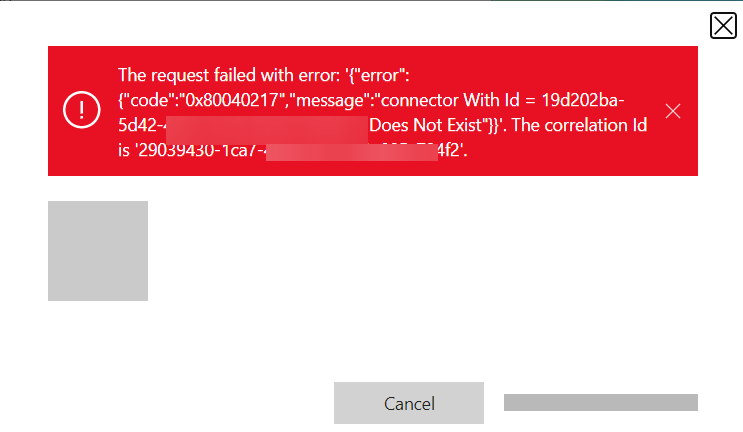
Today , I want to explain how to fix Error 0x80040217. If you created custom connector and put it inside solution with for example your flow or your App, may you find in this error, when you try import solution on new Environment:
Some note to remember:
Really, really simple!
Create a new solution ed import your custom connector. Then , remove it from previus solutions. Basically, you must import your custom connector before, then import your flows or app that using it.
I hope these information can help you!
Contact me for questions! Have a nice day!
Today , I want to explain how you can recover deleted Power Automate flows. PS: If you need recover Power Apps, you can read my article here.
Some note to remember:
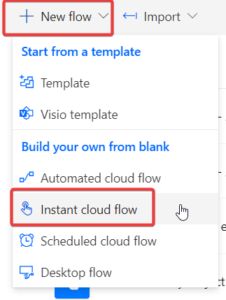
Let’s build a new “Instant cloud flow” with manually trigger.
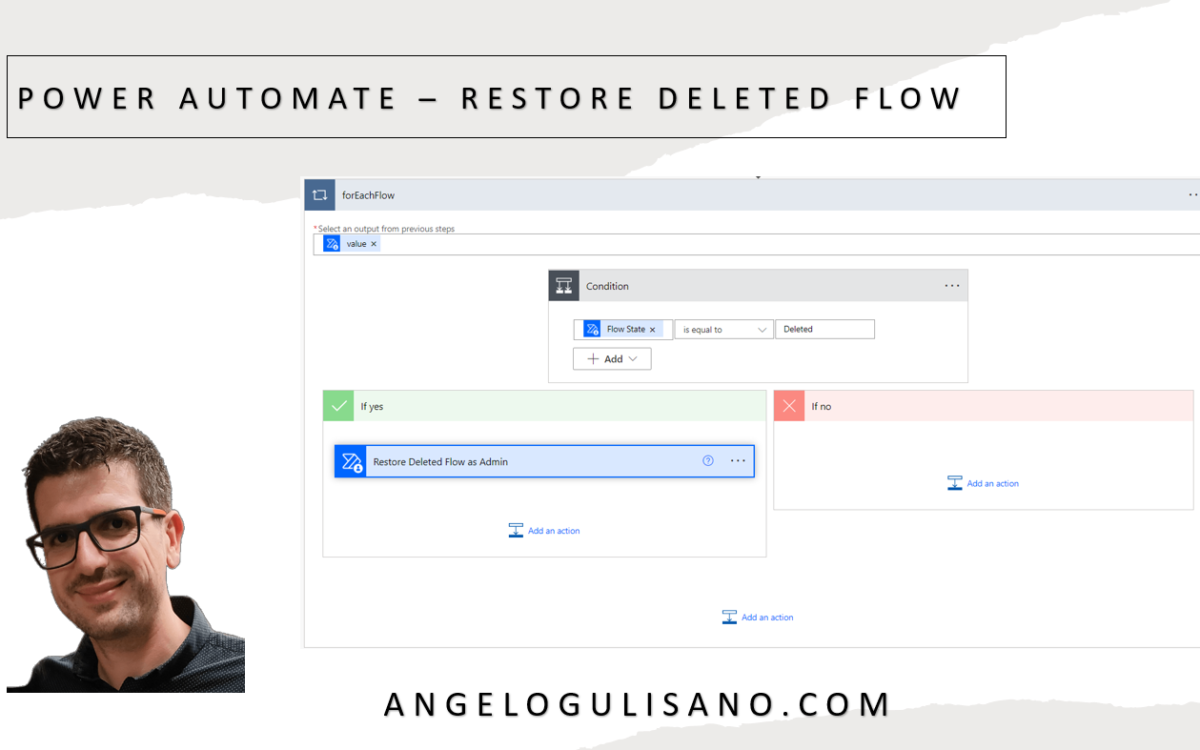
Now we can add some step to recovery our flow, search “Power Automate Management” and looking for step “List Flows as Admin”, then choose correct Environment and set “Include Soft-Deleted Flows” to Yes.
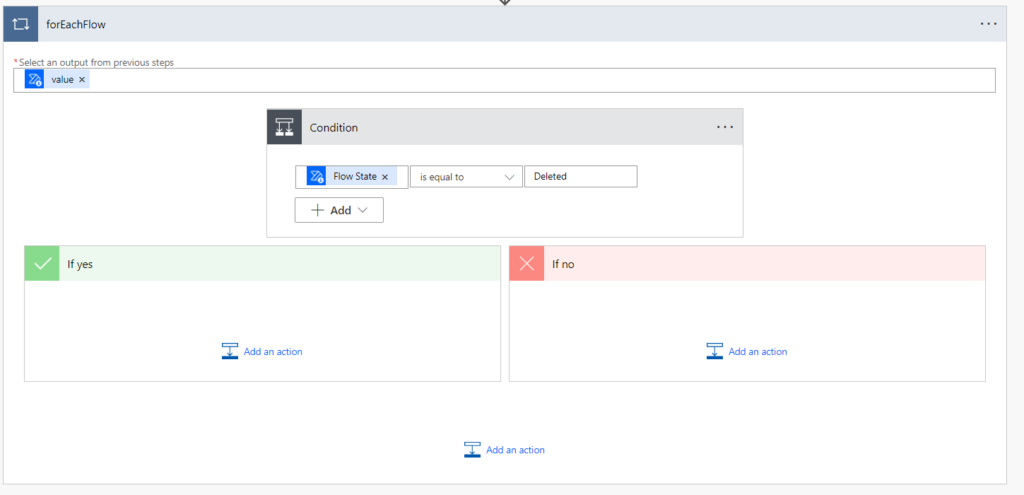
Now have action to list our flows, included deleted flows. Add “Apply to Each” step (I renamed it “ForEachFlow”) in order to iterate our results and then add “condition” action to filter only “deleted” flow by status property:
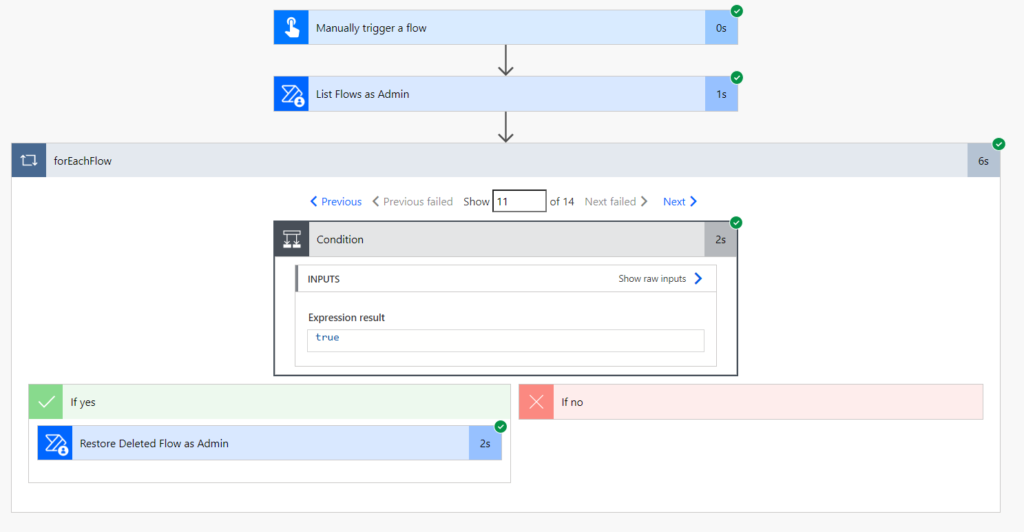
Now last step, add action called “Restore Deleted Flow as Admin” set correct Environment (same as step “List flows as Admin”):
and finally run it.
Now , your flow should be appear in list of flow and should be in disabled state:
I hope these information can help you to recover your deleted Power Automate Flow…Here you can find official documentation from Microsoft.
Contact me for questions! Have a nice day!
Today , we’re introducing one of the menu & nav controls group of Creator Kit: “Nav Control“. Let’s see What is it and how it works. If you don’t know what Creator Kit is, you can read my article here.
Before use it, you should add it to your app. If you didn’t have installed Creator Kit in your environment, you can read this article to do it.
Let’s see how to use this control.
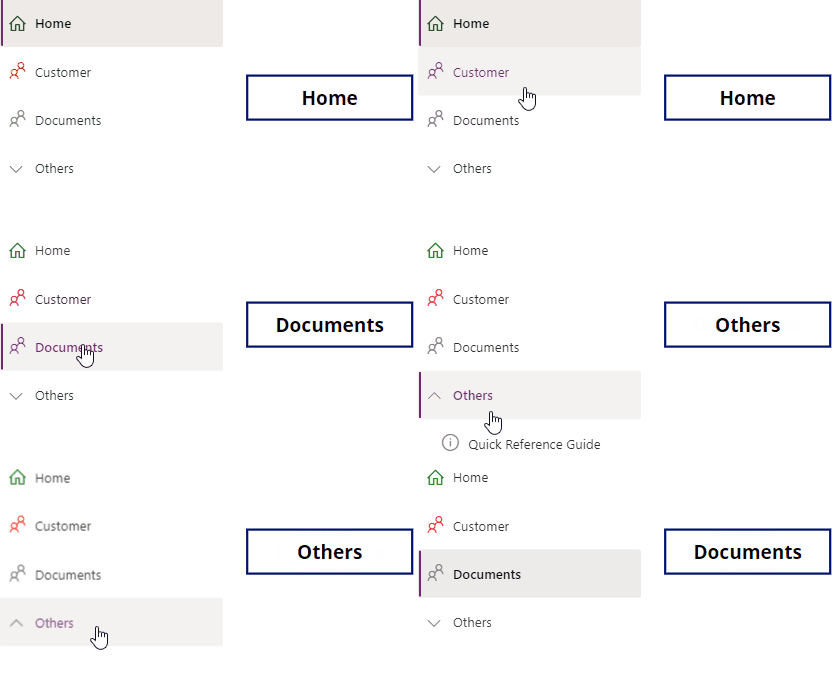
You can use this control to create a navigation menu in your app. Let’s understand how can we use it. When you add it on your app, you should see something this:
We should set some properties:
Create Table with these attributes:
Accourding to documentation, try to put this on Items properties:
Table(
{
ItemKey: "1",
ItemDisplayName: "Home",
ItemIconName: "Home",
ItemIconColor: "Green"
},
{
ItemKey: "2",
ItemDisplayName: "Customer",
ItemIconName: "People",
ItemIconColor: "Red"
},
{
ItemKey: "3",
ItemDisplayName: "Documents",
ItemIconName: "People",
ItemIconColor: "Grey"
},
{
ItemKey: "4",
ItemDisplayName: "Others",
ItemIconName: "DocumentSet",
ItemIconColor: "Grey"
},
{
ItemKey: "5",
ItemDisplayName: "Quick Reference Guide",
ItemParentKey: "4",
ItemIconName: "Info",
ItemIconColor: "Grey"
}
)
You should see this result:
You can use OnSelect to get selected item and do some actions like change page. As usual, Just to understand , I show selected item display name in a label:
NavMenu.Selected.ItemDisplayName
Results:
Others useful properties are:
I hope these information can help you…Here you can find official documentations on GitHub for this control.
Contact me for questions! Have a nice day!
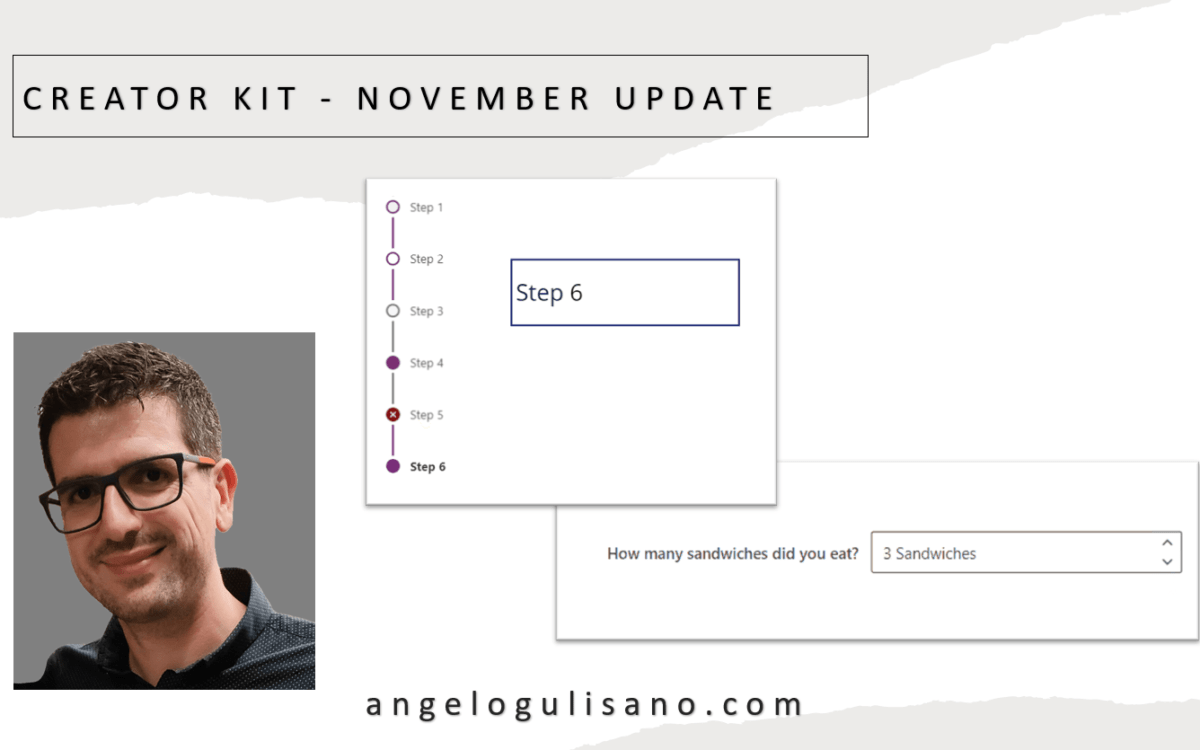
Let’s see what news are introduced with november update of creator kit. If you don’t know what Creator Kit is, you can read my article here.
Have been introduced 2 new (in preview) components, SubwayNav and SpinButton:
SubwayNav Control
SpinButton Control
Let’s see a basic introduction to use these controls.
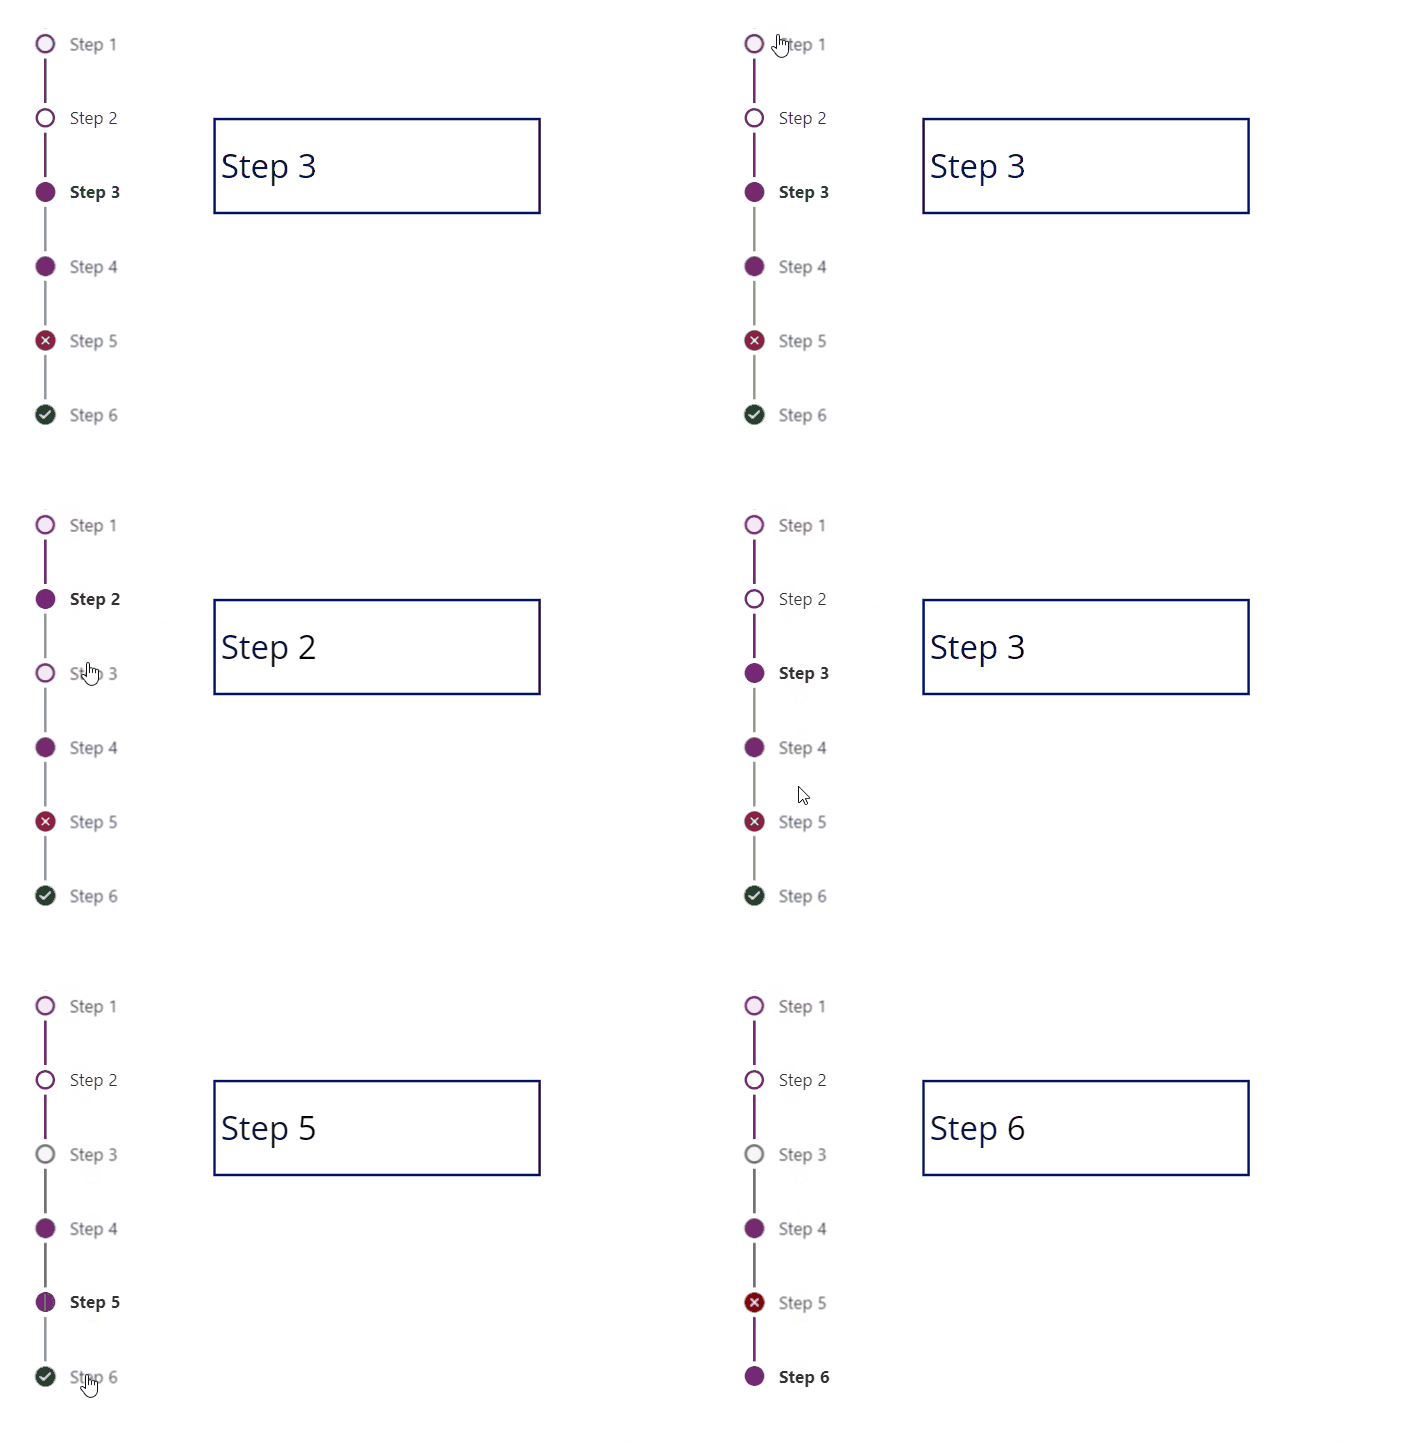
You can use this control to show a wizard steps in our application. Let’s understand how can we use it. When you add it on your app, you should see something this:
We should set some properties:
Set a Table , with these attributes:
Accourding to source code, try to put this on Items propertie:
Table(
{
ItemKey: "1",
ItemLabel: "Step 1",
ItemState: "Current"
},
{
ItemKey: "2",
ItemLabel: "Step 2",
ItemState: "Completed"
},
{
ItemKey: "3",
ItemLabel: "Step 3",
ItemState: "Unsaved"
},
{
ItemKey: "4",
ItemLabel: "Step 4",
ItemState: "ViewedNotCompleted"
},
{
ItemKey: "5",
ItemLabel: "Step 5",
ItemState: "Error"
},
{
ItemKey: "6",
ItemLabel: "Step 6",
ItemState: "WizardComplete"
}
)
You should see this result:
If you don’t want specify ItemState , you can set empty string (ItemState: “”) , and you’ll see an empty white dot.
You can use OnSelect to get selected item and change page to show next step of your wizard. Just to understand , in this case I saved selected step on variable (Is just an example, you can use Controlname.Selected insted):
UpdateContext({SeletectStep: Self.Selected})
And on label:
SeletectStep.ItemLabel
Results:
Other useful properties are:
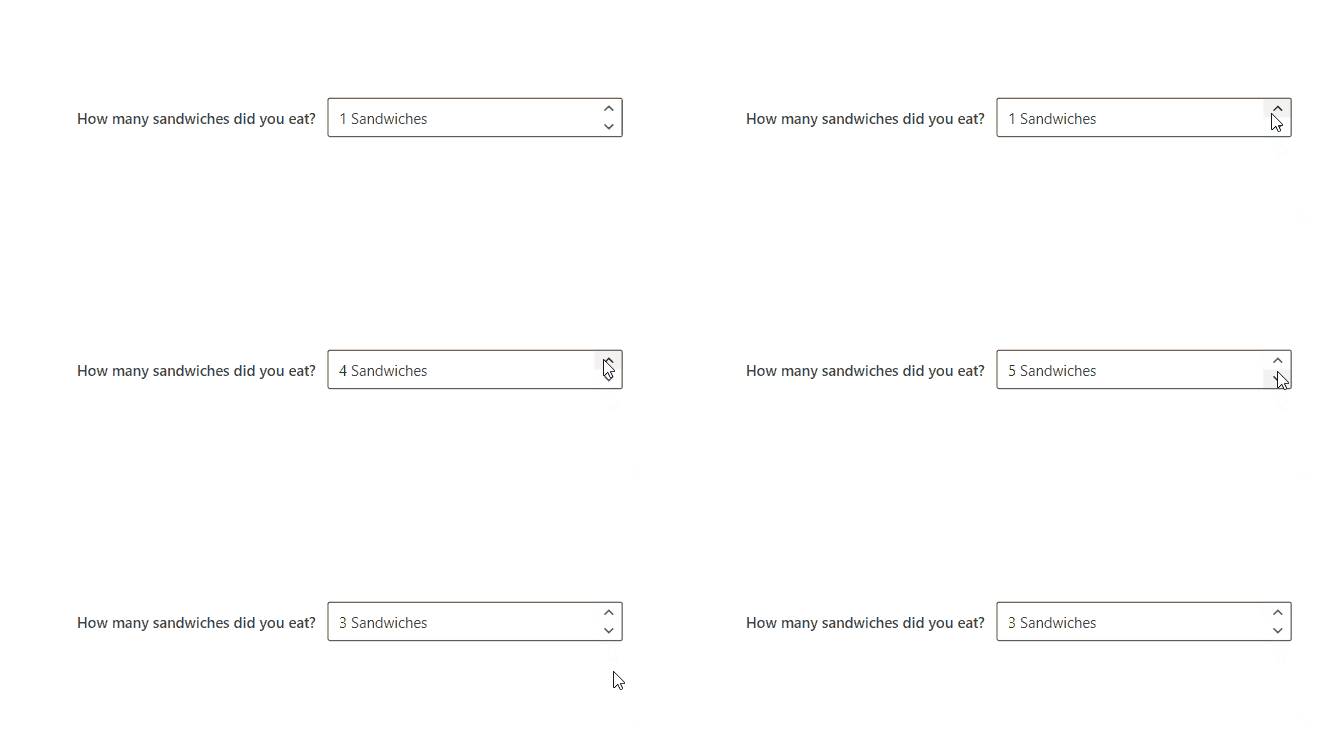
A spin button is control to allow to add number in small steps. When you add control you should see this:
Principal properties:
Le’t see an example, I set these properties:
About esixting control, have been added:
I hope these information can help you…Here you can find official release page on GitHub for this update.
Contact me for questions! Have a nice day!
Today, we’re going to speak about Creator Kit. With this fantastic tool, we have possibility to create Canvas App, with professional look & feel with “Microsoft 365” Style.
What is “Cretor Kit” ?
According to Microsoft , Creator Kit consist in a series of controls , utility and templates , created to increase developer productivity.
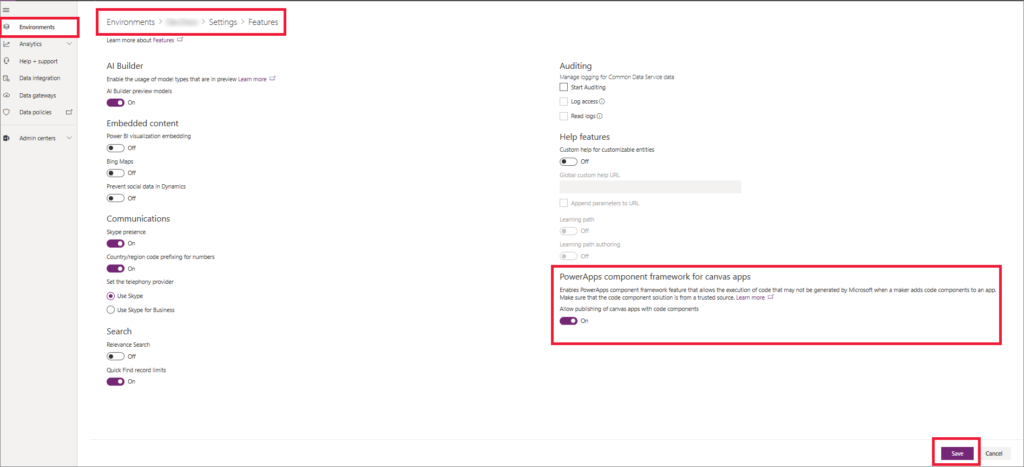
Follow these Steps:
Now you can see new control on control list under “Code components” group.
Creator Kit contains around 24 components. You can start study from here. Most intresting component in my opinion are:
As I told you, there are more component and more will added every month. I’m going to create a post every month with description on new comonents.
Contact me for questions! Have a nice day!
Today, we’re going to speak about Environment. Where people starting to create App or Flow, usually, use Default Environment. But in order to have correct governance or our Power Platform solutions, a good idea (but is not only the one) is create more then one Environment. For Example Dev, Quality and Prod.
What is an “Environment” ?
According to Microsoft , and Environment is a a space to store and share data, app , flows. You can image it as a “Container”.
Basically we can create 4 kinds of environment.
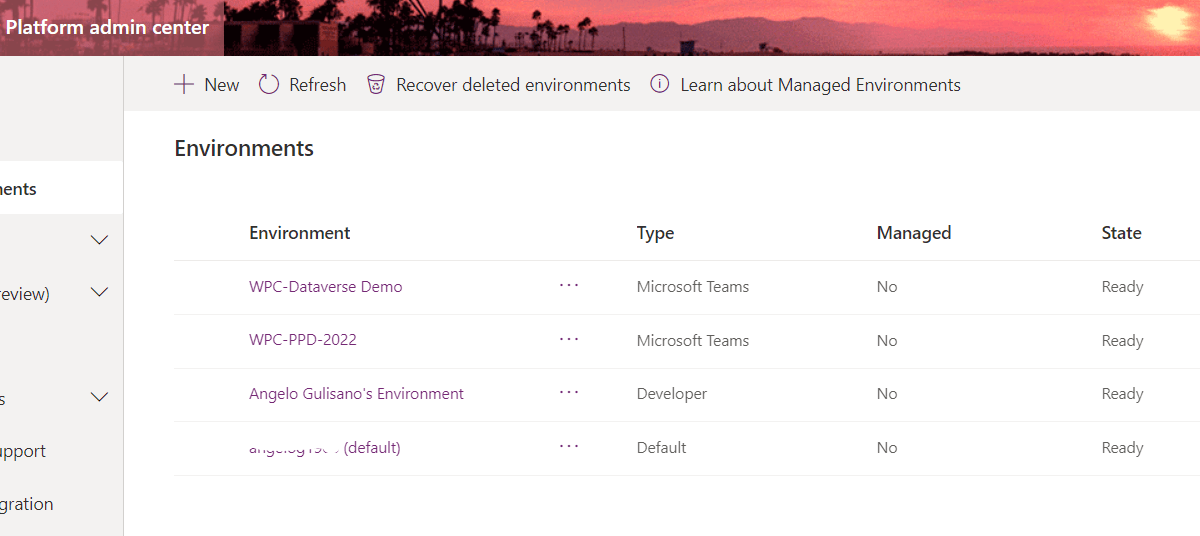
Go to Power Platform admin center: Power Platform admin center (microsoft.com) and click on “New”:
Now you can fill option and create your new environment
You can find usefull information here.
Contact me for questions! Have a nice day!
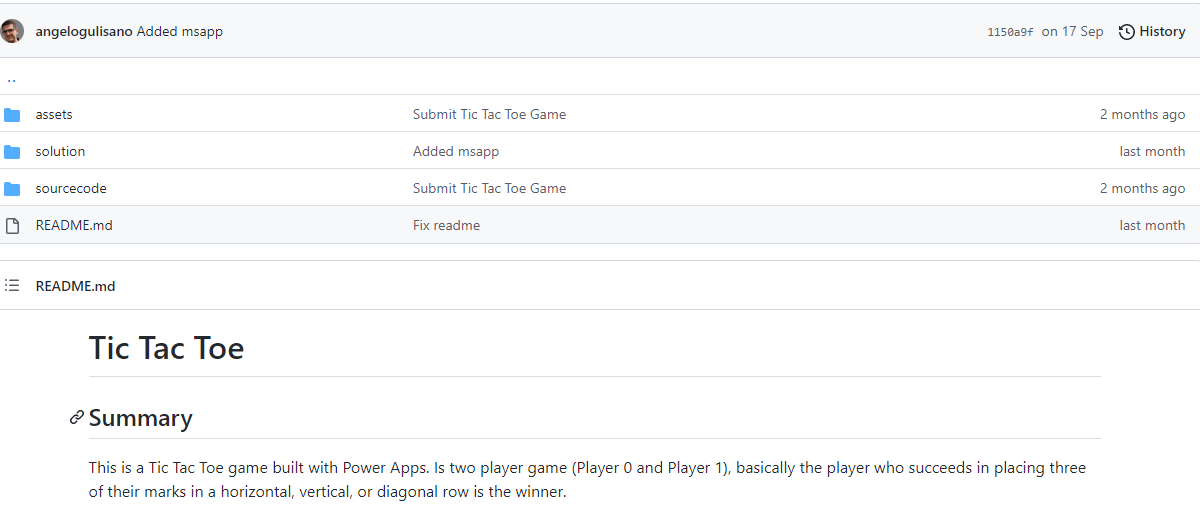
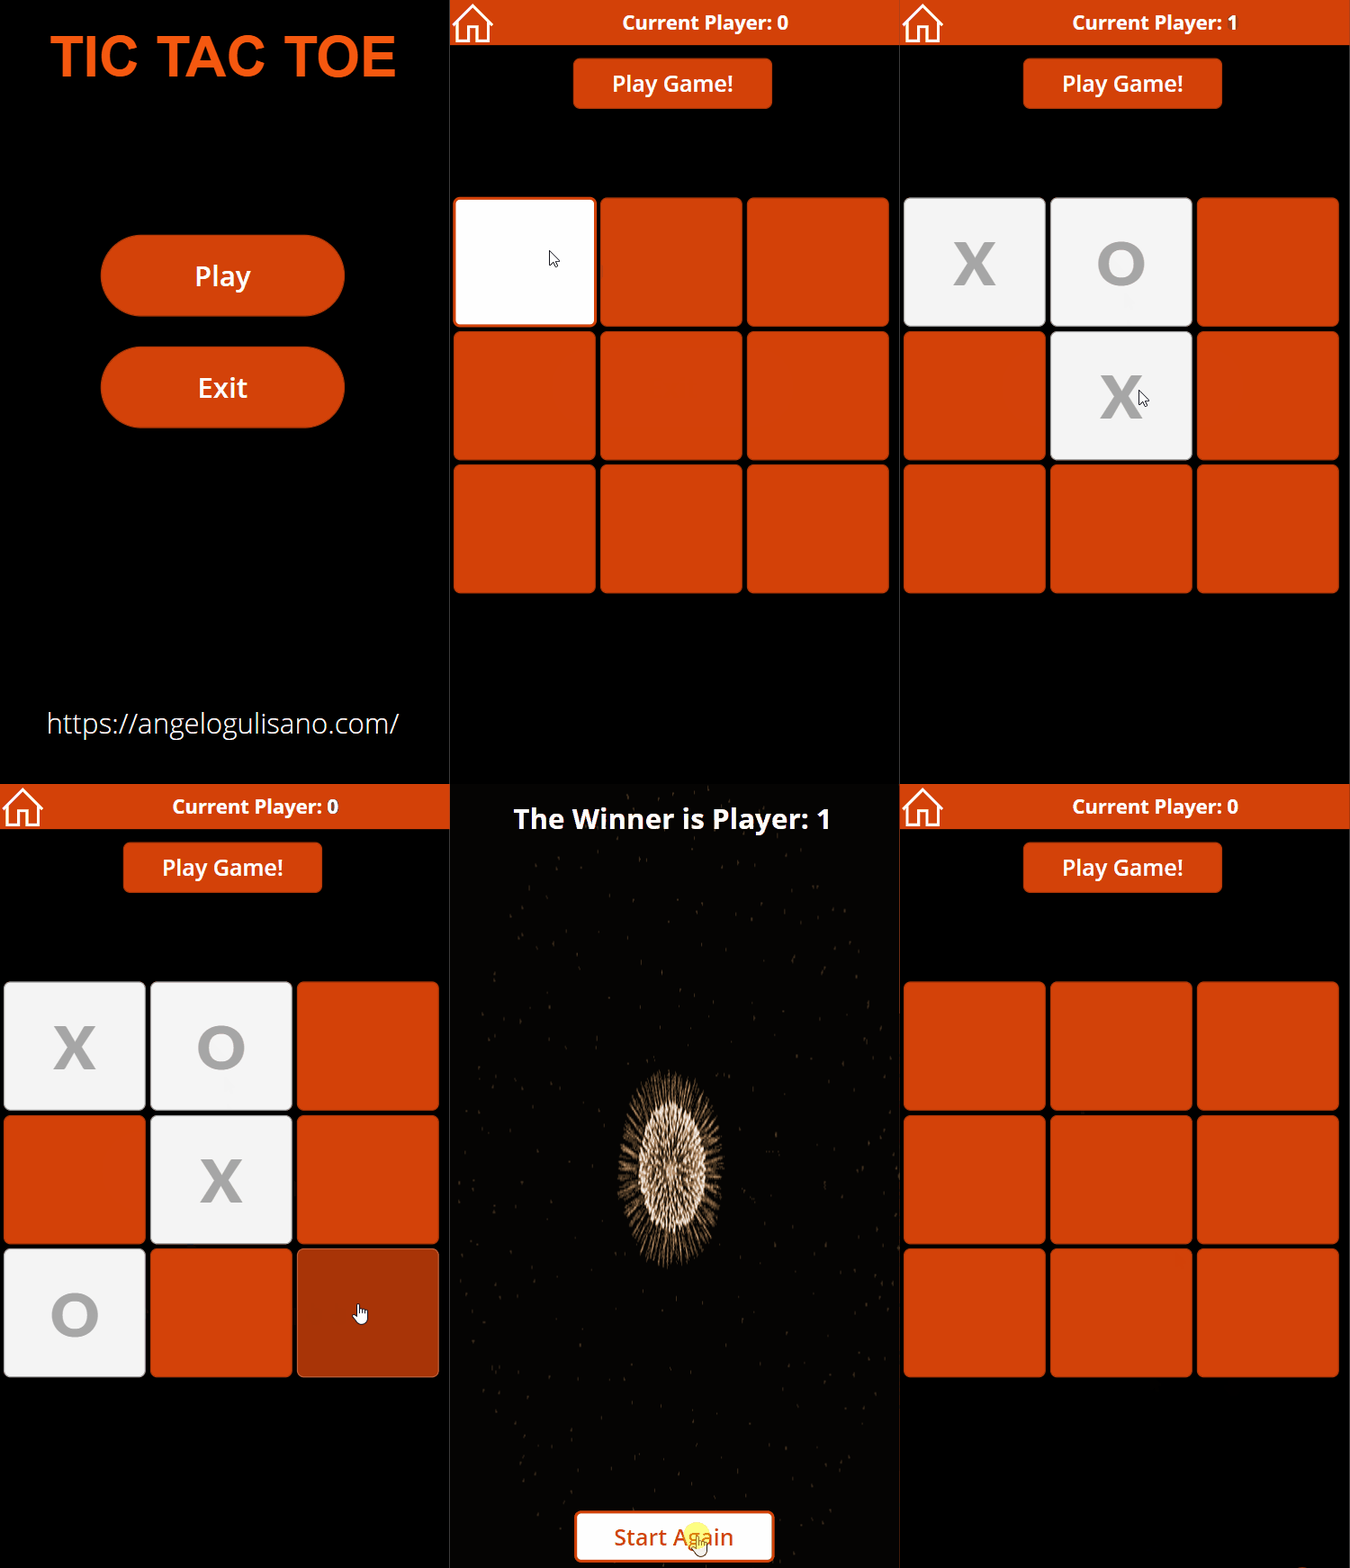
Hello, I’m very happy to annunce my first contribute to PNP community. I created and share source of my “Tic Tac Toe game” app , created with Power Apps.
You can get it from here:
https://github.com/pnp/powerapps-samples/tree/main/samples/TicTacToe
Contact me for questions! Have a nice day!
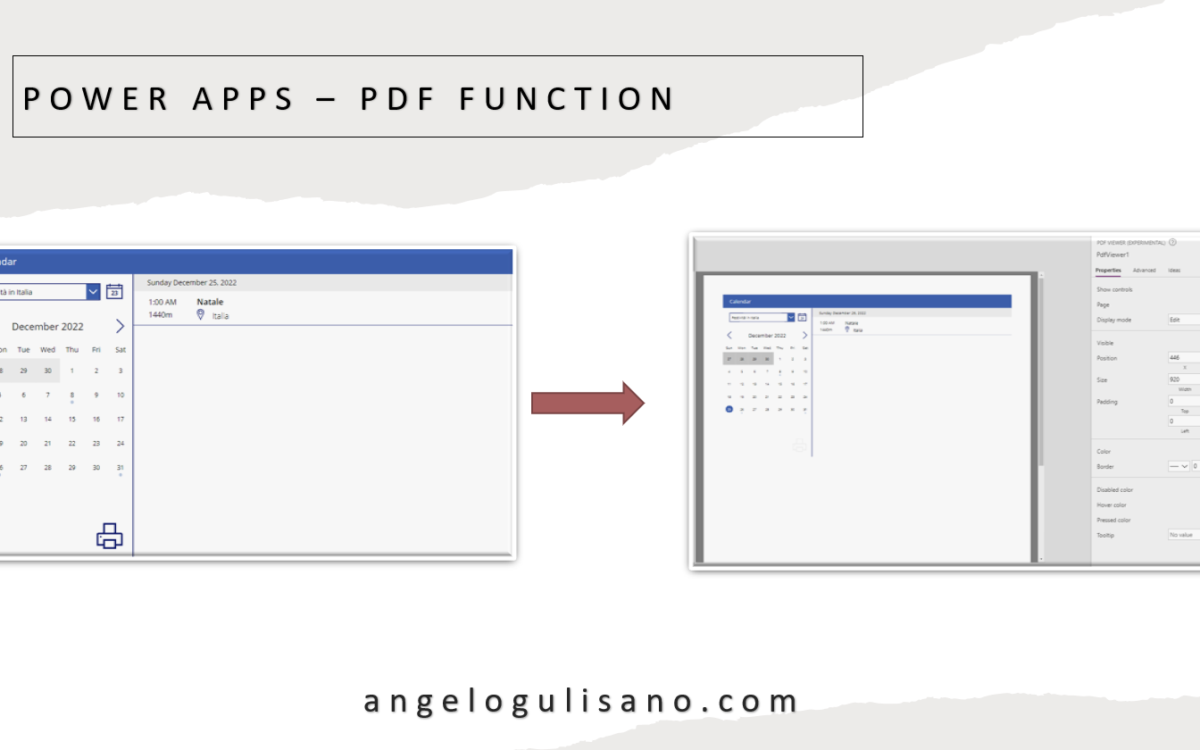
Hello, really nice fuction under our lens today. “PDF Function”. What is this? Is an Experimental function to print Power Apps Screen as PDF.
Let’s start!
First of all, you must enable this feature:
Basically , you should call “PDF” Function and pass it information about screen to “Print” as PDF.
PDF (Screen or control name [,{Size, DPI, Margin, Orientation, ExpandContainers}])
The mandatory parameter is Screen (or control name), but you can specify Size, DPI, Margin etc.. Check documentation here.
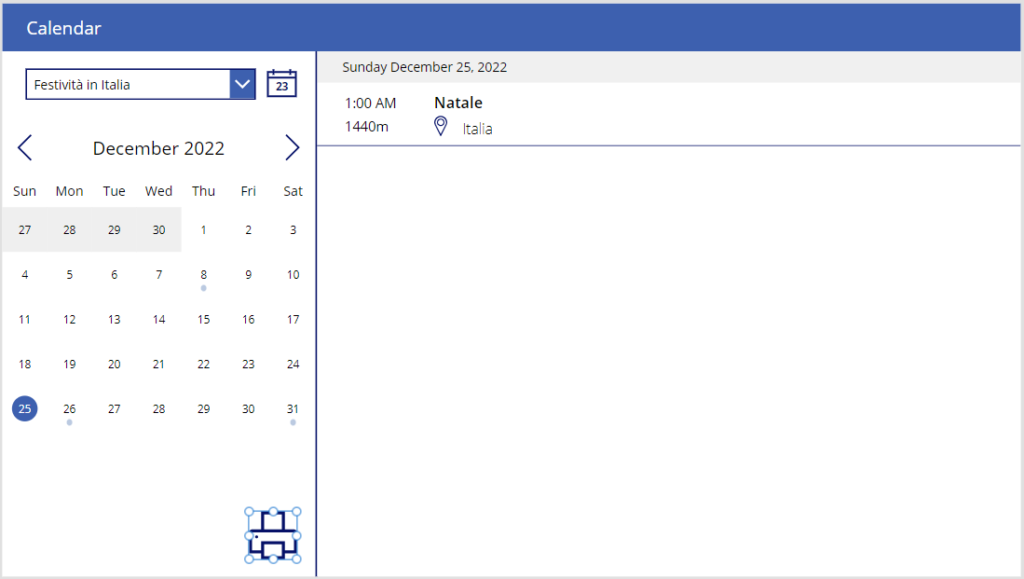
Create a form, with “print button”:
Set(myPDF,JSON(PDF(Screen3))
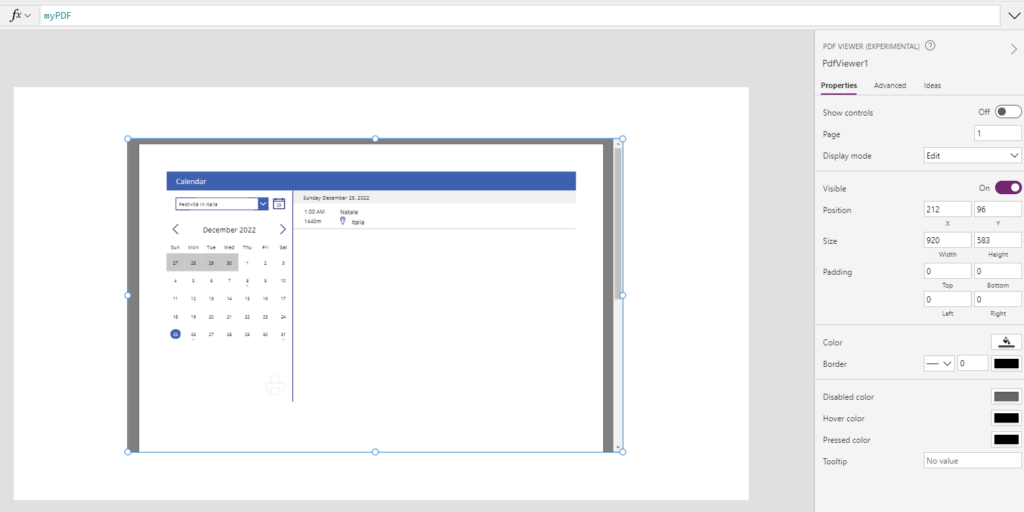
Now, use PDFViewer control to see result:
Contact me for questions! Have a nice day!
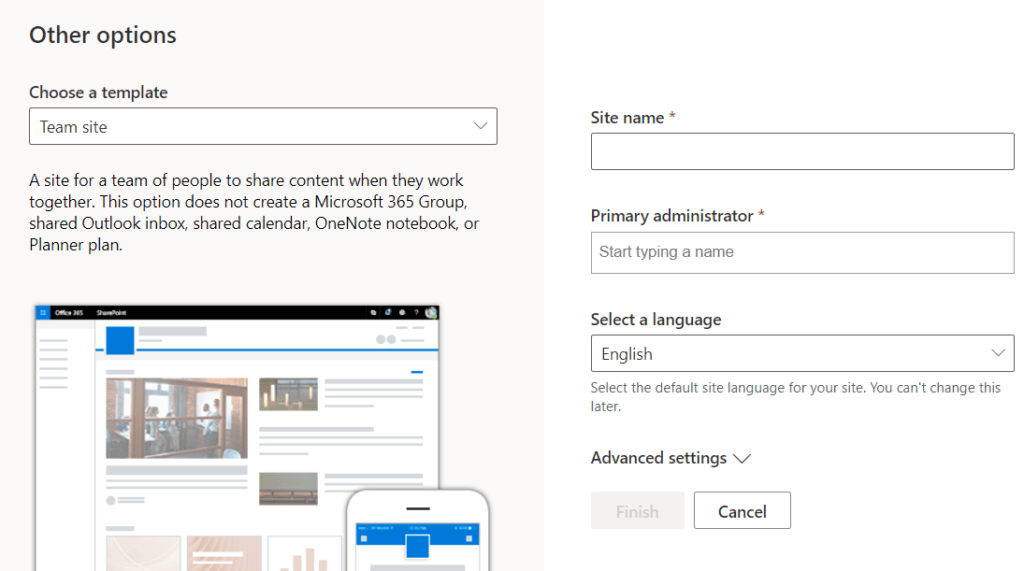
Hello, here really simple post to explain how to create a SharePoint site without Microsoft 365 group associated.
Follow there instructions:
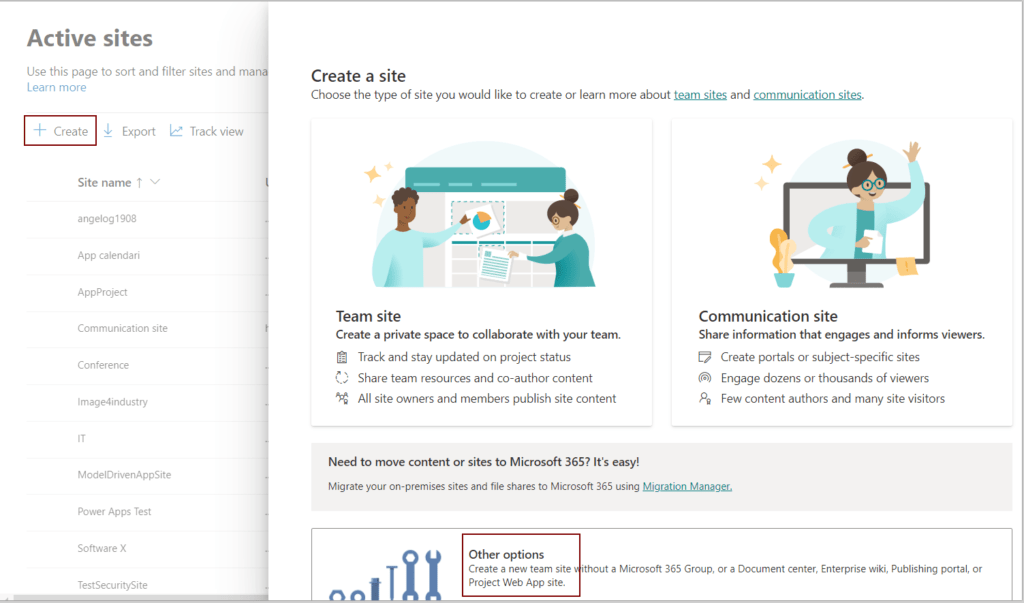
Clicck on App Launcher and then on “Admin”. Then click on “Expand all” , SharePoint and “Active sites”
Then we can create site:
Click on Create and “Other options”:
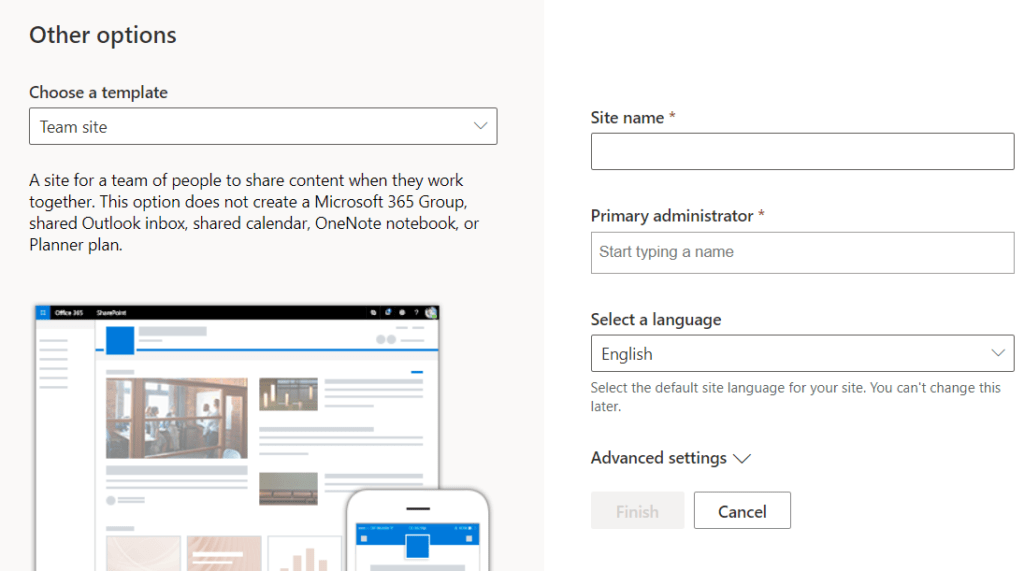
Now we can create our site:
Why we should create site with no M365 group? If we don’t need Outlook, planner or Teams associated but just need a SharePoint Team Site. Just to remind…to do that, we should be are SharePoint Administrator.
Contact me for questions! Have a nice day!
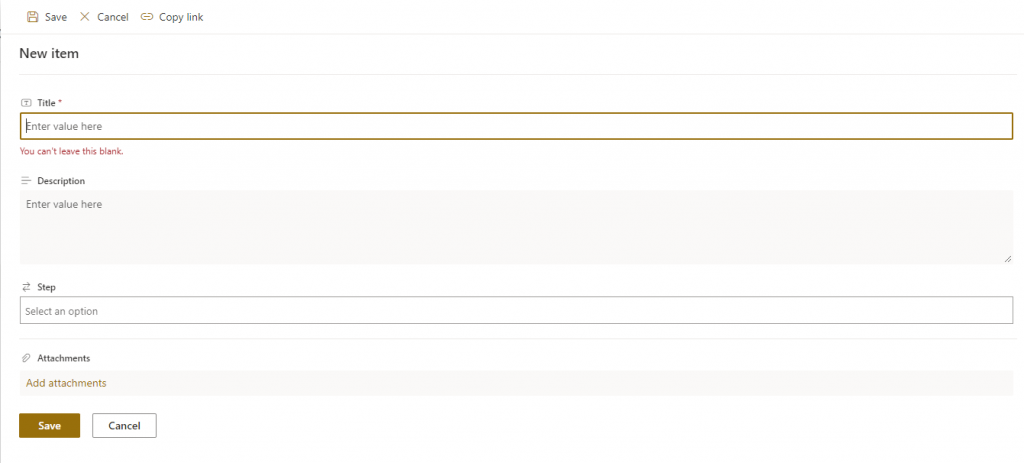
Hello, Today we spoke (write 🙂 )about SharePoint list form customization. Basically, we have two way to customize existing form:
We try to Explain how to customize form formatting with Json.
Go to your list, and click on New, click on the top right Edit form icon, e click on “Configure layout”.
Basically We can write some JSON to format these sections:
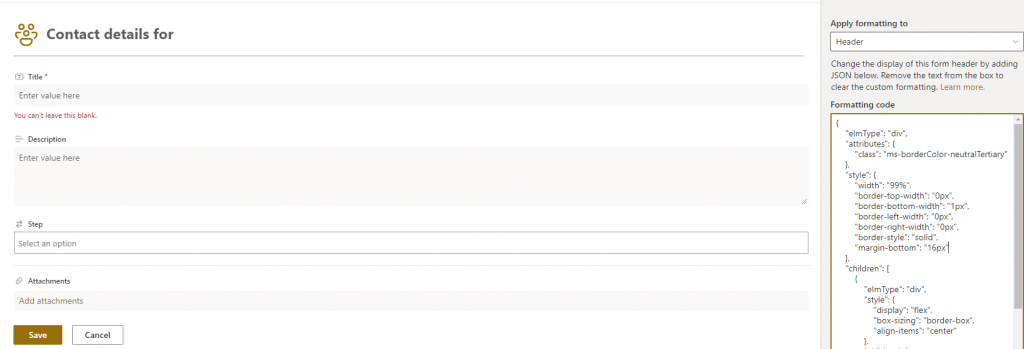
Choose “Header”. How can we customize it?
We can start from official MS Docs , copy header JSON code and try it:
{
"elmType": "div",
"attributes": {
"class": "ms-borderColor-neutralTertiary"
},
"style": {
"width": "99%",
"border-top-width": "0px",
"border-bottom-width": "1px",
"border-left-width": "0px",
"border-right-width": "0px",
"border-style": "solid",
"margin-bottom": "16px"
},
"children": [
{
"elmType": "div",
"style": {
"display": "flex",
"box-sizing": "border-box",
"align-items": "center"
},
"children": [
{
"elmType": "div",
"attributes": {
"iconName": "Group",
"class": "ms-fontSize-42 ms-fontWeight-regular ms-fontColor-themePrimary",
"title": "Details"
},
"style": {
"flex": "none",
"padding": "0px",
"padding-left": "0px",
"height": "36px"
}
}
]
},
{
"elmType": "div",
"attributes": {
"class": "ms-fontColor-neutralSecondary ms-fontWeight-bold ms-fontSize-24"
},
"style": {
"box-sizing": "border-box",
"width": "100%",
"text-align": "left",
"padding": "21px 12px",
"overflow": "hidden"
},
"children": [
{
"elmType": "div",
"txtContent": "='Contact details for ' + [$Title]"
}
]
}
]
}
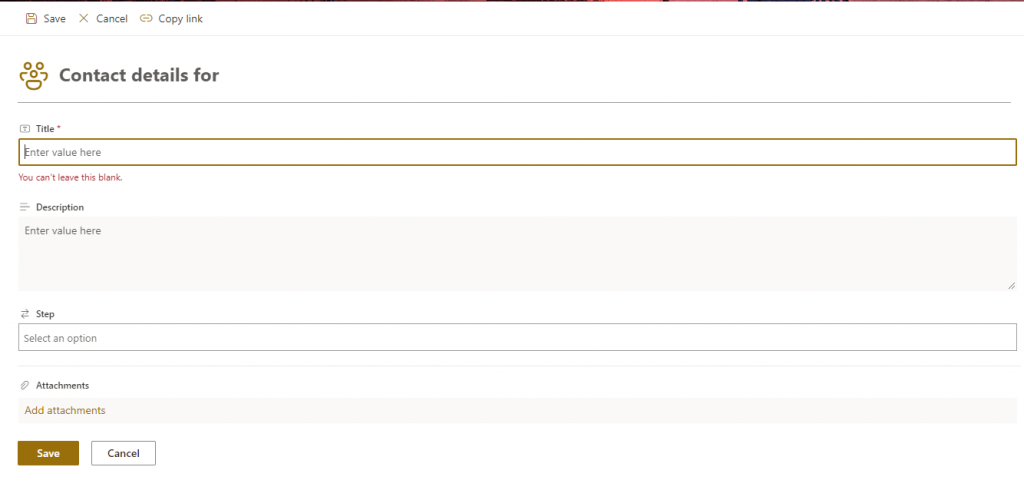
So , now we can see result.
Before:
After:
How to edit?
Basically, our JSON going to apply style to these section:
{
"elmType": "div",
"attributes": {
"class": "ms-borderColor-neutralTertiary"
},
"style": {
"width": "99%",
"border-top-width": "0px",
"border-bottom-width": "1px",
"border-left-width": "0px",
"border-right-width": "0px",
"border-style": "solid",
"margin-bottom": "16px"
},
Element:
"elmType": "div",
"attributes": {
"class": "ms-borderColor-neutralTertiary"
},
Style
},
"style": {
"width": "99%",
"border-top-width": "0px",
"border-bottom-width": "1px",
"border-left-width": "0px",
"border-right-width": "0px",
"border-style": "solid",
"margin-bottom": "16px"
},
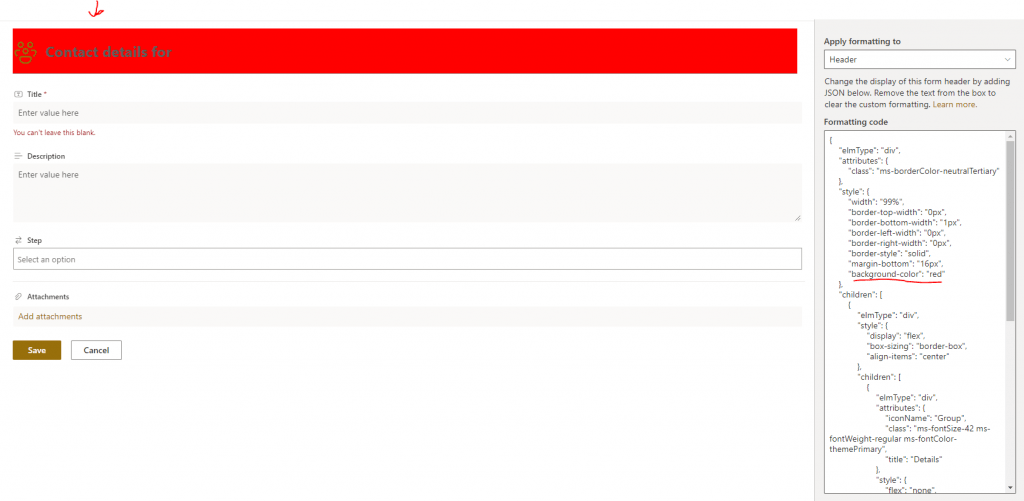
Some people asking me, “How can I find witch section I’m modifing? I’m not expert” , an Idea is : Add background color red to style to indentify section:
Not beautiful to see, but simple to identify 🙂
To customize Body, you should simply define Sections and fields, in my case:
{
"sections": [
{
"displayname": "Basic information",
"fields": [
"Title",
"Description"
]
},
{
"displayname": "Worfkflow status",
"fields": [
"Step"
]
},
{
"displayname": "Other",
"fields": [
"Attachments"
]
}
]
}
Now the last part, footer. Similar to header, we can write JSON for a part to customize
{
"elmType": "div",
"style": {
"width": "100%",
"text-align": "left",
"overflow": "hidden",
"border-top-width": "1px"
},
"children": [
{
"elmType": "div",
"style": {
"width": "100%",
"padding-top": "10px",
"height": "24px"
},
"children": [
{
"elmType": "a",
"txtContent": "='This is footer section! ' + [$Title]",
"attributes": {
"target": "_blank",
"href": "='https://aka.ms/contacts?email=' + [$Title]",
"class": "ms-fontColor-themePrimary ms-borderColor-themePrimary ms-fontWeight-semibold ms-fontSize-m ms-fontColor-neutralSecondary–hover ms-bgColor-themeLight–hover"
}
}
]
}
]
}
As you can see , you can also use field of the record , in our example title: [$Title].
Syntax
Advanced formatting concepts
https://docs.microsoft.com/en-us/sharepoint/dev/declarative-customization/formatting-advanced
Where you can find icons name
https://developer.microsoft.com/en-us/fluentui#/styles/web/icons
Column formatting
This is one way. Another option is modify form with Power Apps, let me know if you want an article to understand how.
Contact me for questions! Have a nice day!
Hello, Today I want to explain how to improve performance of yours Canvas App. Any comments, integrations or suggestions are welcome 🙂
Does your data chanche during session of your app? If you reply “No”, you should store your data into local variable and get record from it, instead always ask to database.
ClearCollect(CollProject,Projects_1)
PS: Keep mind delegation problem.
ClearCollect Function more informations here.
You should also cache for user data. Example, if you you email of connected user:
User().Email
Consider:
Set(UserEmail,User().Email)
If you create and load collection on “OnStart” event (or on visibile), consider use of Concurrent Function. People tipically write this:
ClearCollect(CollProject,Projects_1);
ClearCollect(CollManager,Manager)
In this case, formula loads each tables one at a time. If you want optimize, you should write this:
Concurrent(
ClearCollect(CollProject,Projects_1),
ClearCollect(CollManager,Manager))
Now your app fetches the tables in parallel.
You shouden’t retrieve all data and then filter locally. Delegate data processing to data source (If is possible). See connectors documentation to learn about delegable formula.
For SharePoint check this link.
For SQL Server:
Simple, but people sometimes forgot to set indexes on column. For SQL Server and SharePoint, check wich columns you’re using to filter, and set Index on these columns.
How to set index on SharePoint columns.
How to set index on SQL Server and Azure SQL.
When you want to create new record in your table you , tipically you use Default() function. When you use it, there is a call to your datasource …
Defaults(Projects_1)
And Idea is store result of this function on variable, and use it instead call Default() every time:
Set(
newProject,
Defaults(Projects_1)
);
If you want to understand what happens “behind the scenes”, you should start a debugging session. From Power Apps portal, select your app and click Monitor:
Now you can understand durations and respons size of your function to prevent performance issue.
Check this official link for other tips .I hope this post was usefull for you.Leave me comment if you has appreciate it.
Contact me for questions! Have a nice day!
Hello, Today not very “tech” article, But maybe usefull 🙂 Yesterday I changed password of my account…and after few hours, I noticed Outlook didn’t receiving any emails… (I updated password anywhere but…). But Previusly it still working…
If your problem , is actually password…A simple way is:
If problem persist, you can try clean cache.
In my personal case the problem was password Update, but the real problem was that I updated correclty password after change, and Outlook worked correctly. It stopped after2 hours…
Contact me for questions! Have a nice day!
Hello, This is one of a series of post where I want to help you to improve your experience with SharePoint Online. This article,I’ll explane how you can ask to SPO to inform you whene anyone makes change to your documents.
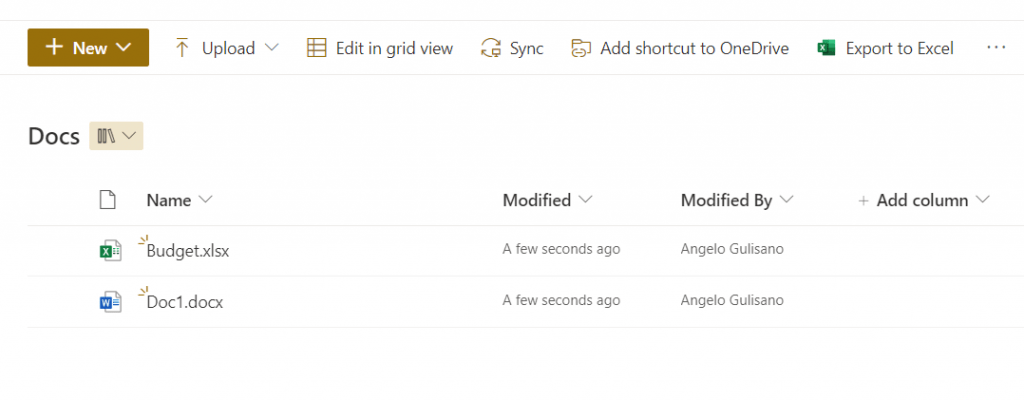
We have SharePoint site, and a document library called “Docs” where we collaborate with our collegues (PS: Do you know Co authoring? See this link)
Basically We don’t want go every day on our document library to check if our collegues has make change on documents…So how can SharePoint help us?
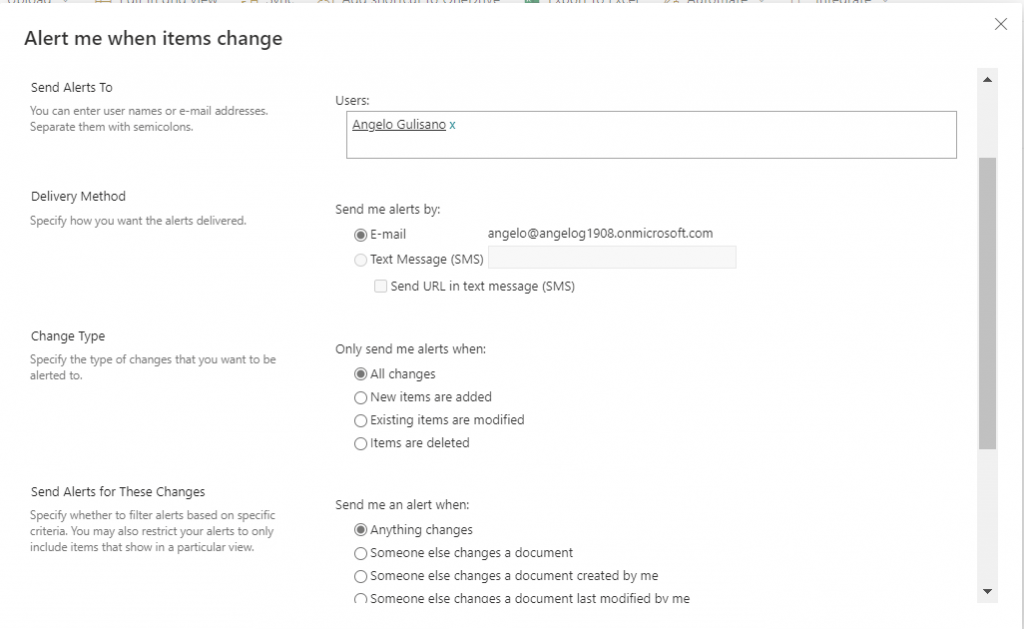
Simple ,As I usually try to explain…:-) One way is configure an Alert on Document Library (Or Lists). Go to your DL, and looking for “Alert Me” on Ribbon:
Next Page page ask us a series of parameters to configure Alert. In Order:
This is really simple way. Another option is create a Power Automate flow with appropriate trigger. I hope this is usefull for you.
Contact me for questions! Have a nice day!
Hello, new Post Today. We’re going to understand how to use Patch function with SharePoint list. For this Example I used a “Task List” who contains text , choose , lookup and numeric columns.
Let’s see “Patch” Function.
Syntax
Patch( DataSource, BaseRecord , ChangeRecord1 ,ChangeRecord2,…)
Parameters:
Pills:
Here our task list:
Create new record:
Patch(
Tasks,
Defaults(Tasks),
{
Title: "New Task",
Description: "Our task descriptions",
Status: {Value: "New"},
Project: {
'@odata.type': "#Microsoft.Azure.Connectors.SharePoint.SPListExpandedReference",
Id: 1,
Value: "Project 1"
},
ProjectID:1000
}
)
Key points:
'@odata.type': "#Microsoft.Azure.Connectors.SharePoint.SPListExpandedReference",
Id: 1,
Value: "Project 1"
}
That’s all! If we want to update an existing record? You must get it and pass to patch function instead Defaults(). In this case, I used Lookup function to retrieve record to update:
LookUp(Tasks,ID=4)
So, complete code is:
Patch(
Tasks,
LookUp(Tasks,ID=4),
{
Title: "Old Task",
Description: "Our task descriptions",
Status: {Value: "New"},
Project: {
'@odata.type': "#Microsoft.Azure.Connectors.SharePoint.SPListExpandedReference",
Id: 1,
Value: "Project 1"
},
ProjectID:2000
}
)
This is the official link of patch function.
I hope this post should help you.
Hello guys, I recently update my site with new look and feel. I hope you like it. It’s more “leaner”, so we can focus on technical informations 🙂
Have a nice day!
If you’ve ever developed a custom Web Part for SharePoint, and “Failed to load components” message occures for guest users, here you can find possibile solution to fix it.
I develop a SPO Webpart…it run correctly but when my customer share site with guest user, it give us and error:
Something like this:
[SPLoaderError.loadComponentError]: ***Failed to load component "12345-c123-a1be27-223a-xxxx0" (MyWebpart Name).
A possible problem is guest users can’t acess to ClientSideAssets library on AppCatalog site, so one way is:
If don’t work, you can try also to restore inherits permission and put guest users inside readers group of app catalog site. In this case, guest can Access to all site resources as reader, but if it work you can continue investigate on problem.
Have a nice day
Today, let’s understand how to filter SharePoint Items, by lookup column, from Power Automate flow.
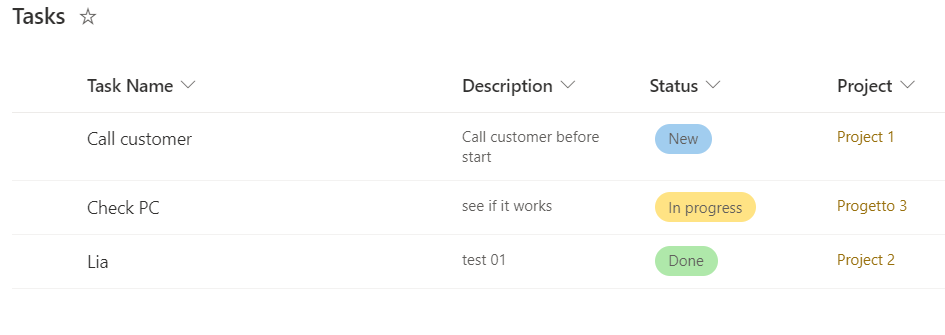
In this Example, I created two lists: Projects and Tasks. Every tasks has lookup to project.
And Tasks:
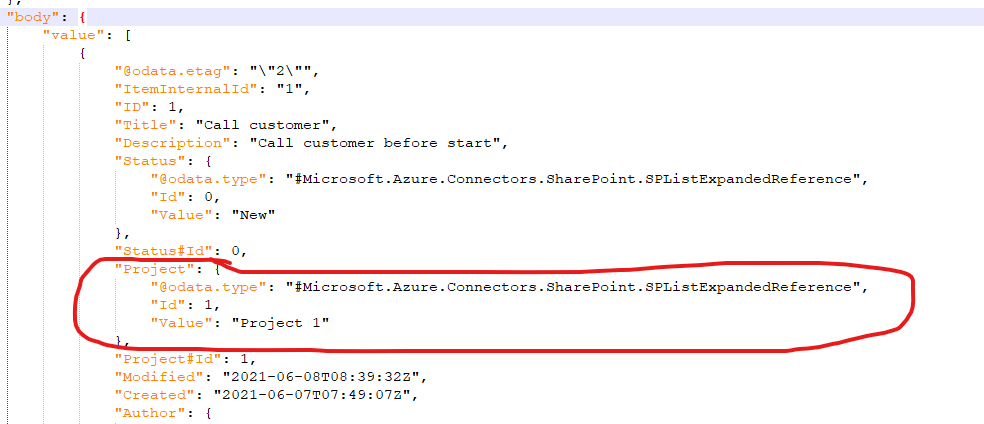
As we can see , we have “Project” column. This is our lookup column.
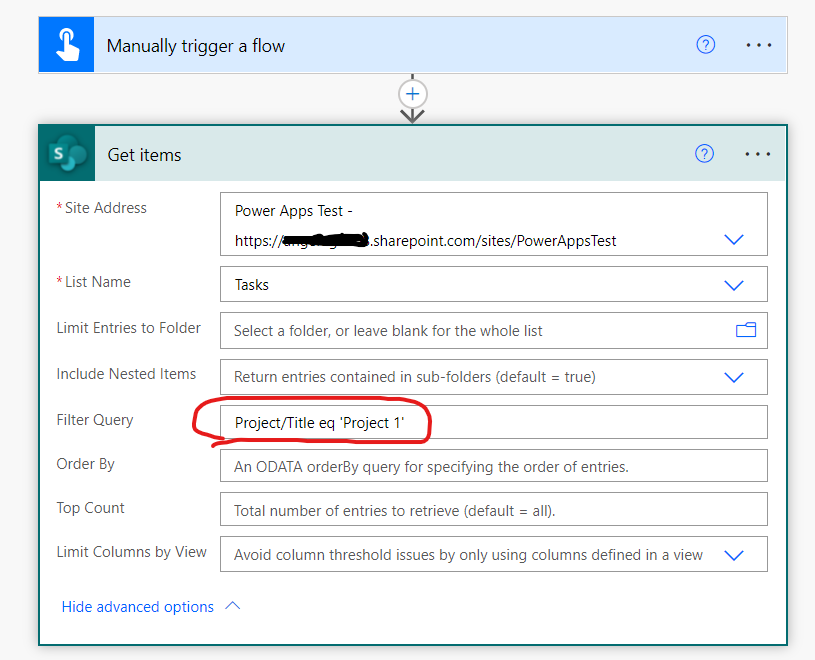
To to this example I create a Simple flow wiht manually trigger (keep mind…this is just an example…). My flow has one Actions (“Get Items”). Let’s see how to filter task by Project. One way is filter by title column of lookup (In this case I used Title). Another options is filter by Lookup ID.
Code to copy, filter by Value
InternalFieldName/Title eq ‘Lookup Value’
Or, filter by
internalFieldName/Id eq ‘Lookup Id’
Let’s see our flow:
Result: It get me one task, associated with “Project 1” .
Have a nice day!
If you want to understand , in general, how to filter Items in Power Automate, click this link.
Let’s learn how can we passing parameter to our Canvas Apps.
In this Example, I built a simple app to write a ticket in SharePoint List. In this case , I need to pass (from “external”) a parameter to our App, to set Ticket Type. My choose are:
To achievement this, we should use “Query String” and Param Function. Query String is part of url , used to passing data to application.
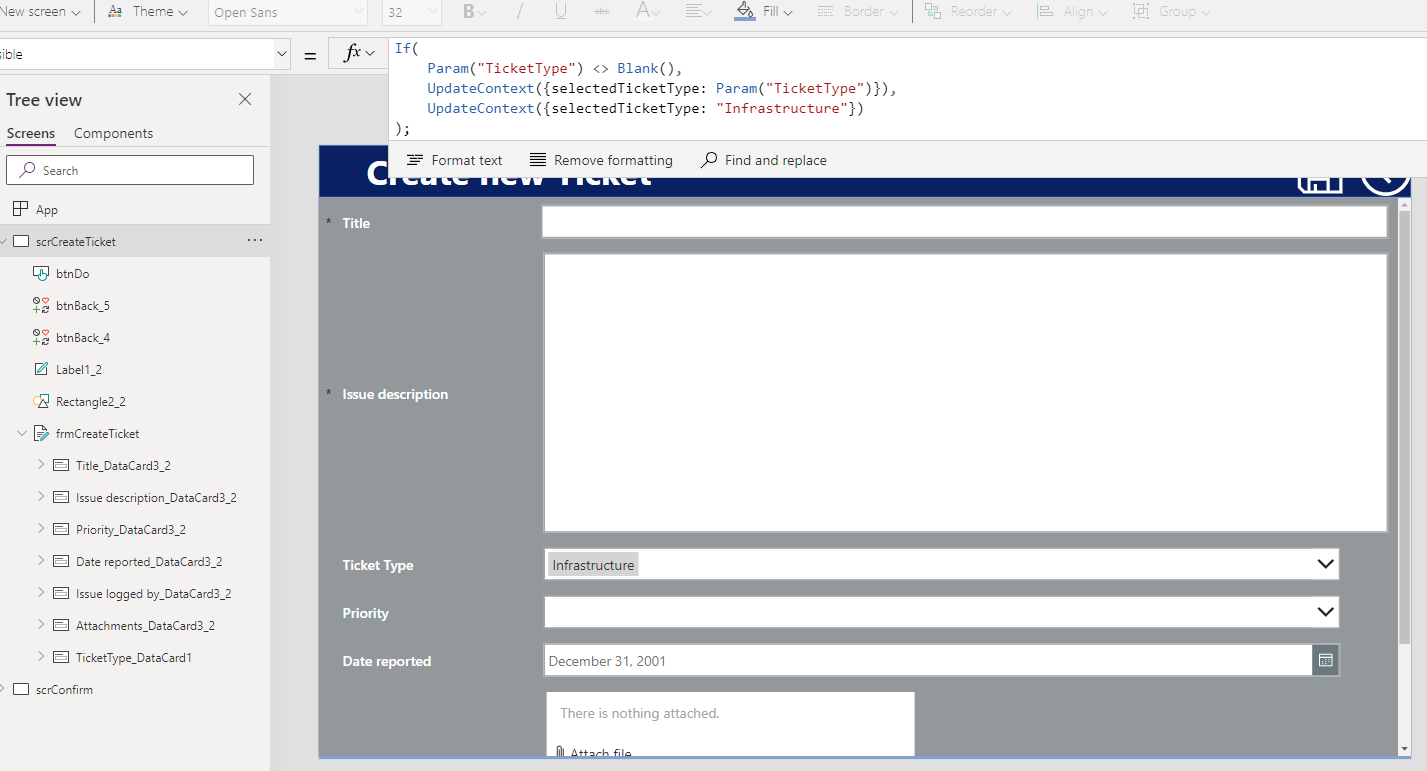
To get query string, I used param function in OnVisible event of my Screen to get date and store it on local variable. I can’t use “On Start” event of app because UpdateContext is only available while you are currently on a screen. When the OnStart code is executed no screen has loaded yet.
Code to copy:
If(
Param(“TicketType”) <> Blank(),
UpdateContext({selectedTicketType: Param(“TicketType”)}),
UpdateContext({selectedTicketType: “Infrastructure”})
);
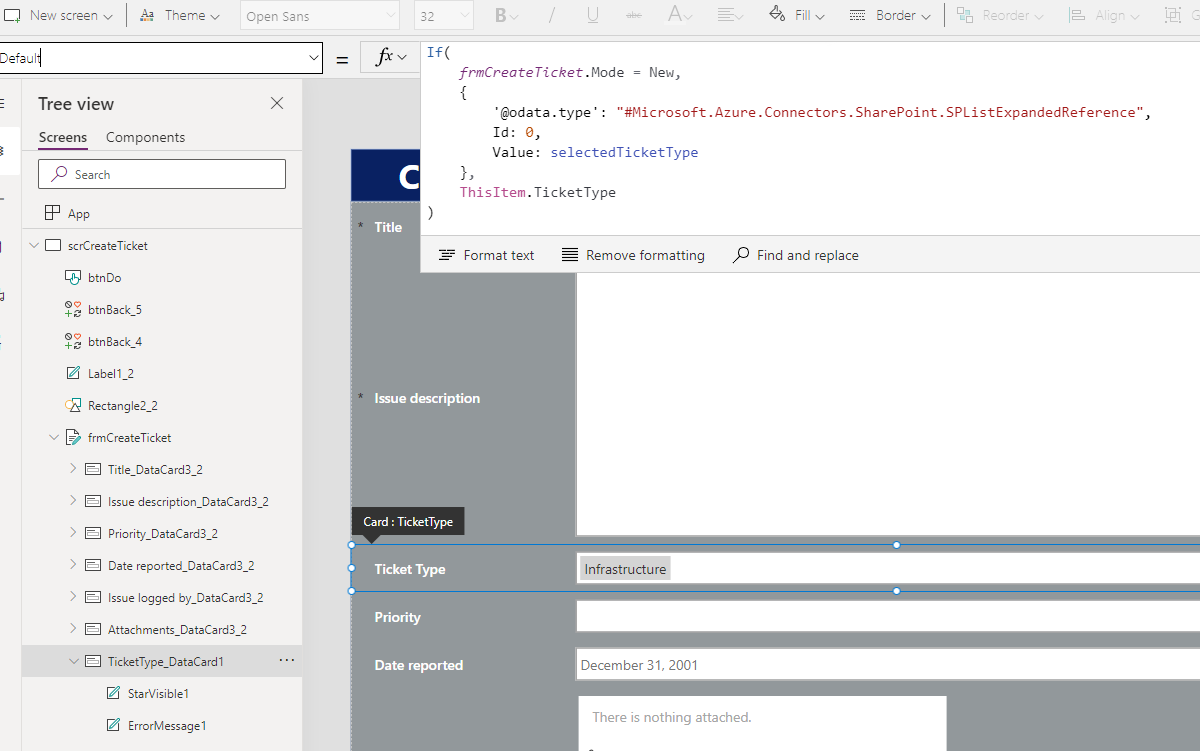
In my Example, I used a Form with SharePooint list as Datasource . My field “Ticket Type” is Choose field. To set value as default, I set Default property of datacard, only if the form is in “insert mode”. Why? because if we are in view or in edit, we need to see data of item, not our parameter. So:
Code to copy:
If(
frmCreateTicket.Mode = FormMode.New,
{
‘@odata.type’: “#Microsoft.Azure.Connectors.SharePoint.SPListExpandedReference”,
Id: 0,
Value: selectedTicketType
},
ThisItem.TicketType
)
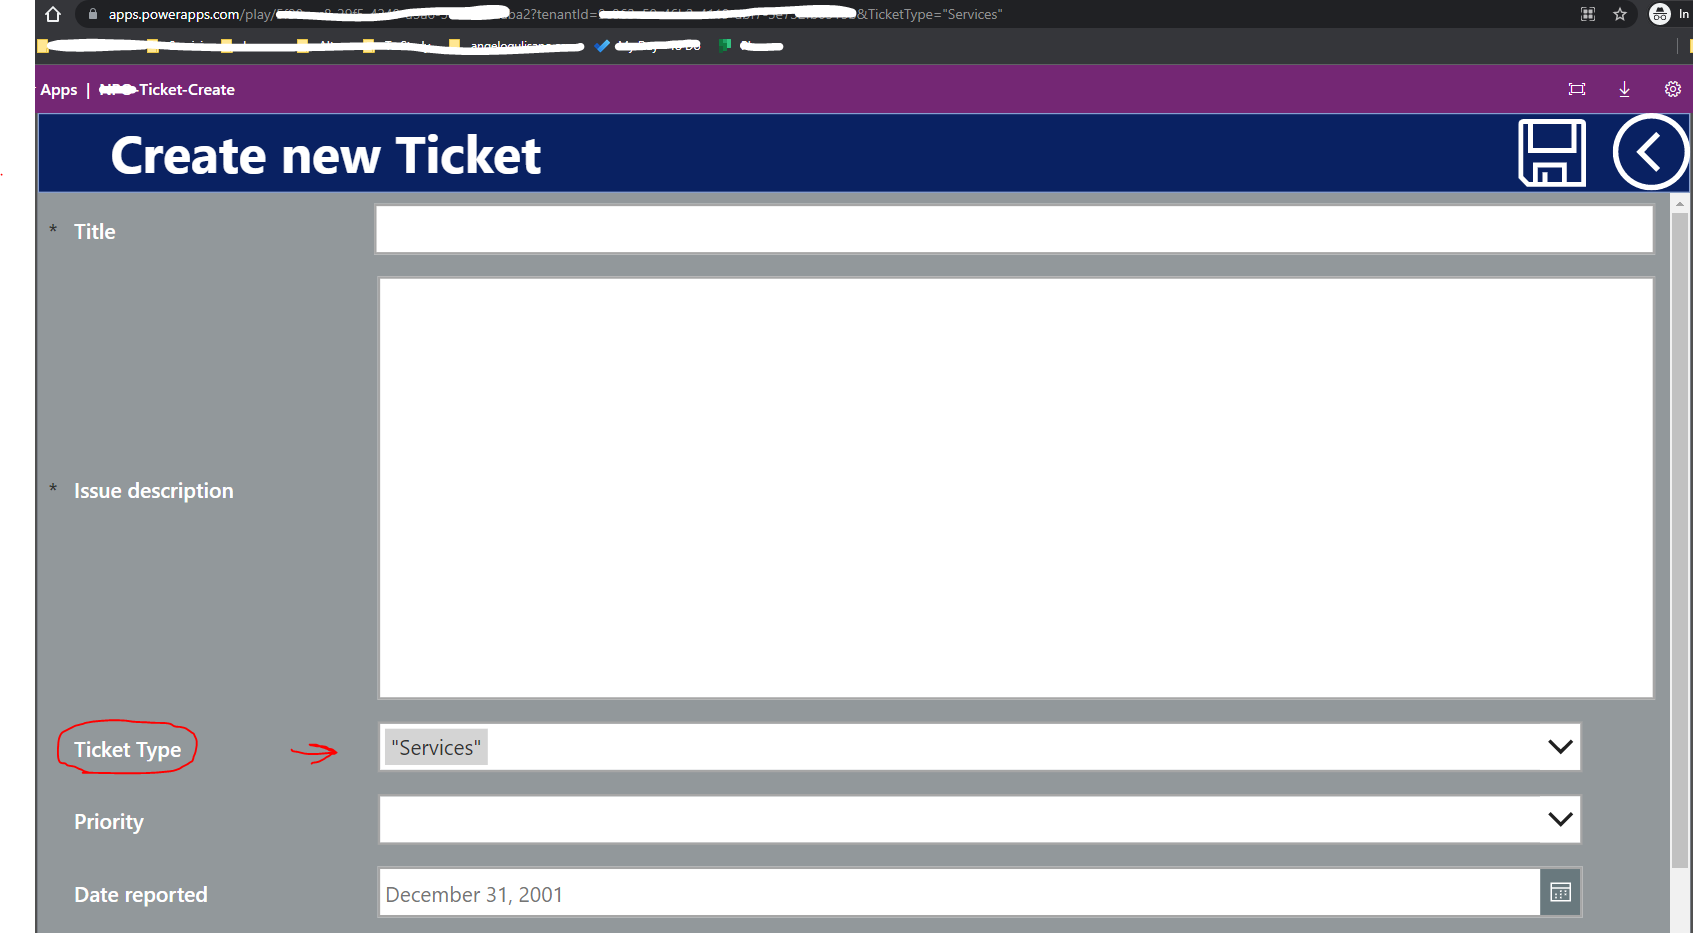
You should call your app with query string, in my case:
https://apps.powerapps.com/play/xxx-xxx-xxx-xxx?tenantId=xxxx-xxx-xxx-xxxx&TicketType=Services
(xxxx are guid of your app and tenant id, you see it when you run an app in browser)
Have a nice day!
New usefull feature! One of Power Apps limitation was we unable to build app more than people a time. Now, we can work togheter!
So how can we do that? Really simple, as I usually write into my blog… “One” minute 🙂 I suppose you’re know what is source control and you know github or Azure DevOps. In this case, I’ll you Git repo on my Azure DevOps account. If you don’t know where terms, please read here.
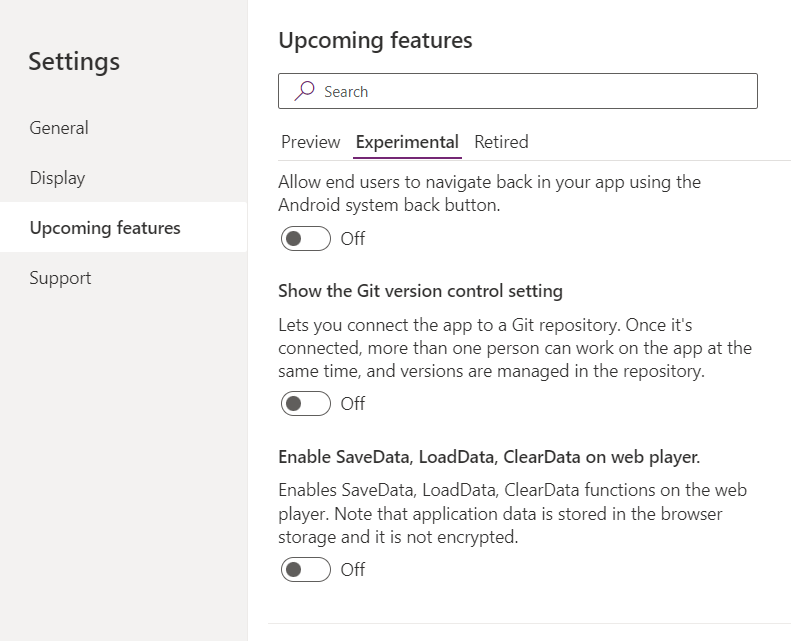
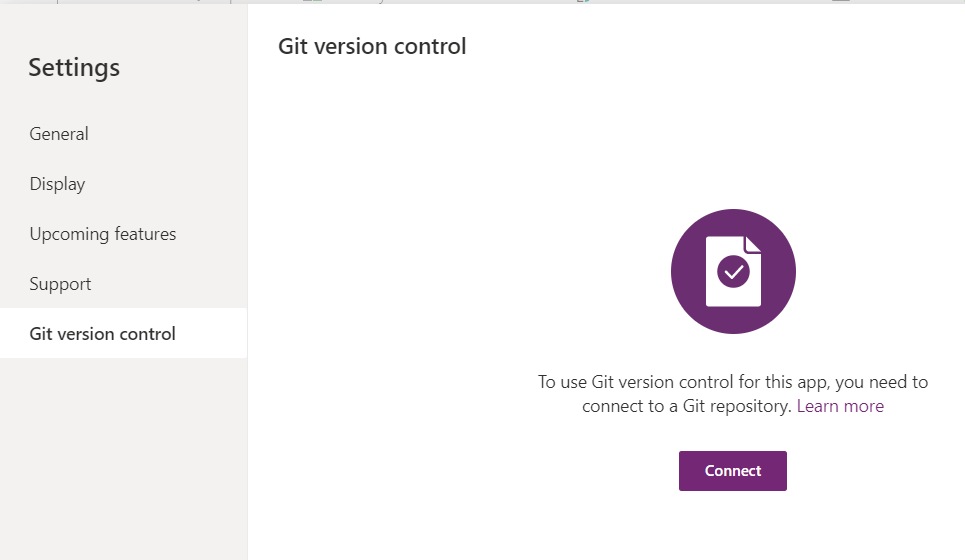
Create news project on Azure DevOps or git repo. Create or open you existing App , and go to settings, Upcoming Features and go to Experimental tab:
Then, enable “Show the Git version control setting”. Then you can see a new Section “Git version control” , click on Connect.
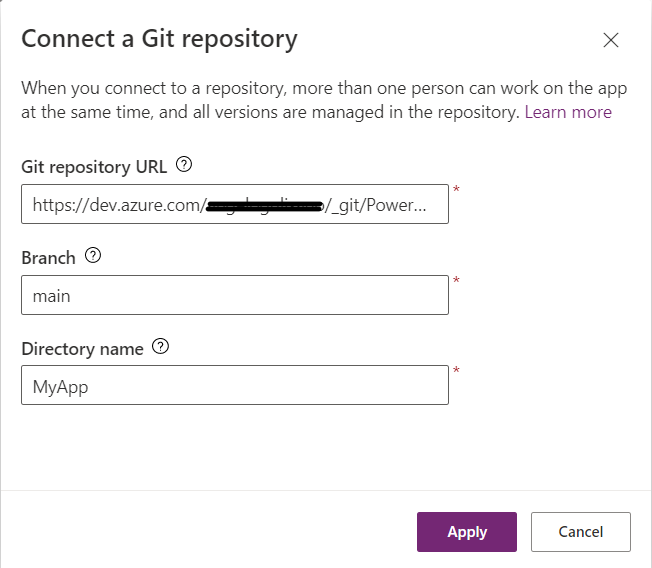
And configure settings:
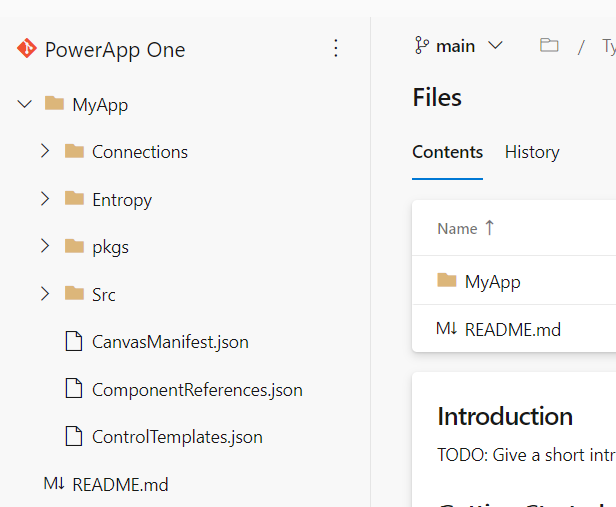
Then, it ask you your credentials. Keep mind, if you’re using DevOps, in password sections, you don’t put password, but you must put your personal access token. Now it create folder for you on your git repo and push your source:
Now you can build app with your collegue! It’s experimental but cool!
Have a nice day
Good news!
Microsoft introduce new way to pay for Power Apps and related services: Pay as you go. From 2/11/21 , you can use your Azure Subcription to cover Power Apps and Dataverse cost, based on usage. In my opionion is very good feature, to allow you to try services with low risk.
See this link:
Have a nice day
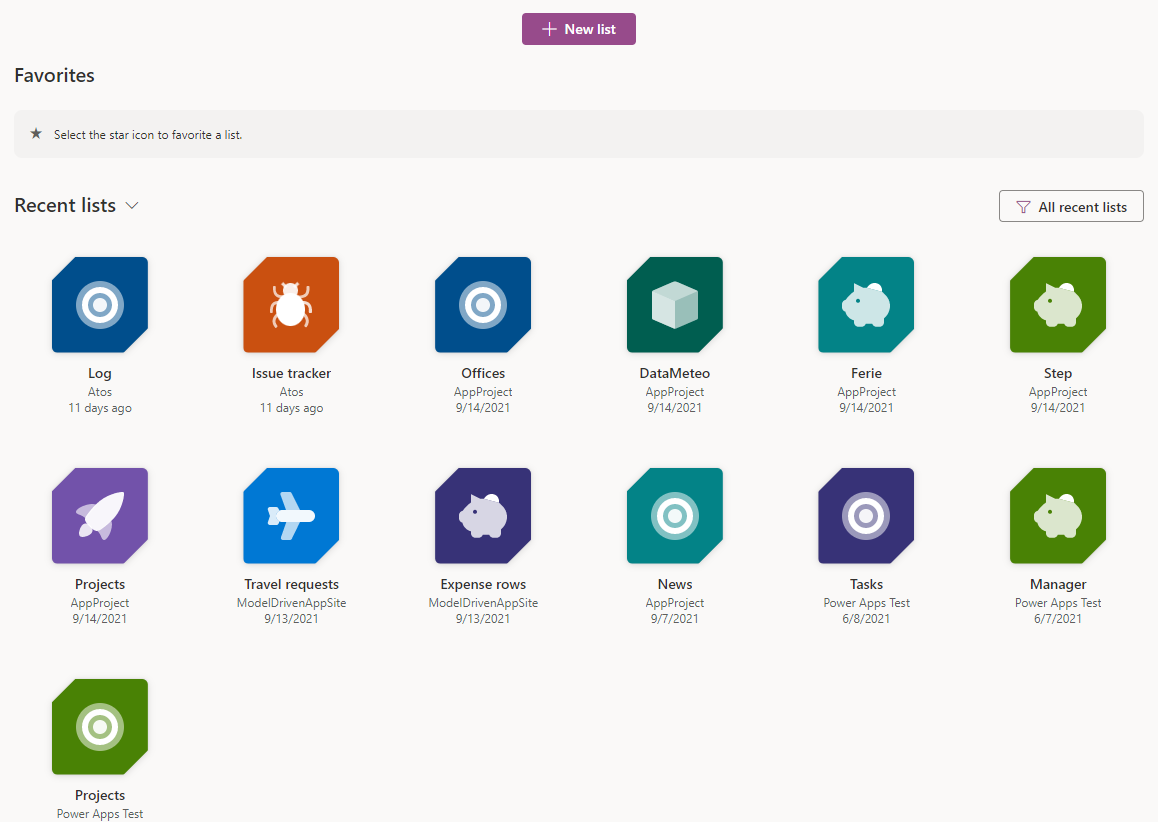
Let’s talk about Microsoft List. You can see “List” and others Mmicrosoft 365 App’s. You can use this awesome tool to create list to track informations (Assets, invetory, customers, issues ecc) and collaborate with your team members. If you know SharePoint List’s, this is appear very familiar.
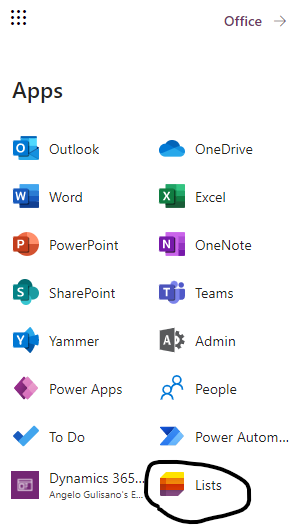
Click on the top-left corner:
App “Lists” and others Mmicrosoft 365 Apps…
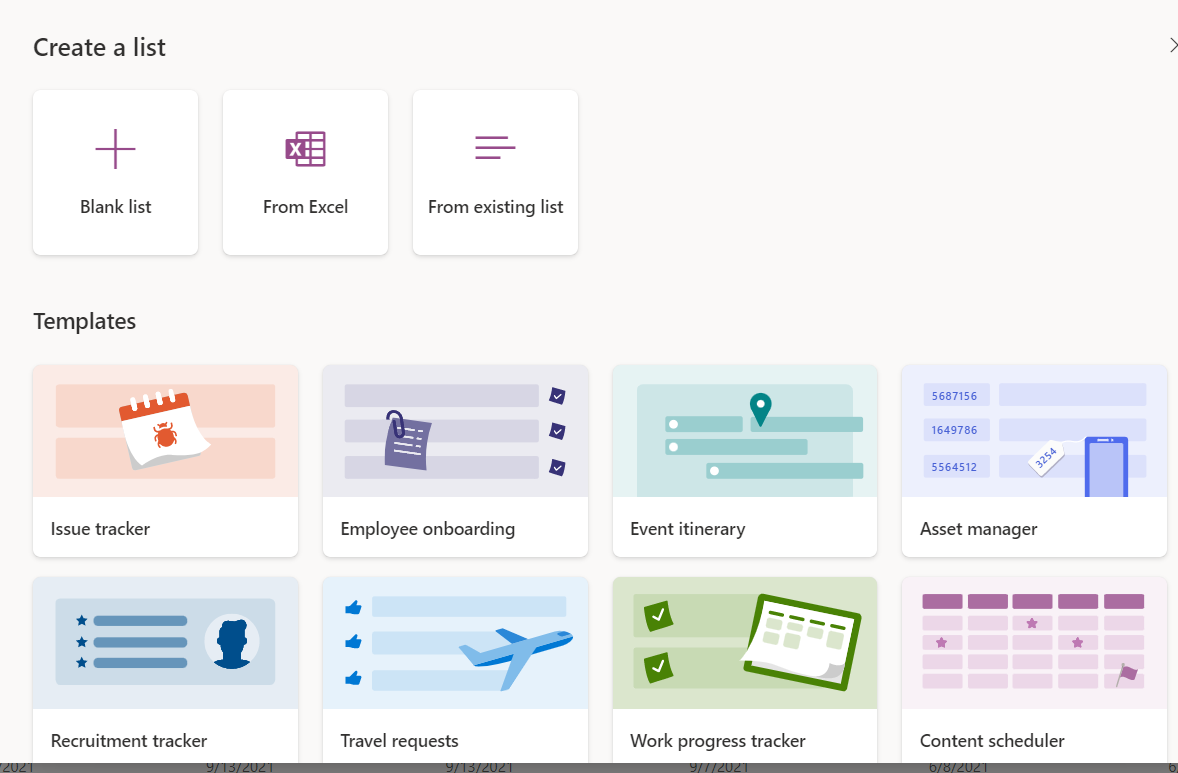
Now you can View and Open your recent Lists or create New List. Click on button “+ New List”.
Now you have 4 choises:
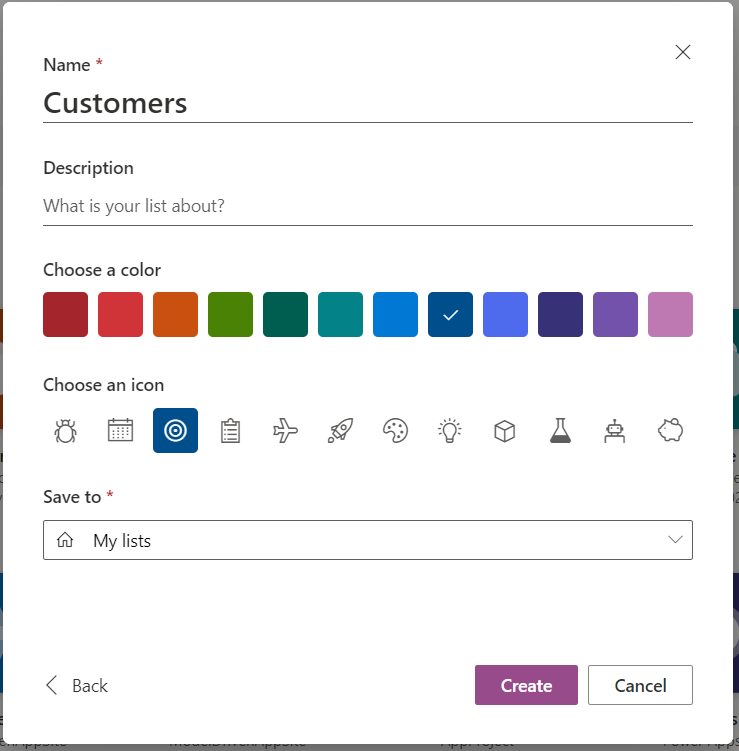
Click on “Blank list“, add list Name, description, color, icon, choose where do you want to save your list (In “My List” or one of your SharePoint sites) and click create.
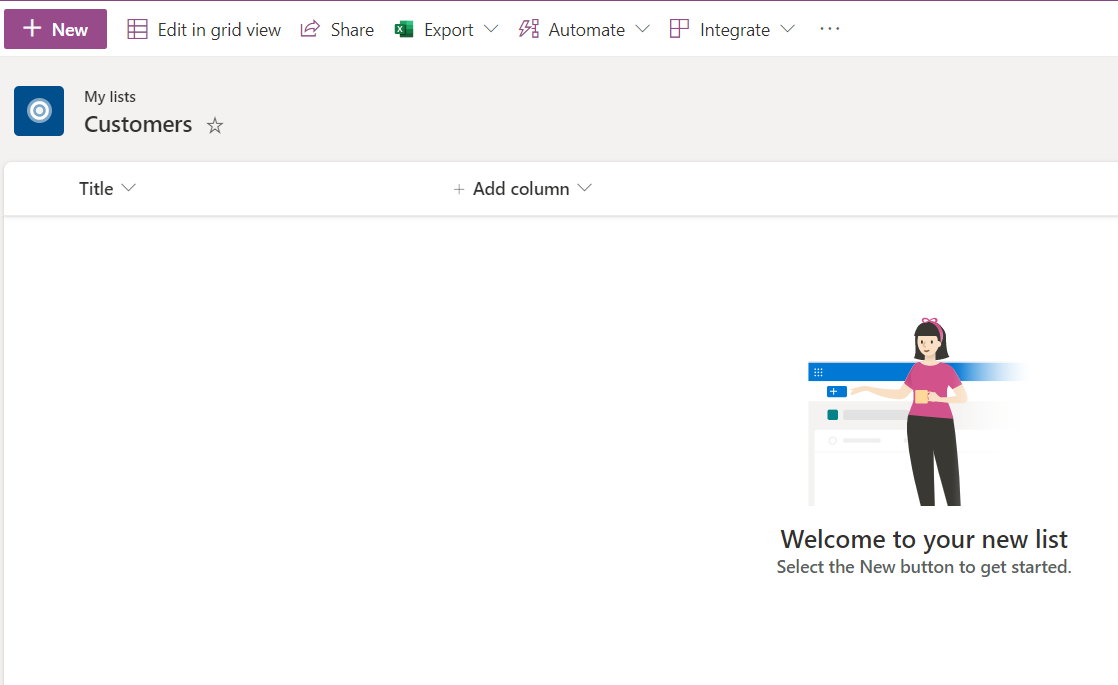
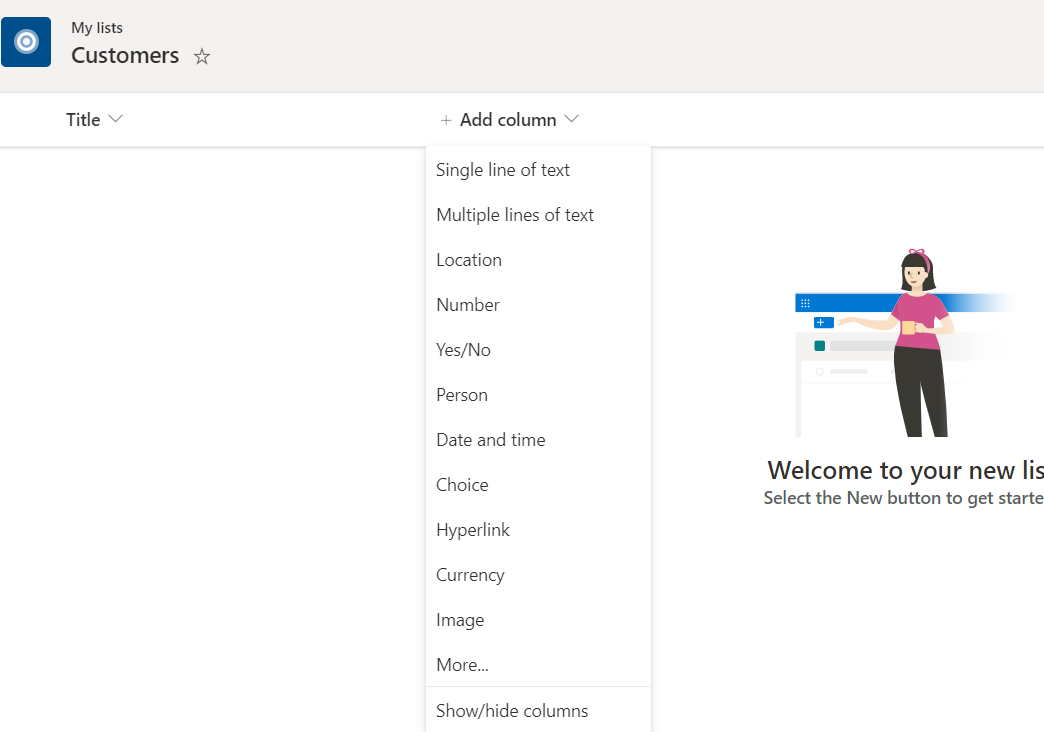
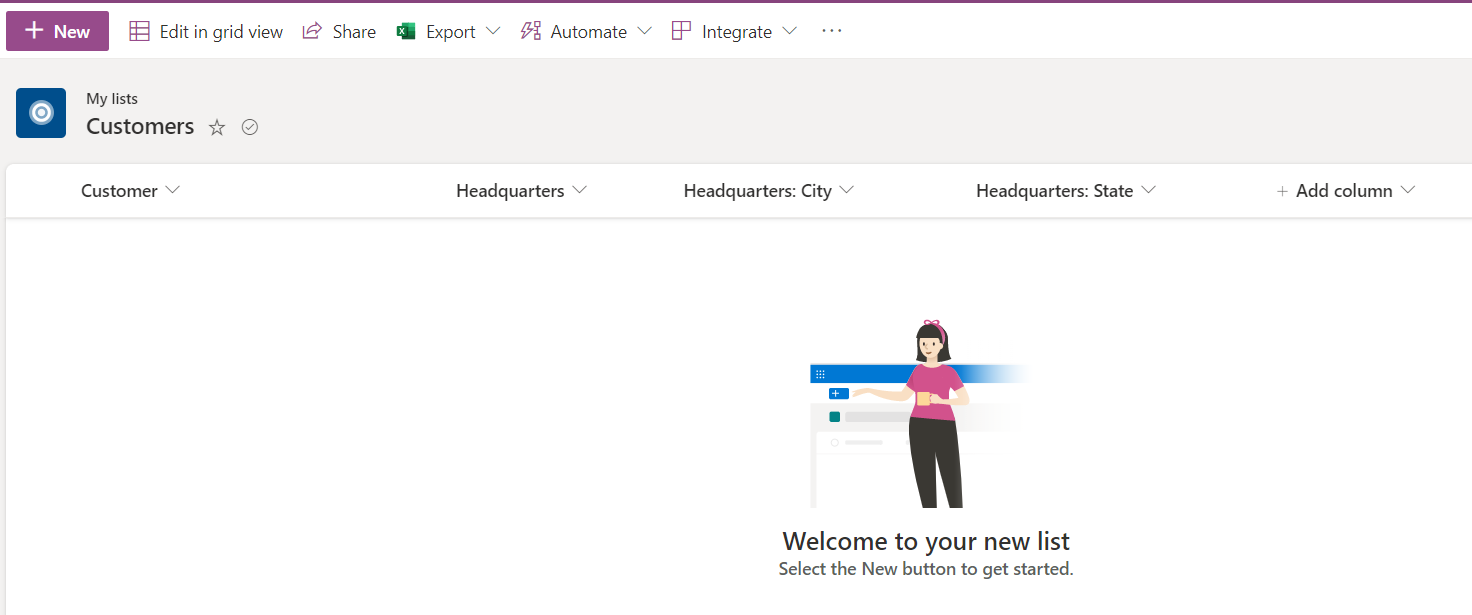
Now we have our Customer list and we can start to use it. First of all, we need to create some columns. Click on “+ Add Column”
Now you must choose type of date you want to store in this column. Don’t worry if you don’t know what it is it…Ask yourself: “what I want to store in this column? Name of customer? Descriptions? Logo? if the customer is active or now?” This is the key, understand what you need to save. Let’s see common type of column:
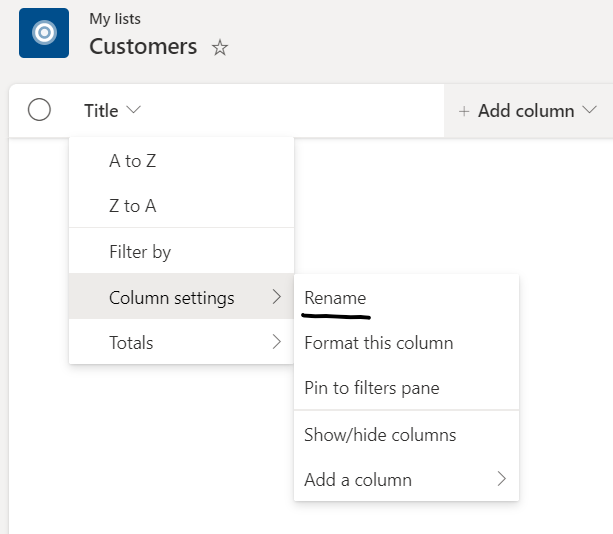
Keep mind, you have by default “Title” field , in your list. You can rename it.
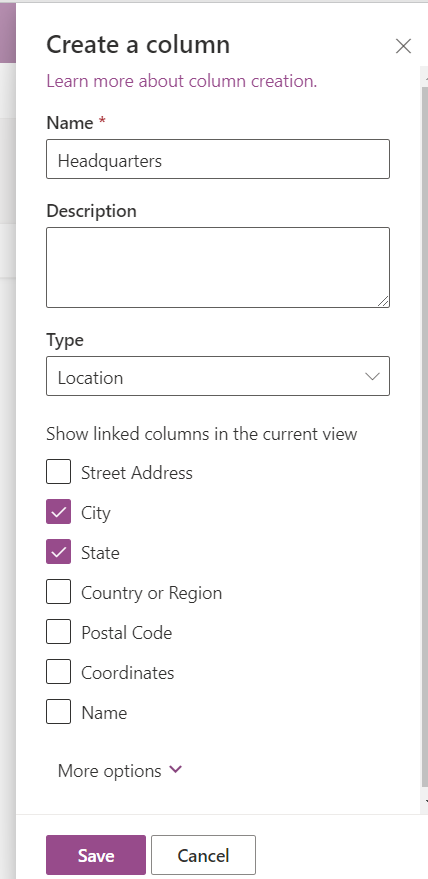
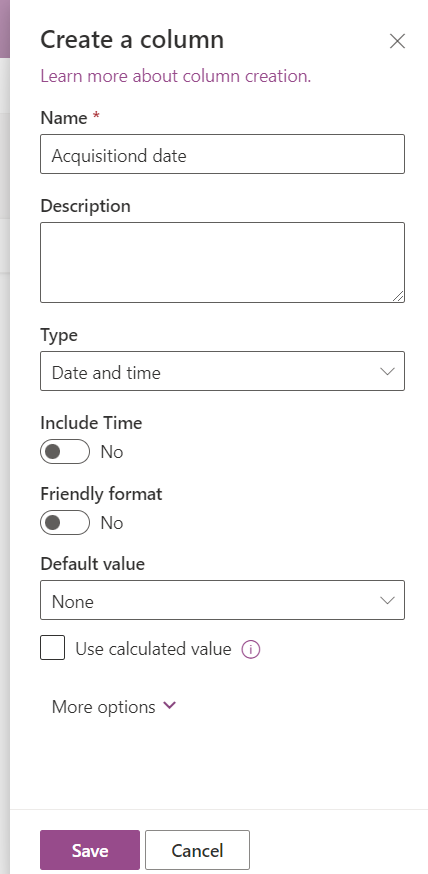
Now I rename “Title” with “Customer”, and create “Headquarters” and “Acquisitiond date”:
Now your list should appear like this:
Now you can click on “New” to add one record a time, or click on “Edit in grid view” to edit it like’s Excel file:
Keep mind, remember to click on “Exit grid view” to save.
I hope it help you..let me know with comment if you want another article on this argumeent. For example how to collaborate with colleague on this list, or how to create rules to send an email when people do something to this list or something else.
Good news!
Microsoft will realease news feature for MS Teams: “Reply to specific message”. Actually, this feature is available for teams mobile app, but soon also available for desktop version.
See this link:
Have a nice day
You can register to attend Ignite digital event November 2–4, 2021!
https://myignite.microsoft.com/home
Ignite is conference for developers and IT professionals hosted by Microsoft.
Have a nice day
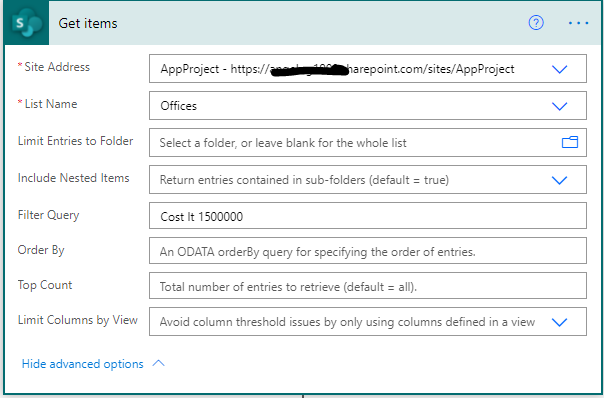
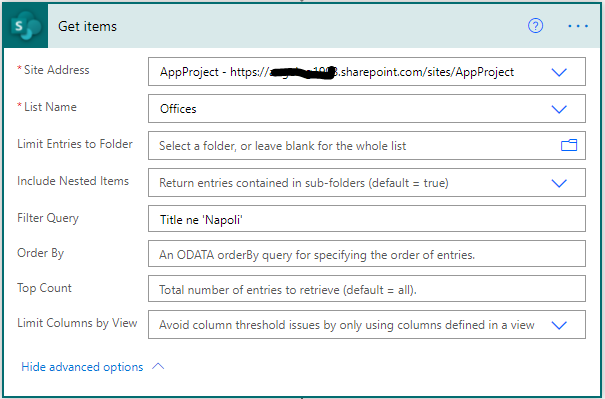
With this article I want to explain how we can get items with Power Automate (From SharePoint Online) and Filter them.
We have:
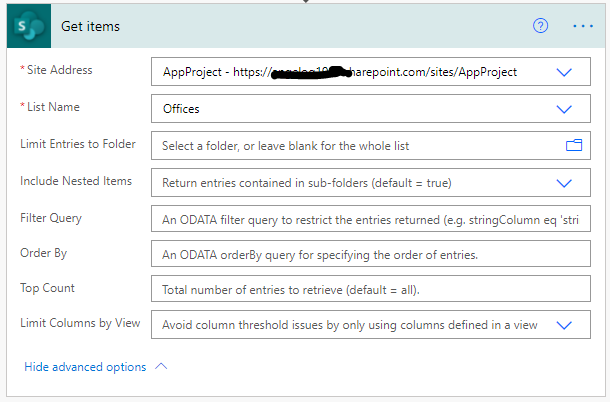
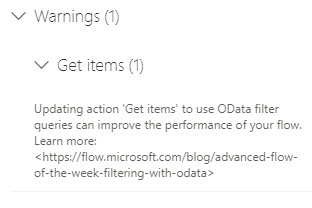
We can get data with no query. In this case, you mus put only “Site Adress” and “List Name Parameters”…keep mind “Top Count” parameter and it returs “All” items. I do not suggest this approach (And also Power Automate, who show you a Warning 🙂 )
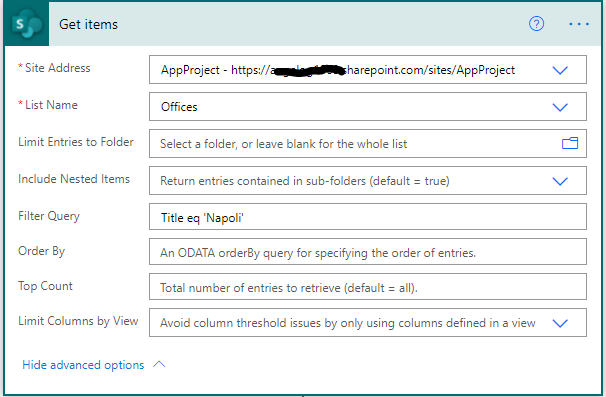
Best approach, is write a Filter Query to retrieve only items you need. Basically you should write a formula like this: fieldname operation value.
We can use also logical operator like “and” and “or”
Let’s see some example (I show query and result on Excel sheet):
Result:
Result:
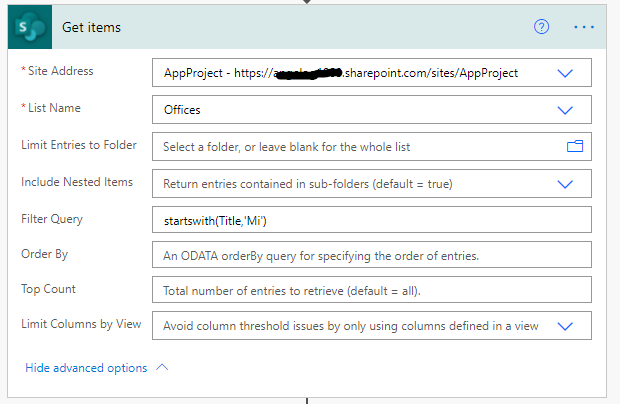
You can also use functions for your filter query.
The syntax is: functions(fieldName, value)
An Example:
Result:
I hope it help you
After about 10 years , Microsoft will update Microsoft 365 licensing cost. All informations here
Quick recap:
Since Office 365 was launched, Microsoft released:
Price:
New pricing will start on March 1, 2022
Read full article for more informations.
I hope it help you…Have a good day!
If you’re trying to execute powershell script and you got this message, you need to install SPO Management Shell and import the module.
Execute this script (as Admin)
Install-Module Microsoft.Online.SharePoint.PowerShell -Force
Now, you can try to connect:
Connect-SPOService -url https://yourorganization-admin.sharepoint.com
If you get this error (It was my problem), you can try solve it following these steps:
I hope it help you…Have a good day!
Did you deleted your App 🙂 ?
Don’t worry, in the most of case you can recover it. Let’s see how, with simple powershell command. As I usually write, if you know what you do , the script is:
Get-AdminRecoverDeletedPowerApp -EnvironmentName ‘Default-abcd1234-abcd1234-abcd1234’ -AppName ‘abcd1234-abcd1234-abcd1234-abcd1234-abcd1234’
Step to do it:
Now, you can restore your app:
I hope it help you…Have a good day!
Hi, Today I want to explain how to implement “try-catch” (and “Finally” also if you need). It’s very simple…basically you should add “scope” , put actions inside, add another “scope” to manage error…let me show:
1) Add “Main” scope with your actions inside:
2) Add another scope. I called it “Catch” …it contains some actions to execute if error in “Main” scope should occur:
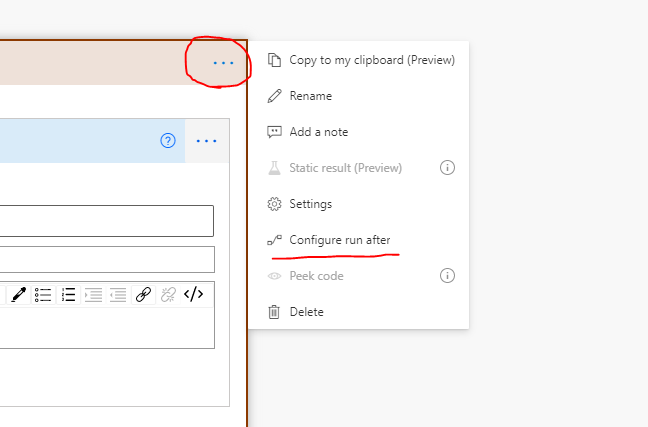
Now, we must configure “Run after” on this scope to execute it in case of error:
If you want , you can add also “Finally” scope to execute some actions in any case…your flow should be appears like this:
That’s all! Personally I use these scope to write log in case of error and success also.
Thanks
Hi! let’s see a simple way to show name of day of week. There isn’t “built in function” get name, but we can use Weekday(Date) function to get numer of day and use it to show name:
Switch(
Weekday(Now()),
1, “Sunday”,
2, “Monday”,
3, “Tuesday”,
4, “Wednesday”,
5, “Thursday”,
6, “Friday”,
7, “Saturday”
)
You can change Today() with your date and get name of week.
I hope it help you…Have a good day!
Let’s see how to change Power App owner.
Actually there is no possible to change it from UI. You can only add a Co-Owner user.
Fortunately we can do it with a simple PowerShell command:
Set-AdminPowerAppOwner -AppName ‘abcd1234-abcd1234-abcd1234-abcd1234-abcd1234’ -AppOwner ‘abcd1234-abcd1234-abcd1234’ -EnvironmentName ‘Default-abcd1234-abcd1234-abcd1234’
Step to do it:
Now, you can change Owner:
I hope it help you…Have a good day!
“Are SharePoint Lists better then Excel Files?” or “Why shloud I use a SharePoint list intead Excel Files?”
These are 2 of the most asked question of my customers/students.
First of all, in my opinion there isn’t “best technology” or best “solutions” for all problems. There is more appropriate solution for your problem (or budget 🙂 ), so the “key” is: know different options to choose the most appropriate.
With these premises, let’s me explain some reasons why, personally, generally I prefer SPO List, intead Excel files.
Have a good day!
If you want, you can try Microsoft Power Apps for free!
As usually…it very simple:
Open this url:
You will get following benefits:
All informations here:
That’s all.
[/et_pb_text][/et_pb_column][/et_pb_row][/et_pb_section]
How can we open external URL in Power Apps? for example another app or site?
Very simple:
“Launch” function. It need url as first (mandatory parameter) and if you need, you can also add parameters.
Example:
Launch( “https://powerapps.microsoft.com/it-it/blog/” )
Or if you need to pass parameters, one way is:
Launch( “https://www.google.com/search?”; { q: “powerapps” } )
That’s all.
Hi, here’s to know “How can we create relationship” beetwen two SharePoint Online lists.
My idea is create relation with a list of costs rows, to my list “Travel requests”, created for previous tutorial (Build an app in a few minutes), to understand costs details for each travel 🙂
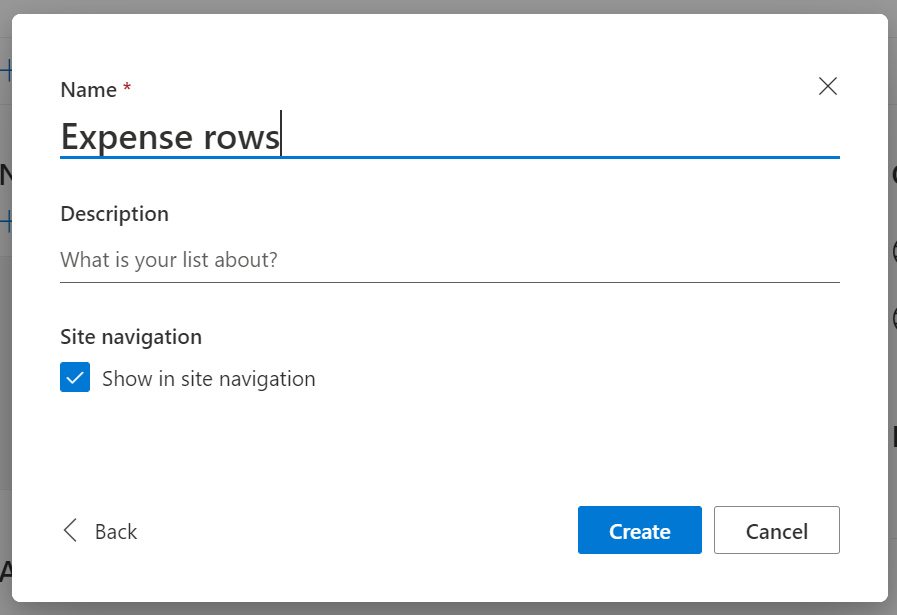
As a first step, we need a new list to store costs rows, so I add new list to my SPO site.
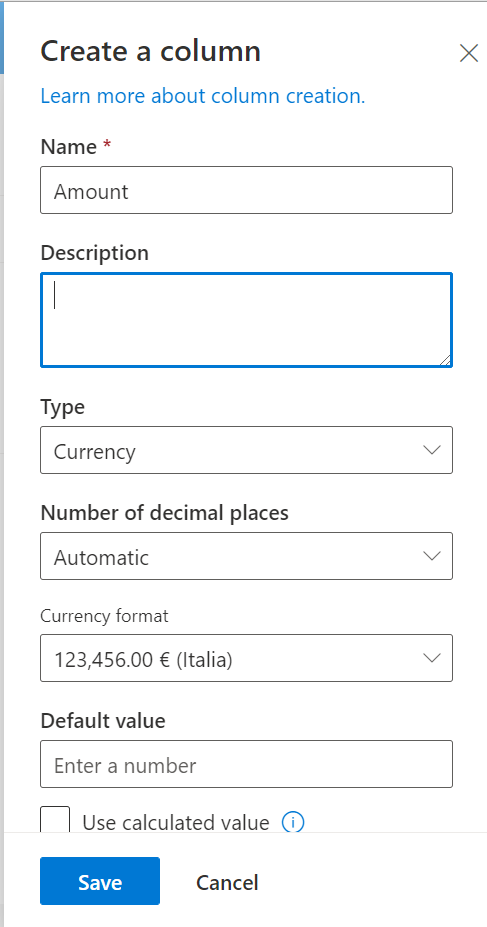
Then, we should add column to store amount of cost and column to create relationship with travel rows (PS: I use Title column for title of cost row)
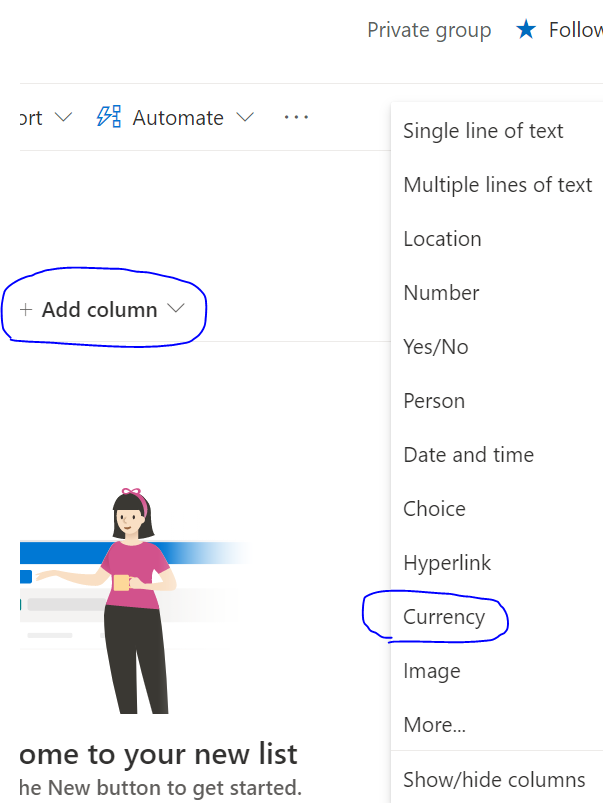
Ok now we must create column to create relationship beetwen cost row and travel. To do this, need a LookUp column or for Italian People (“Ricerca”). Please keep mind this kind of column doesnt’t listed on list of common type column (see previous screenshot). One way to create it: click on “Add column” , “More” .
Here we can create lookup column.
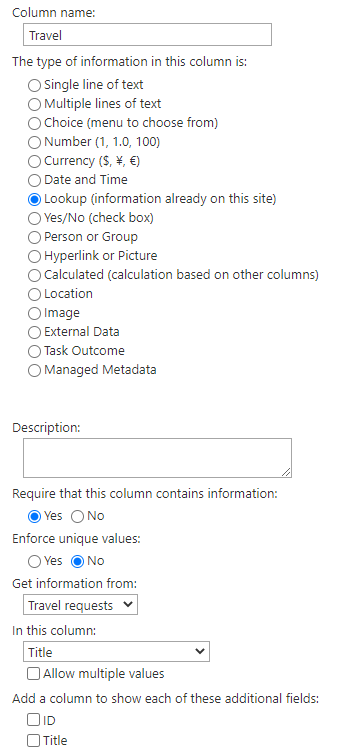
Put column name (my case “Travel”) and choose type “Lookup”… (Wait for page reload).
Now you should set “Get information from” field : In this field you must choose another list where get row (or multiple rows) to create relationship.
Set “In this column” field. Here you can set column of other list, used to choose row.
In my case I also checked “Require that this column contains information“, because , in my opinion, when we add cost rows, travel is mandatory 🙂
There are others option, but for this tutorial we can click ok, and come back to our list.
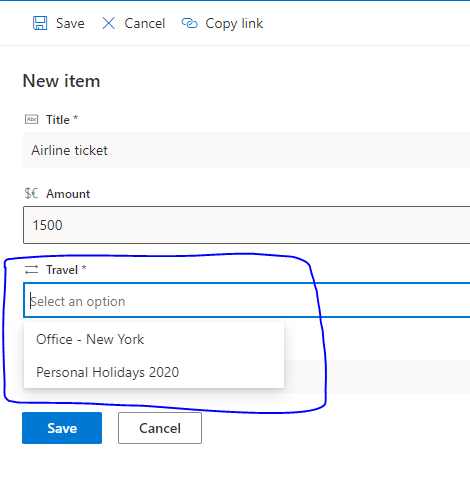
First, create some travel rows and cost rows. Now , when we add some cost rows, we must choose “travel” row to associate it 🙂
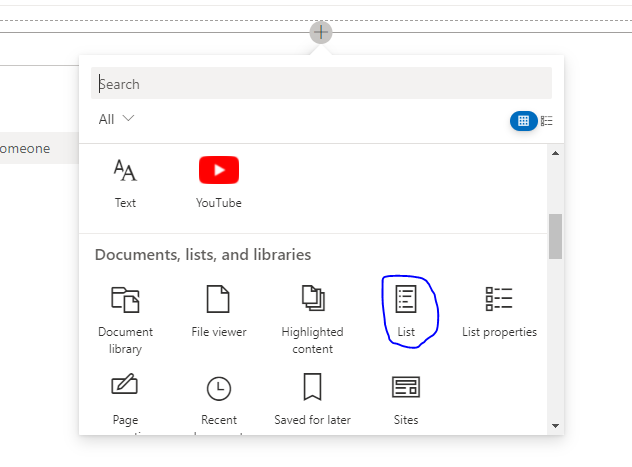
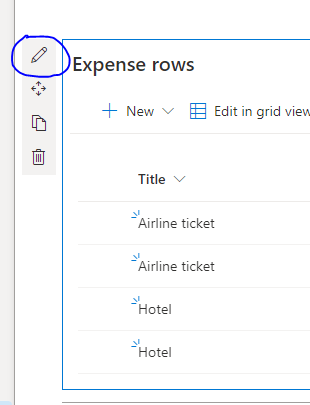
Now it simple 🙂 To show relationship beetwen two list, we must edit a SharePoint page, add two “list” webpart:
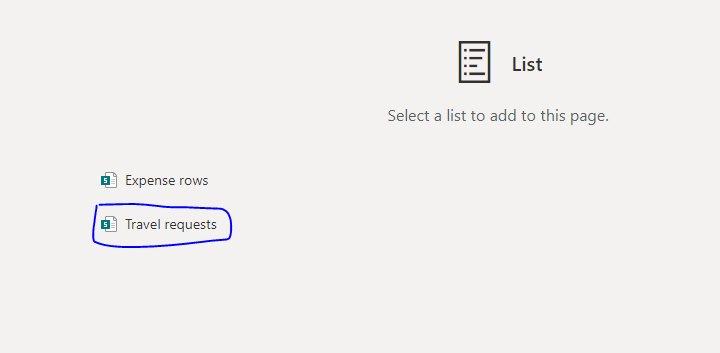
Select Parent list first:
And then we do same process for expense rows.
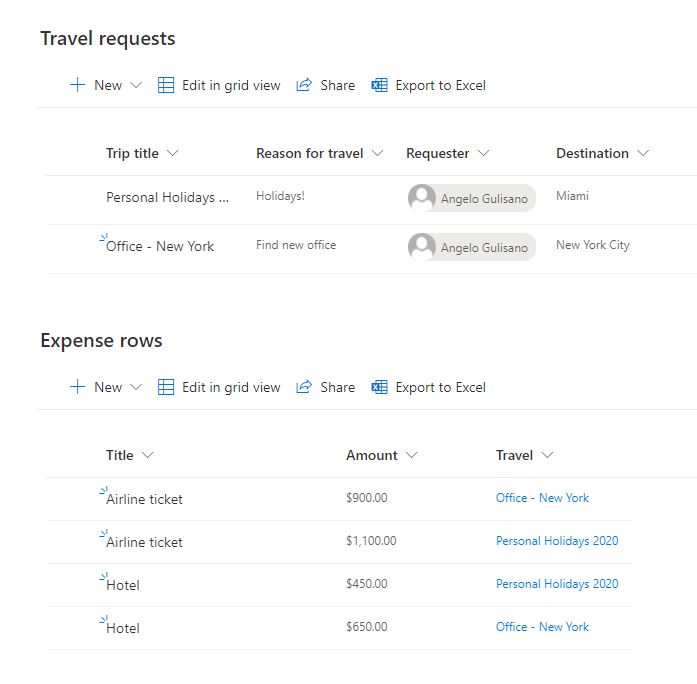
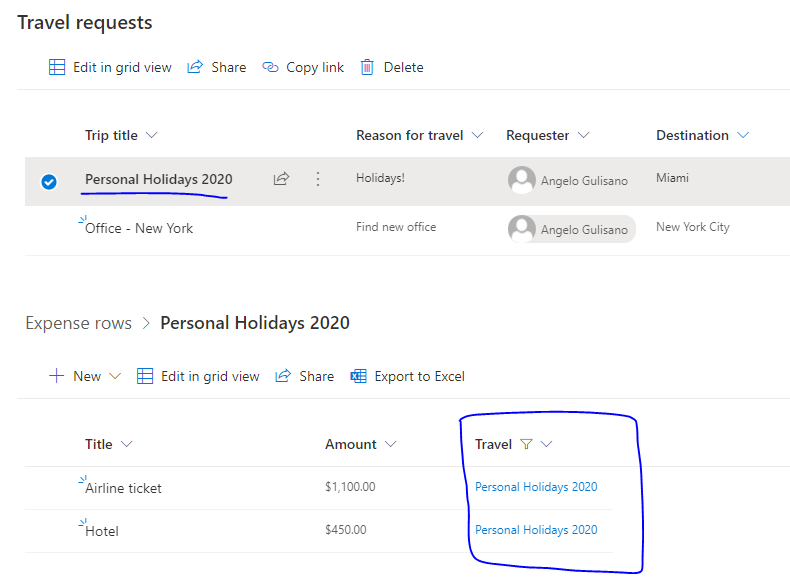
Finally we have 2 lists in page:
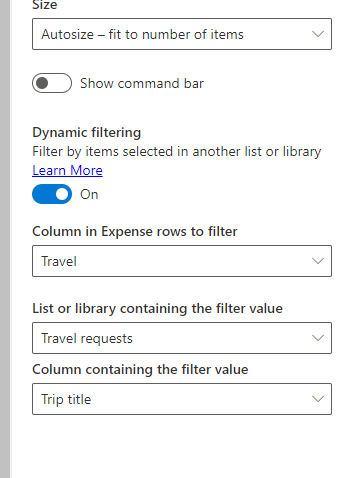
Finally, add Dynamic filtering on “Expense row” webpart:
Result:
Thanks and Stay tuned 🙂
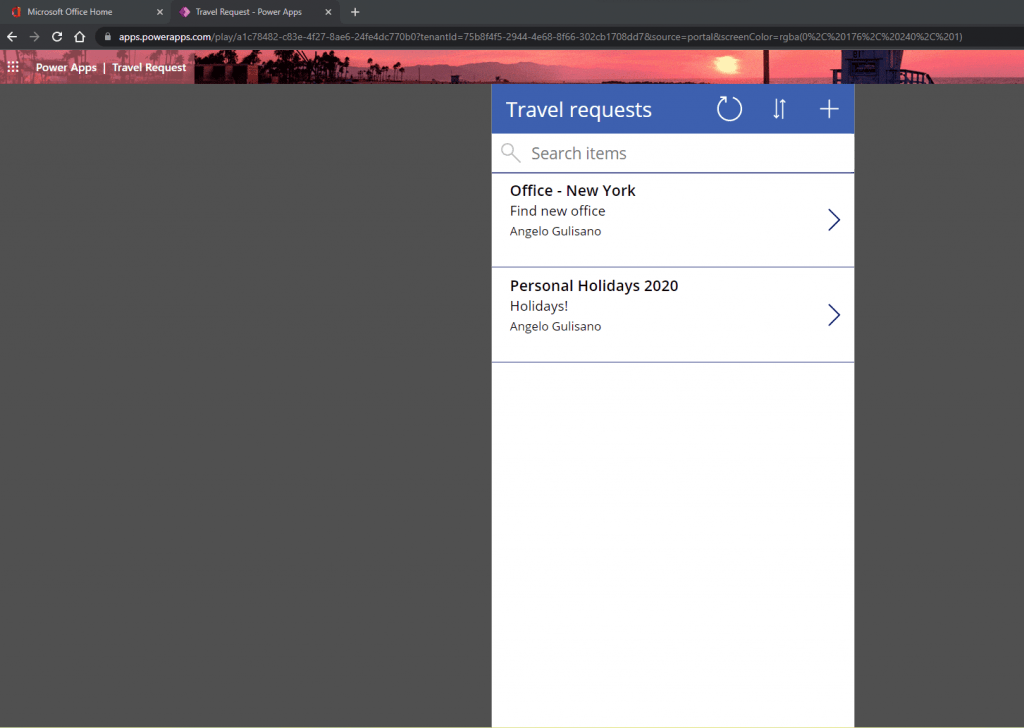
There are two ways to build an app with Power Apps. “Canvas App” (My favourite) and “Model-driven app”. In this article , let’s see how we can build an app in less then ten minutes with Canvas App, starting from data.
We should start from data using one of connectors available, such as Excel, SQL Server, Dataverse or SharePoint.
For this article, I created a SharePoint list , starting from template “Travel requests”. The Idea is create a mobile app to allow users create travel requests.
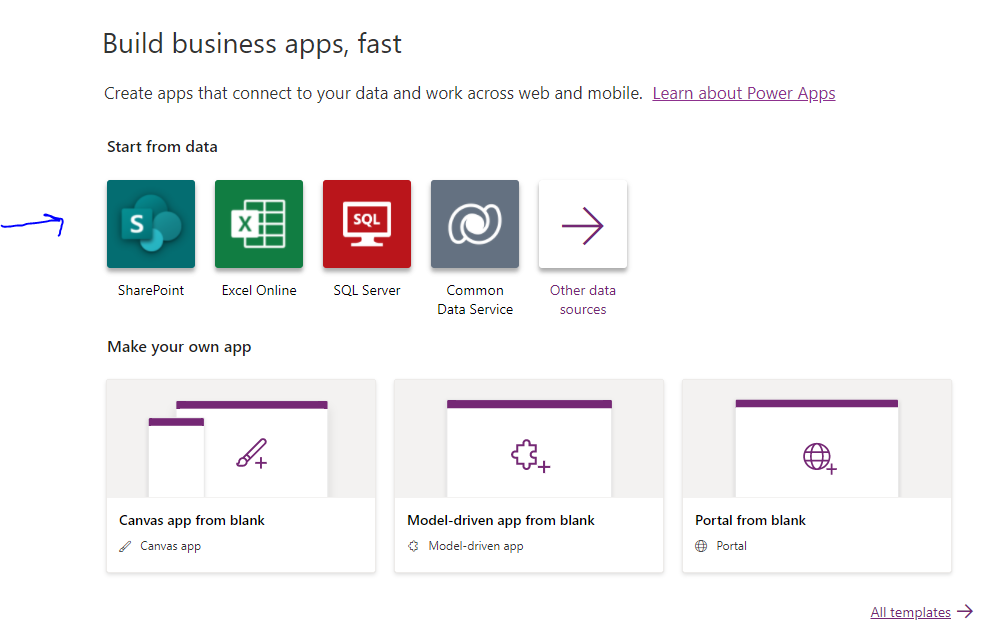
Let’s build 🙂 Go to https://make.powerapps.com/ , login with our account, on “Start on data”, click on “SharePoint”:
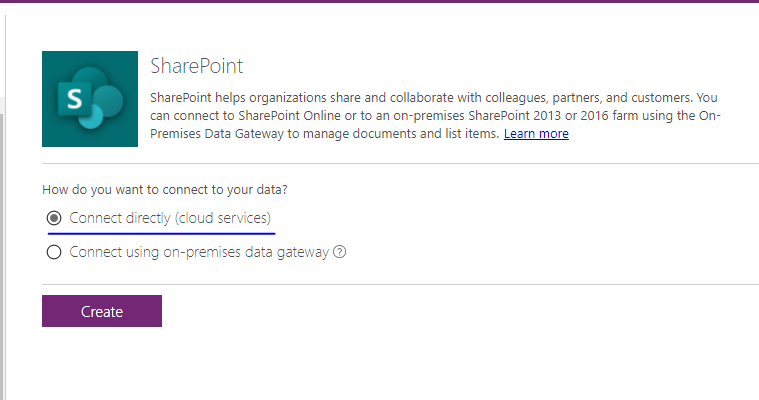
Then, choose “Connect Directly” (In my case , I use a list on SharePoint Online):
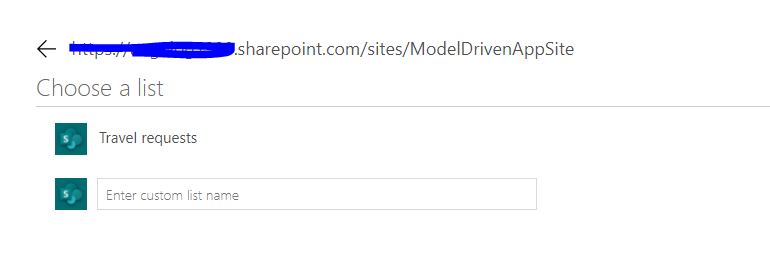
Click on “Create” button, and put url of SPO Site who host our list:
Click “Go” , then choose the list, click “connect” and wait….
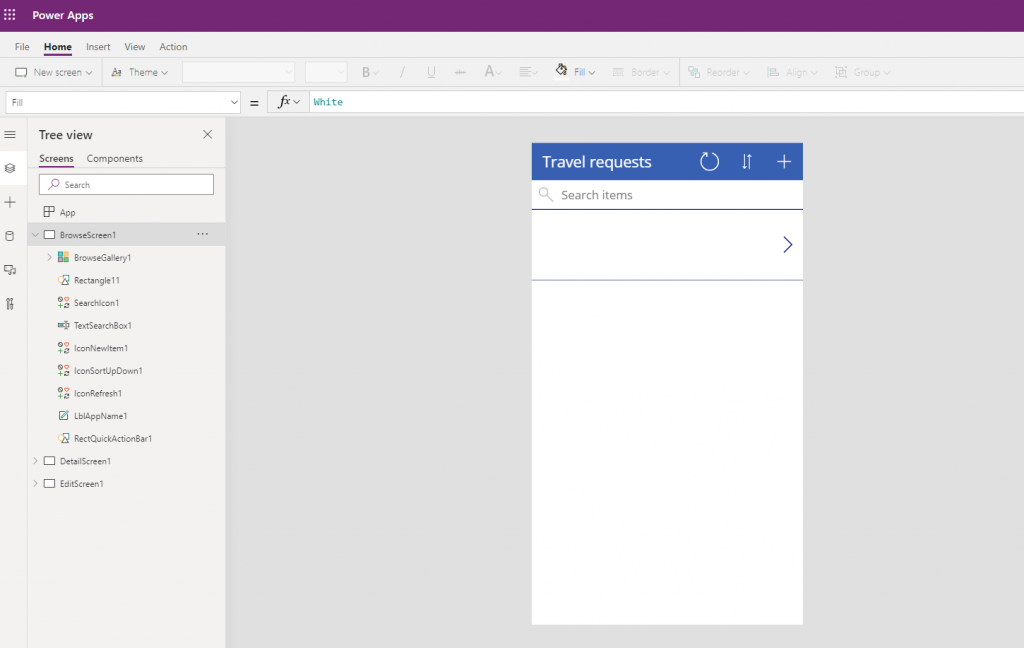
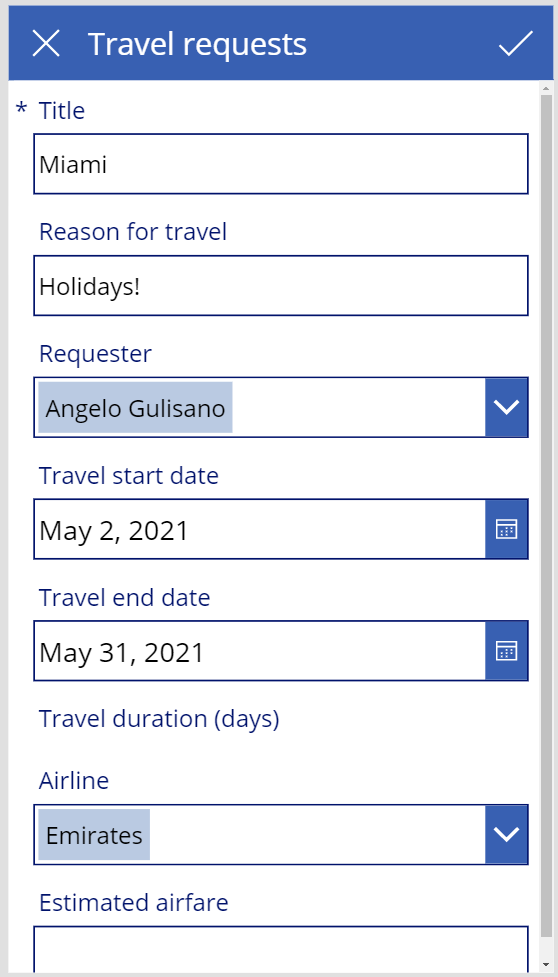
Now? we have our app , ready to use or customize!
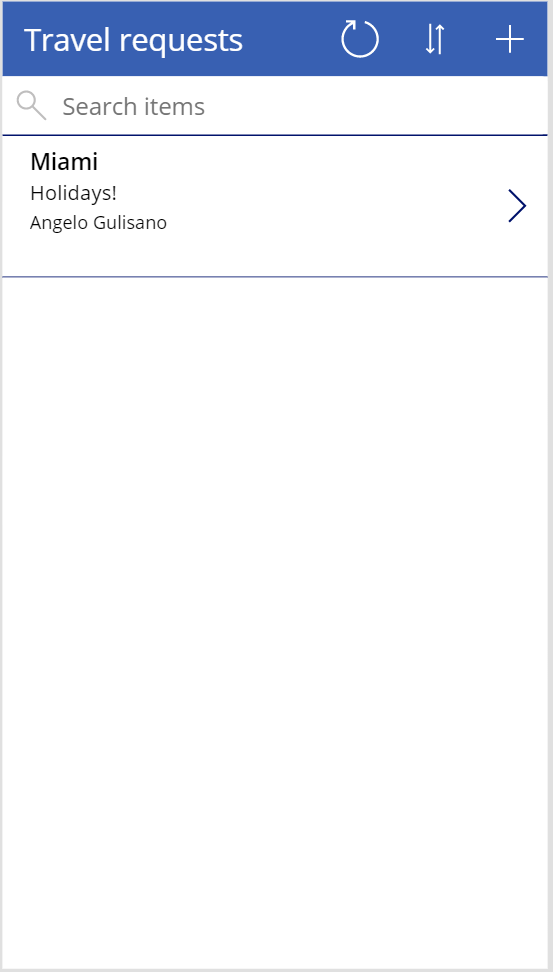
Our App, is ready to use with Add, edit, delete and search functions.
I spent more time to write this article then create app 🙂
In my opinion, this is the fastest way to create a Power Apps, If you don’t like it, you can use it as starting point to learn how to build and app, or to create a poc for your users or customer.
Customer’s often ask me: “What is Power Apps? What can I do with it?“
“Official” reply is : “Power Apps is a suite of apps, services, connectors and data platform that provides a rapid application development environment to build custom apps for your business needs. Using Power Apps, you can quickly build custom business apps that connect to your business data….” (Here official link)
In order to make it easier to understand, my reply is:
“With Power Apps, you can build applications without being developers, integrated with different services, usable through browsers, tablets and Android or iOS Smartphones.”
Does It appear cool? Yes it do 🙂
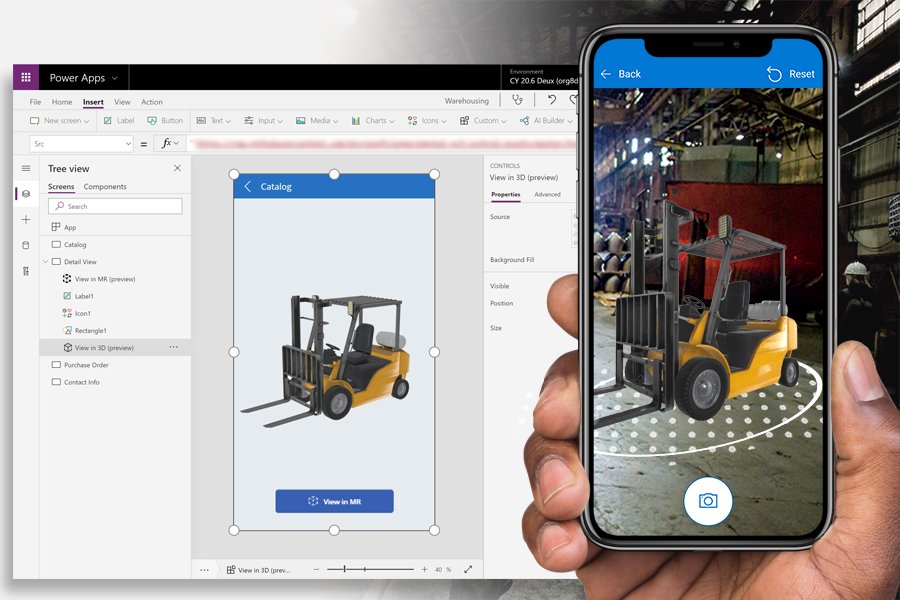
There are many other things you can do… for example the features of Mixed Reality, or AI Builder that allows you to take advantage of artificial intelligence to extract text from an image, perform sentiment analysis, process receipts etc…
I’ll write a series of tutorials that will bring you closer to this world with very little effort.
See you soon. Stay tuney!
Hi! I decided to open this blog to share my knowledge. I’ll shortly publish the first articles. Visit the “Who I am” page to know me better.
The thematic areas of my articles will mainly concern Microsoft technologies, with a focus on SharePoint and Power Platform.
Stay tuned!
Angelo