CategoriesPower AutomateSharePoint Online

Power Automate – Send email from SharePoint Rest Api

Hello, today I want to share with you a method to send emails with Power Automate by using a REST API available in SharePoint. There is a method called “sendMail” in SP.Utilities.Utility that can be used to send emails to users.

Some attention points:

  1. Recipients must be authenticated SharePoint users.
  2. Attachments cannot be included through this API method (You can include inline attachments likes images uploaded in the same SharePoint domain).
  3. It doesn’t send emails to distribution groups or lists.
  4. “To” field must be an array.

Build flow

In this article, I’m going to create a cloud flow that can be run manually. Of course, you can use any trigger that you need, or you can incorporate a SharePoint HTTP request to send an email wherever necessary.

To send mail you should simply add “Send an HTTP request to SharePoint” connector:
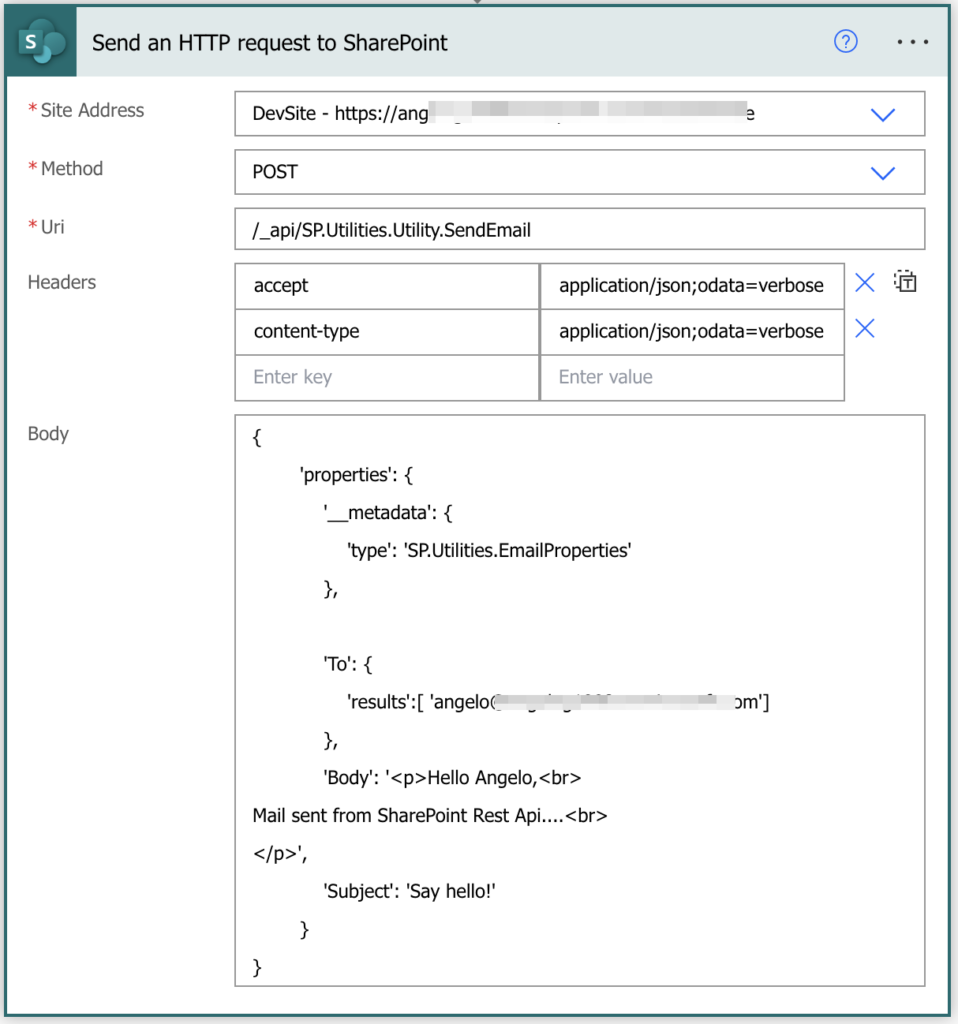
Send email with SharePoint http request

So, you must use there parameters:

  • Site address: SharePoint to use to make call
  • Method: POST
  • URI: /_api/SP.Utilities.Utility.SendEmail
  • Headers:
{
  "accept": "application/json;odata=verbose",
  "content-type": "application/json;odata=verbose"
}
  • Body:
{  
        'properties': {  
            '__metadata': {  
                'type': 'SP.Utilities.EmailProperties'  
            },  
  
            'To': {  
                'results':[ 'email address']
            },  
            'Body': '<p>Hello Angelo,<br>  
Mail sent from SharePoint Rest Api....<br>
</p>',
            'Subject': 'Say hello!'  
        }  
}

In the body section, you should add “TO” as an object with a result property that accepts an array of email addresses. Similarly, if you want to add “CC” or “BCC“, you can also include “Body“, which can contain HTML, and “Subject” as a string.

This is result:
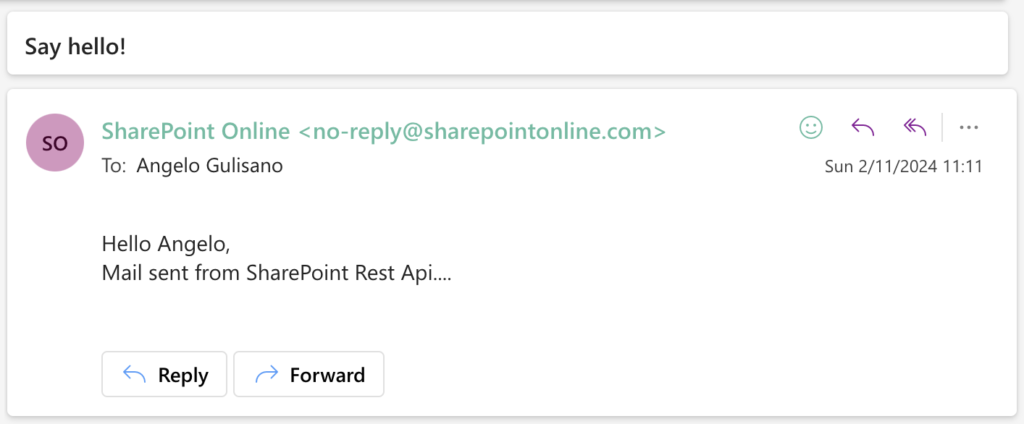
Email sent from SharePoint rest

Considerations

Some people ask me, “Why should we use this option?” I wrote this article inspired by a recent training course on Power Automate that I delivered for a customer. In this instance, my client needed to send emails, but we didn’t have the option to use a service account to send emails with the standard Outlook 365 connector, and he didn’t want to send them from his email address.

I hope these information can help you.

Contact me for questions! Have a nice day!

CategoriesAIPower AppsPower AutomatePower Platform

Power Apps – ChatGPT Integration

In this article, let’s see how we can integrate ChatGPT with our Canvas App to add AI functionality.

ChatGPT is an artificial intelligence-based chatbot developed by OpenAI, specialized in conversing with human users. The acronym GPT stands for Generative Pre-trained Transformer, which means “pre-trained generative transformer.” With ChatGPT we can, for example, generate content, answer questions, Translate, summarize, complete sentences etc.

Feel free to write me if you need help.

Requirements

Basically, the Idea is call ChatGPT Service via Power Automate, get response and pass it to our App. Before start, you need ensure to have:

  • Premium Licence (Or Trial) to make Http Post request from Power Automate
  • An account with some cretit on OpenAI
  • Valid OpenAI API key

Build flow

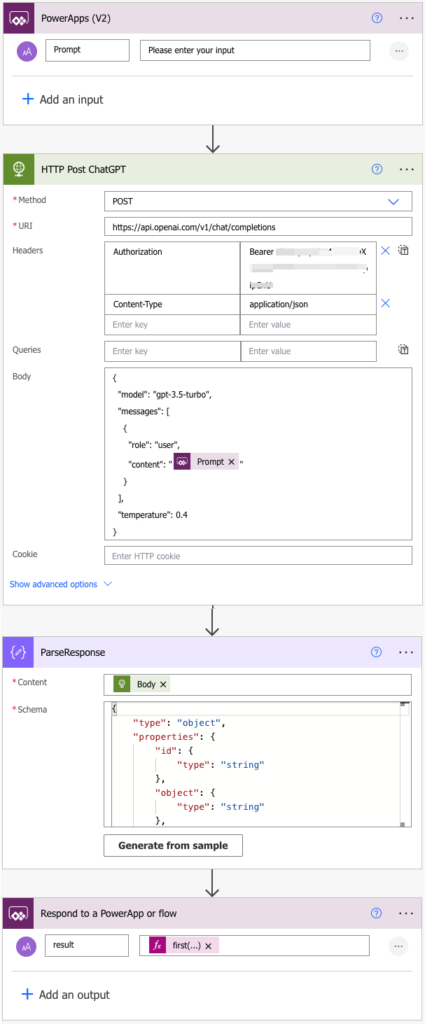
In this Example, we’re going to call our flow from a Canvas App, passing a prompt and get an output. Trigger is Standard Power Apps connector:

Power Apps connector as trigger

Then, we must do an HTTP Post request to call OpenAI Service. According to Open AI documentation (at this this link) we need to specify in the following headers to make request:

  • URL: https://api.openai.com/v1/chat/completions
  • Content-Type: application/json
  • Authorization: Bearer $OPENAI_API_KEY

And as Body, a Json with:

  • Model
  • Messages
  • Temperature

Example:

{
     "model": "gpt-3.5-turbo",
     "messages": [{"role": "user", "content": "Say this is a test!"}],
     "temperature": 0.7
   }

In my case I parameterized the prompt, but of course you could also parameterize model or temperature, So, the action to call ChatGPT from flow is:

Call ChatGPT from Http Request

Now, we must get body response, parse it, extract result and pass information back to our app.

Add “Parse Json” action and use this schema (I suggest you do to first call to service and get response and then use “Generate from sample” option):

{
    "type": "object",
    "properties": {
        "id": {
            "type": "string"
        },
        "object": {
            "type": "string"
        },
        "created": {
            "type": "integer"
        },
        "model": {
            "type": "string"
        },
        "choices": {
            "type": "array",
            "items": {
                "type": "object",
                "properties": {
                    "index": {
                        "type": "integer"
                    },
                    "message": {
                        "type": "object",
                        "properties": {
                            "role": {
                                "type": "string"
                            },
                            "content": {
                                "type": "string"
                            }
                        }
                    },
                    "finish_reason": {
                        "type": "string"
                    }
                },
                "required": [
                    "index",
                    "message",
                    "finish_reason"
                ]
            }
        },
        "usage": {
            "type": "object",
            "properties": {
                "prompt_tokens": {
                    "type": "integer"
                },
                "completion_tokens": {
                    "type": "integer"
                },
                "total_tokens": {
                    "type": "integer"
                }
            }
        }
    }
}

Result:

Parse Json response

And finally, we can get result and pass it to our app. In my case, I used and expression to get first message from result, and pass it to my app:

first(body('ParseResponse')?['choices'])['message']['content']
Pass result to app

Completed flow

The completed flow:

Completed flow

Test from App

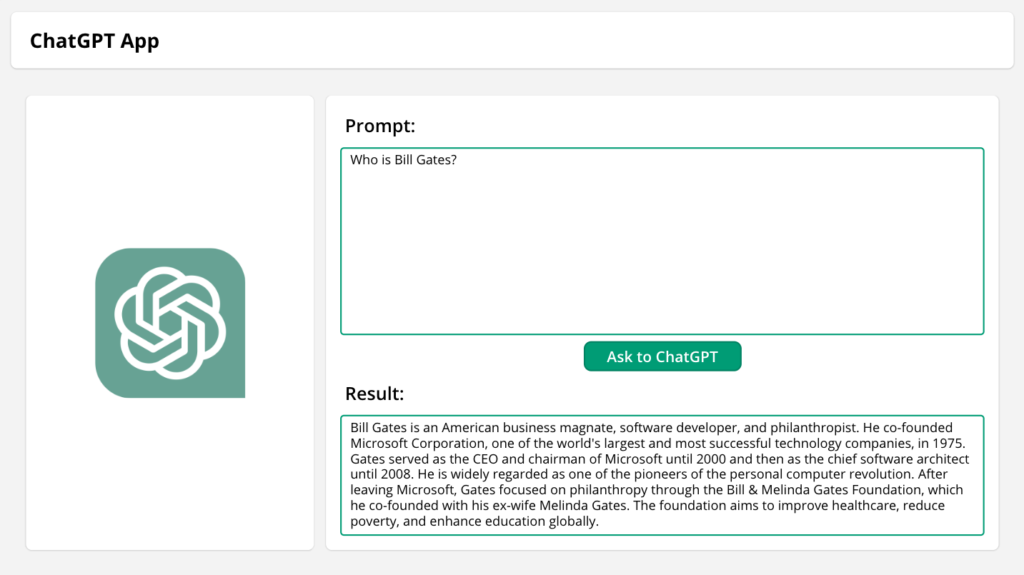
Finally, we can create an App to test it. I created a screen with two textbox , firstone for prompt and secondone for output, then I added a button to call our flow and store result in variable.

UpdateContext({ctxChatGPTResponse: ChatGPT.Run(txtChatGPTInput.Text)})

Result:

ChatGPT App

Considerations

I hope these information can help you! Leave me a comment to let me know what you think, or if you have a better idea to handle this case.

Contact me for questions! Have a nice day!

CategoriesPower AutomateUncategorized

My First Article for CODE Magazine!

I am extremely happy and grateful for my first publication for Code Magazine, presented at the Power Platform Conference in Las Vegas 2023. As a Microsoft MVP, I have always dreamt of sharing my passion and knowledge with the tech community. My article, “Using Power Automate to Manage Process” focuses on streamlining business processes with Power Automate. This achievement was the result of dedication and hard work and has given me the opportunity to participate in a prestigious event and expand my professional network. I would like to thank Microsoft, Code Magazine, and everyone who supported me. My commitment as an author and MVP continues, and I hope to share more knowledge and experiences with the tech community. Thank you for your support on this exciting journey.

Code Magazine - October
CategoriesPower Automate

Power Automate – Get Action Error Details

In this article, let’s see how you can catch error during flow executions and send information via email. My way to catch error is by incorporating error handling , and track in log table or SharePoint list on you can also send and email with error details. First of all, if you didn’t , you should read my old article “Power Automate – Try Catch”.

Our Flow

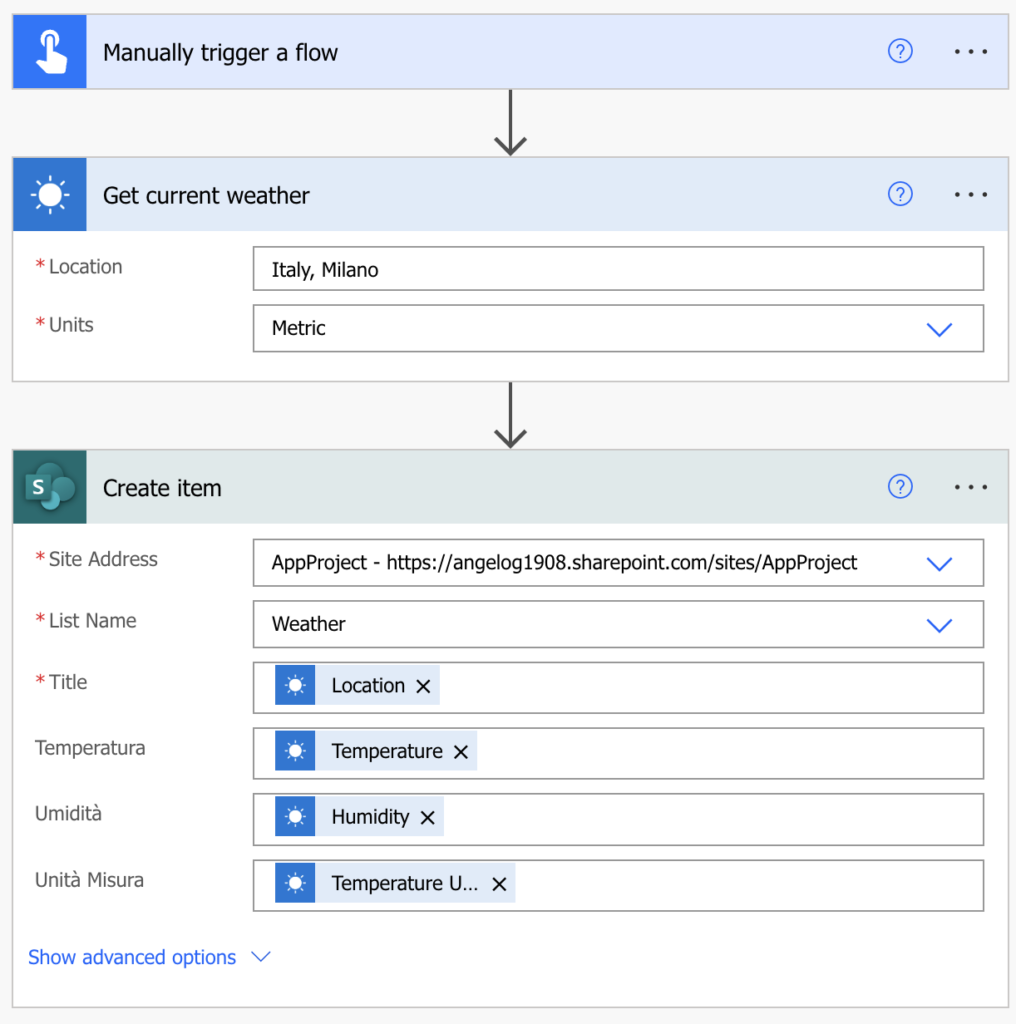
Basically, we have a Power Automate flow with manually trigger who catch wheater informations and log them in SharePoint list.

Power Automate Flow without error handling

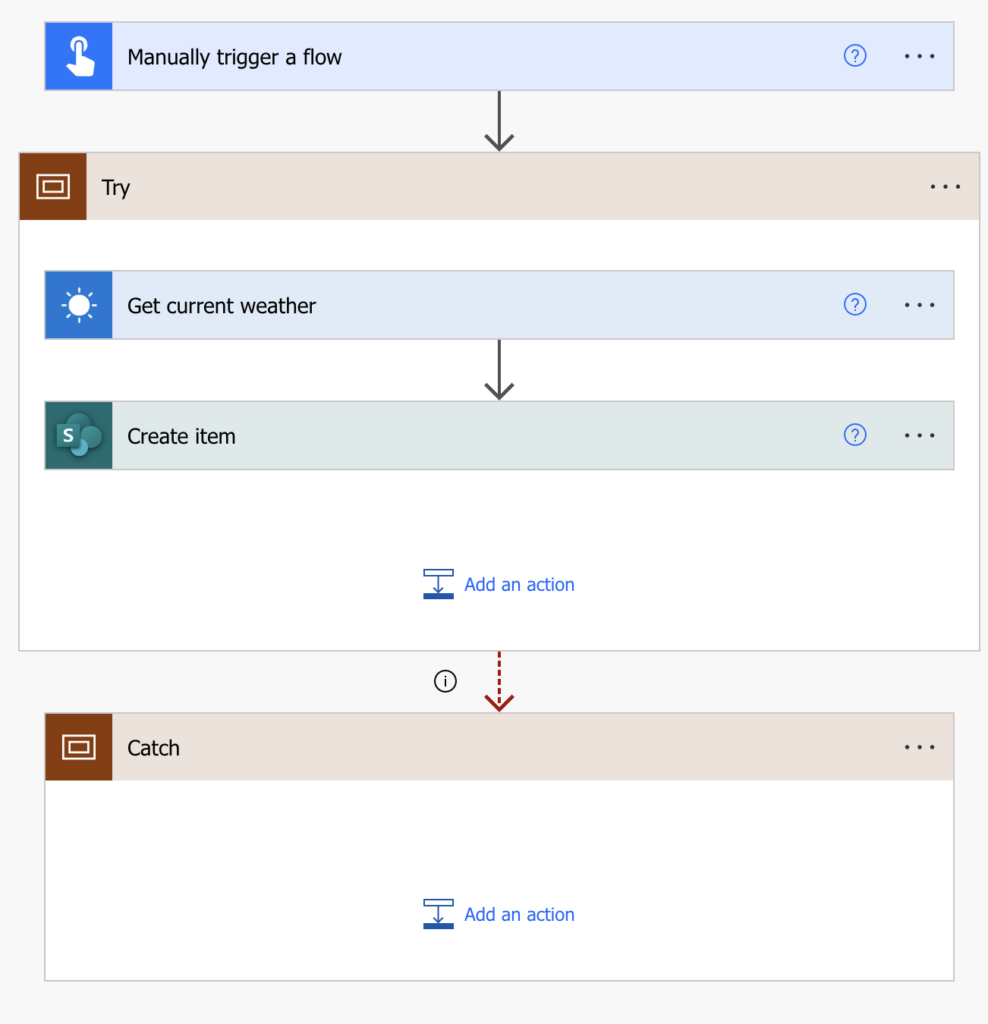
According, to my old article. Add “Try Catch” scopes. Our flow became:

Simple flow

In this case, my “Catch” scope, is configured to execute only in case of:

  • has failed
  • Is skipped
  • has time out

Basically, now you can add some action to track if your flow going in error and send alert to users. By, let’s do a little additional step, and get error details.

Get errors details

How can we get error details?

In our “Catch” scope, we shuld add “Compose” block to get output result of our “Try” scope, then, we should filter result to extract error details.

Key Point:

Get “Try” scope result, with compose: (you must use “Get result” action)

result('Try')
Get Try result

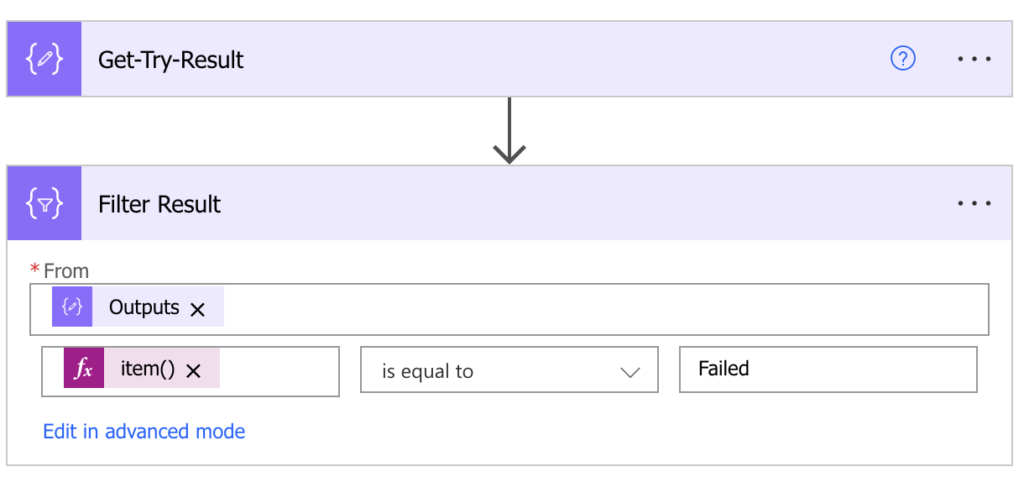
Now, use “Filter array” action, to filter “Get-Try-Result” result action. In filter, I added this:

item()?['Status']

and filter for “Is Equal” to “Failed”, so final result is:

Filter error in Catch block

Now you can send email with details or track them on list (or both 🙂 ). You can get Action Name, with this expression. To try , I added bool variabile, and set to null in “try” scope.

body('Filter_Result')[0]?['Name']

And error details:

body('Filter_Result')[0]?['Error']

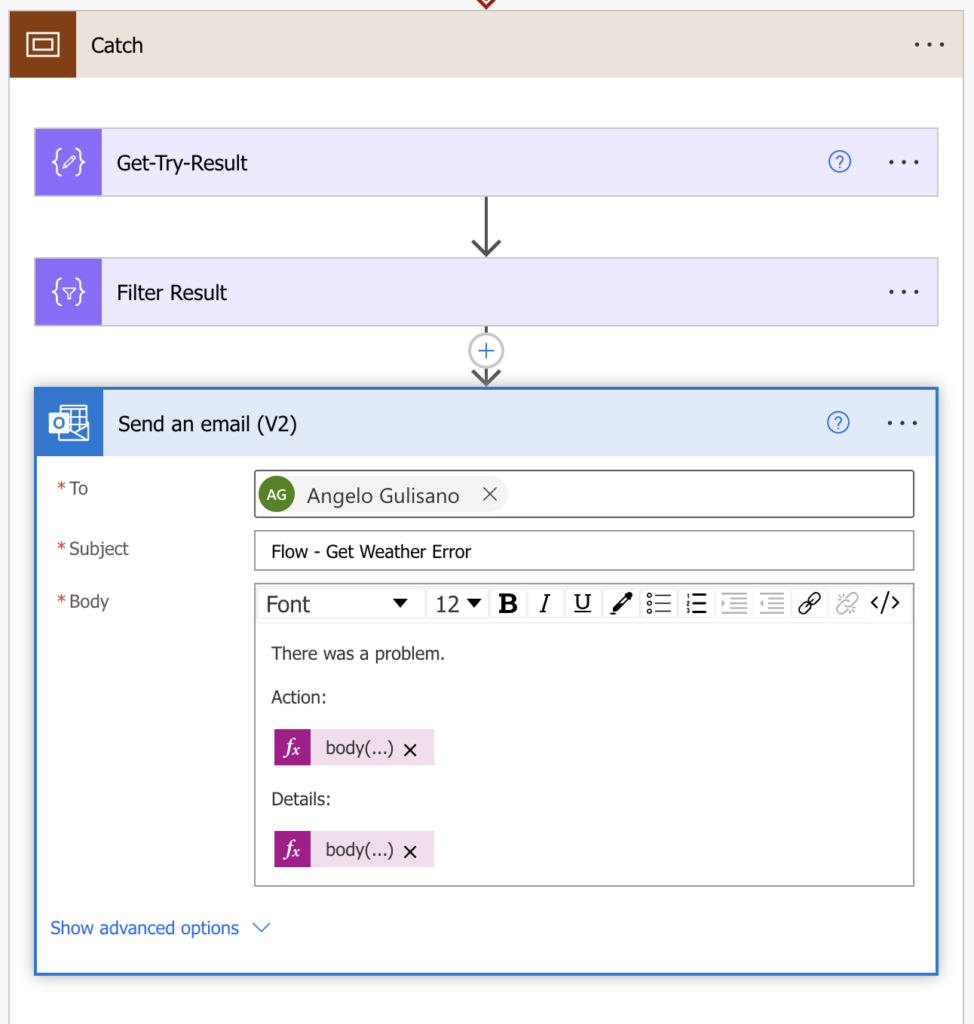
So , final result of “Catch” scope is:

Final result of catch scope with error handling

Final Flow:

Complete flow with error handling.

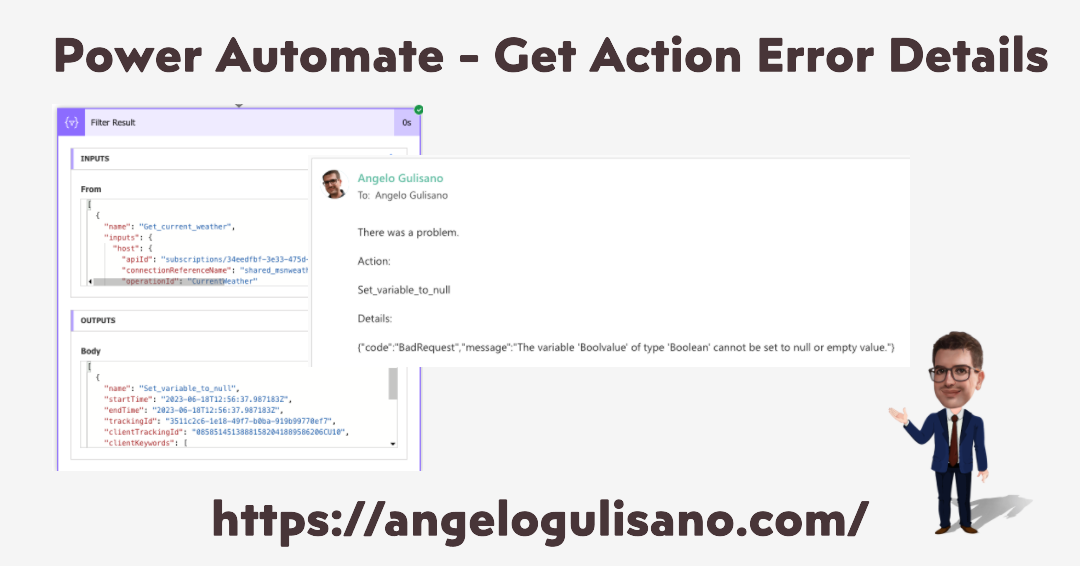
Finally, in case of error, here is the detail:

Error details

Considerations

I hope these information can help you! Leave me a comment to let me know what you think, or if you have a better idea to handle this case.

Contact me for questions! Have a nice day!
CategoriesPower AutomatePower Platform

Power Automate – Restore deleted flows

Today , I want to explain how you can recover deleted Power Automate flows. PS: If you need recover Power Apps, you can read my article here.

Some note to remember:

  • You can’t recover your flow if it was deleted more than 20 days ago
  • You can recover your flow if it was not part of solution (but if did, you can try to open a ticket support)
  • Default state of recovered flow is disabled
  • You can recover flow also with powershell commands
  • You need use Admin user of environment
  • You can write me for comment to improve quality of my contents 🙂

Create flow to recover deleted flow

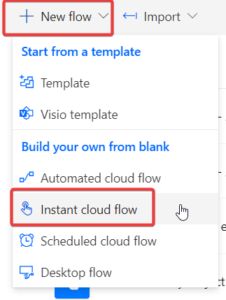
Let’s build a new “Instant cloud flow” with manually trigger.

Create new flow
Create new instant cloud flow
Create new flow with manually trigger
Create new instant cloud flow

Now we can add some step to recovery our flow, search “Power Automate Management” and looking for step “List Flows as Admin”, then choose correct Environment and set “Include Soft-Deleted Flows” to Yes.

List Flows as Admin
List Flows as Admin

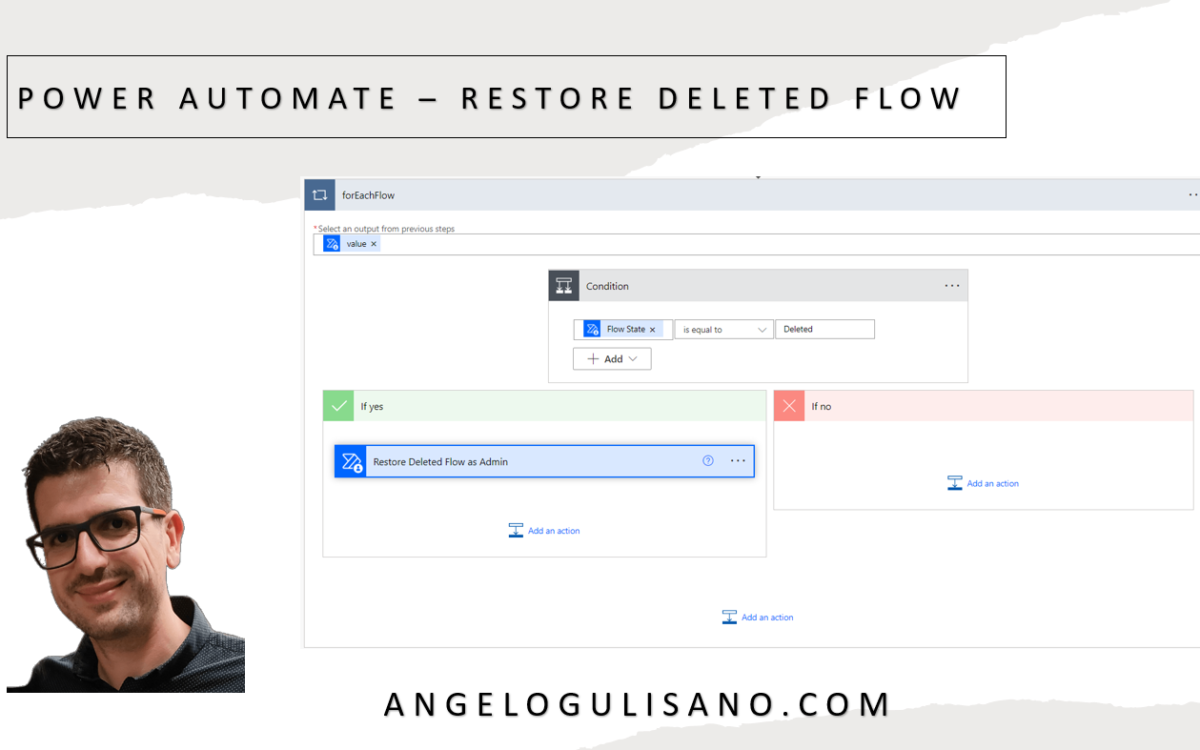
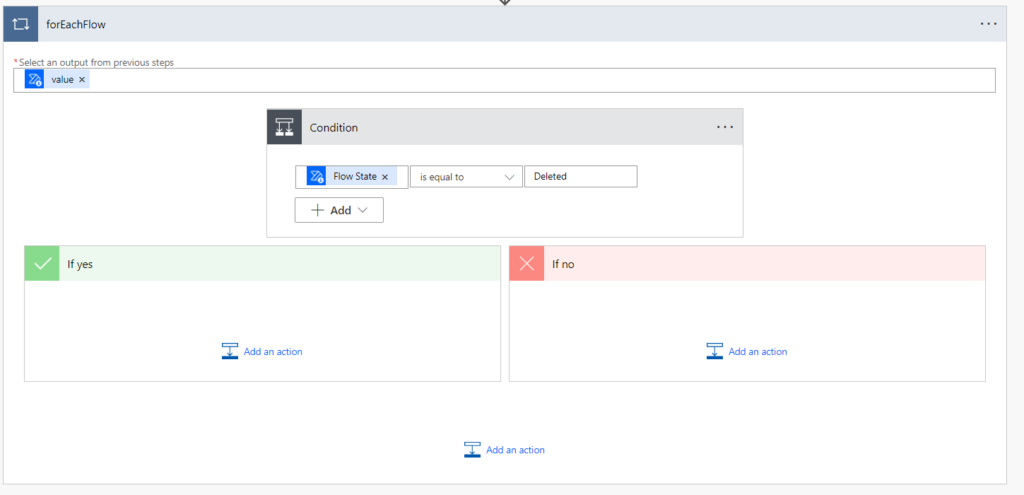
Now have action to list our flows, included deleted flows. Add “Apply to Each” step (I renamed it “ForEachFlow”) in order to iterate our results and then add “condition” action to filter only “deleted” flow by status property:

Filter only deleted flow

Now last step, add action called “Restore Deleted Flow as Admin” set correct Environment (same as step “List flows as Admin”):

Restore flow  Step
Restore flow Step

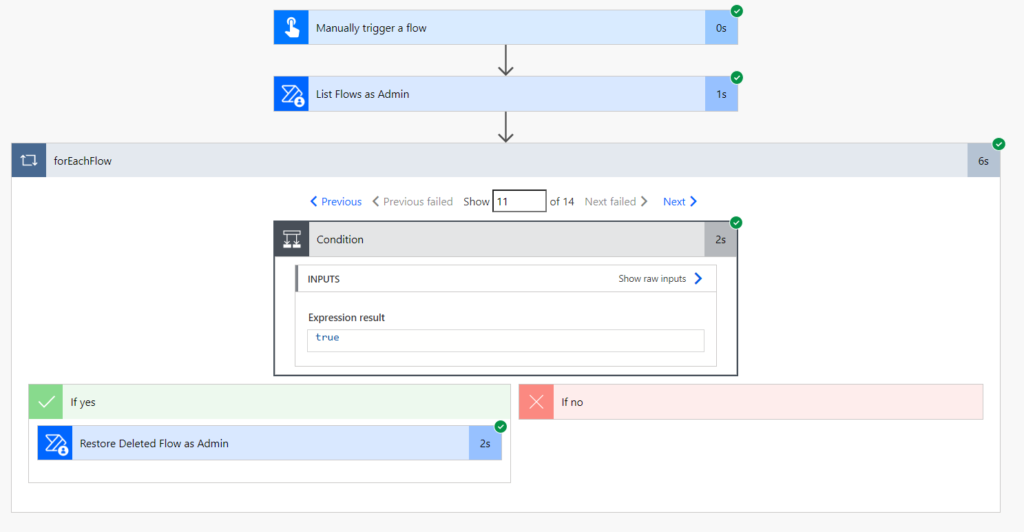
and finally run it.

Recover flow
Recover flow

Now , your flow should be appear in list of flow and should be in disabled state:

Restored flow
Restored flow

Considerations

I hope these information can help you to recover your deleted Power Automate Flow…Here you can find official documentation from Microsoft.

Contact me for questions! Have a nice day!
CategoriesPower AppsPower AutomatePower Platform

Power Platform – Environment

Today, we’re going to speak about Environment. Where people starting to create App or Flow, usually, use Default Environment. But in order to have correct governance or our Power Platform solutions, a good idea (but is not only the one) is create more then one Environment. For Example Dev, Quality and Prod.

What is an “Environment” ?

According to Microsoft , and Environment is a a space to store and share data, app , flows. You can image it as a “Container”.

  • Each environment can have a single Dataverse DB (but you can create environment withoud it)
  • Default environment is Shared by all users, in my opinion you shouldn’t use it to develop critical app.

Environment types

Basically we can create 4 kinds of environment.

  • Sandbox: used for non-production environment but for developing and test. It can be reset or copy.
  • Production: used for permanent work. You need Power Apps license to create and manage it. It will provided with 1 GB database capacity.
  • Trial: used for short term testing. It will be cleaned automatically after 30 days. I usually use it to try new features. It can be create also as subscription based, and it can be conferted as production environment.
  • Developer: you can create a developer plan, follow this one.

Create new Environment

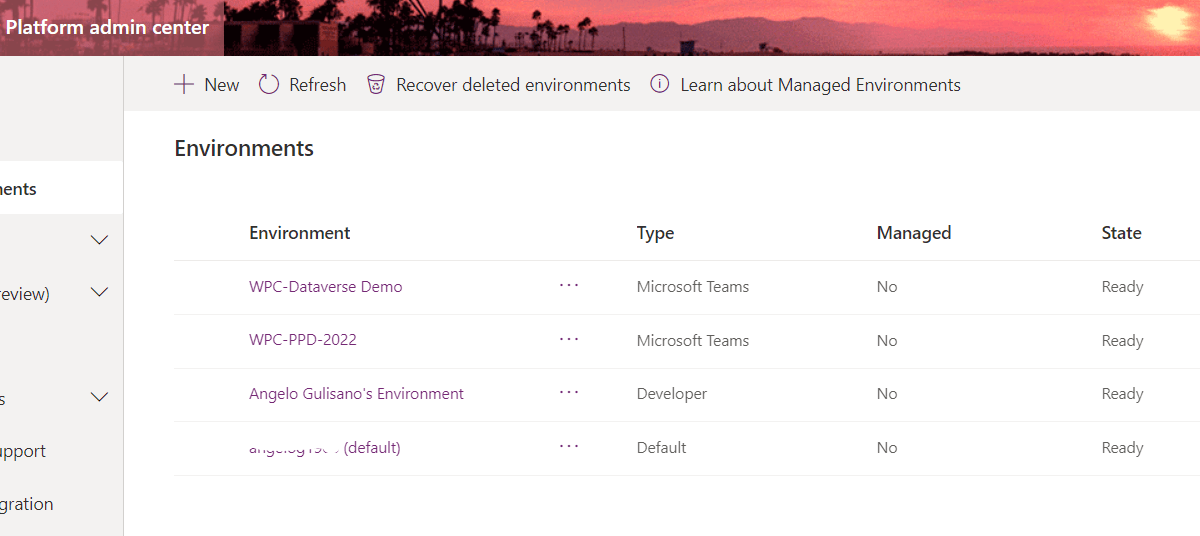
Go to Power Platform admin center: Power Platform admin center (microsoft.com) and click on “New”:

Admin Center
Create new environment

Now you can fill option and create your new environment

Create new environment
Creating

You can find usefull information here.

Contact me for questions! Have a nice day!

CategoriesMicrosoft 365Power Automate

Power Automate – Get items – Filter by lookup columns

Today, let’s understand how to filter SharePoint Items, by lookup column, from Power Automate flow.

FILTER BY LOOKUP COLUMN

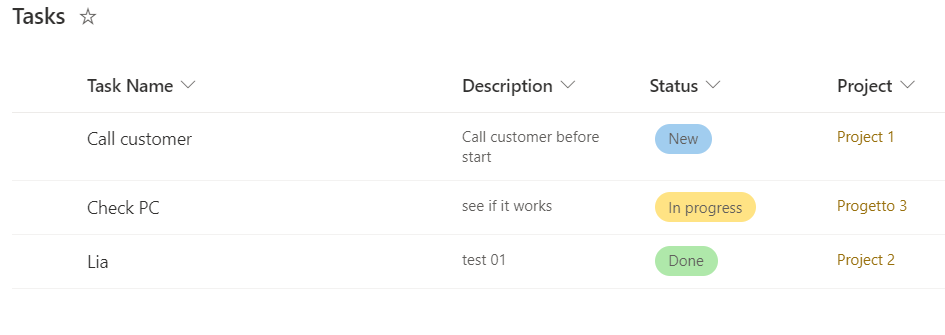
In this Example, I created two lists: Projects and Tasks. Every tasks has lookup to project.

filter-by-lookup-projectlist

And Tasks:

tasks

As we can see , we have “Project” column. This is our lookup column.

Create a flow

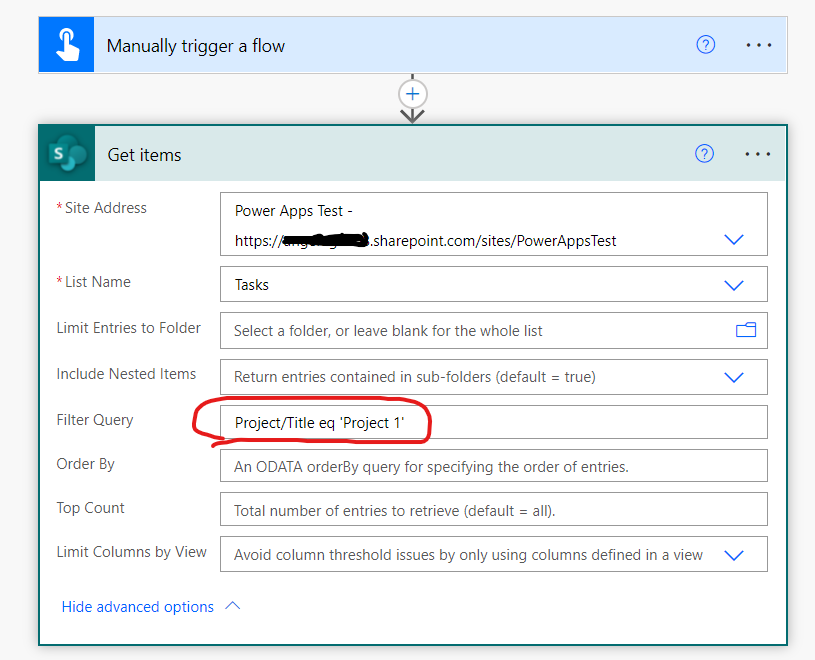
To to this example I create a Simple flow wiht manually trigger (keep mind…this is just an example…). My flow has one Actions (“Get Items”). Let’s see how to filter task by Project. One way is filter by title column of lookup (In this case I used Title). Another options is filter by Lookup ID.

Code to copy, filter by Value

InternalFieldName/Title eq ‘Lookup Value’

Or, filter by

internalFieldName/Id eq ‘Lookup Id’

Let’s see our flow:

get-items-lookupfilter

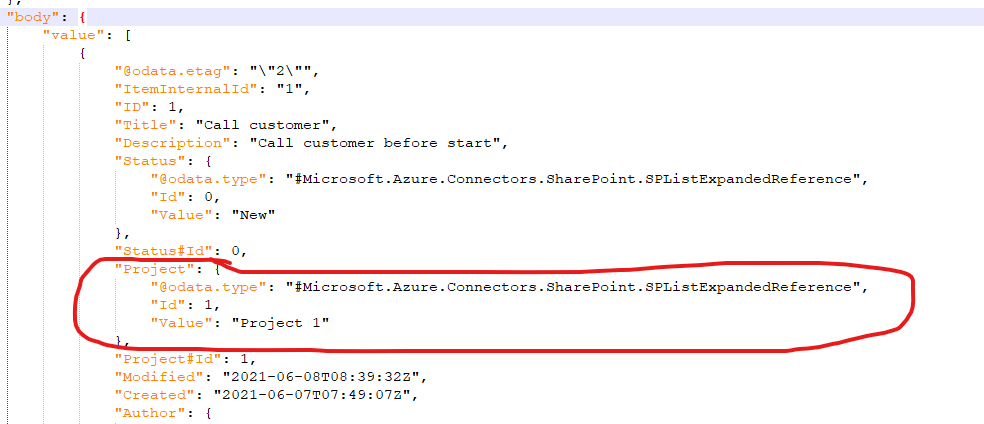
Result: It get me one task, associated with “Project 1” .

lookup-filter-result

Have a nice day!

If you want to understand , in general, how to filter Items in Power Automate, click this link.

CategoriesMicrosoft 365Power AutomateSharePoint Online

Power Automate – SharePoint Get Items – Filter

Power Automate – SharePoint Get Filtered Items

With this article I want to explain how we can get items with Power Automate (From SharePoint Online) and Filter them.

We have:

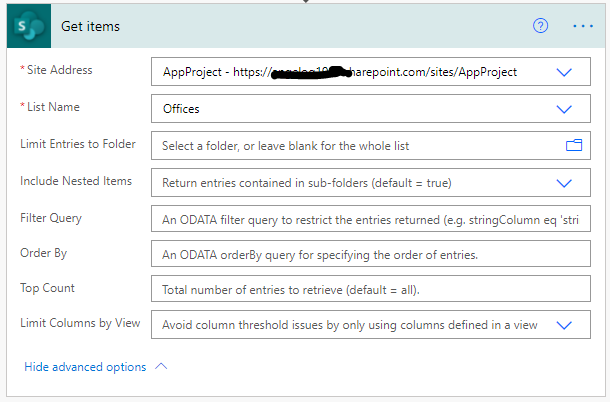
  • SharePoint list’s called “Offices” ,with some data:

  • Excel file where we save filtered items. I create and Excel file with same column of list, and store it in OneDrive. Keep mind, you must format sheet as a Table if you want to use it in Power Automate to add rows. 
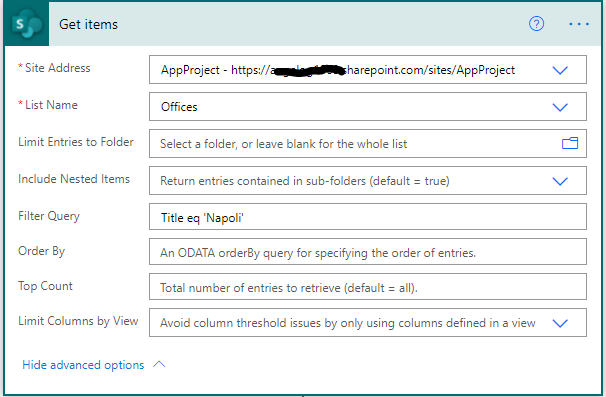
  • Power Automate flow who get data and put it into Excel File. I used “Get Items” connector to retrieve data from SharePoint list.

Get Items

No Query

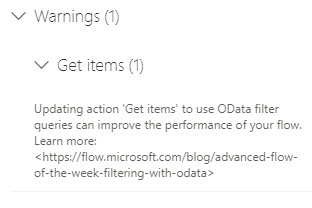
We can get data with no query. In this case, you mus put only “Site Adress” and “List Name Parameters”…keep mind “Top Count” parameter and it returs “All” items. I do not suggest this approach (And also Power Automate, who show you a Warning 🙂 )


Filter Query

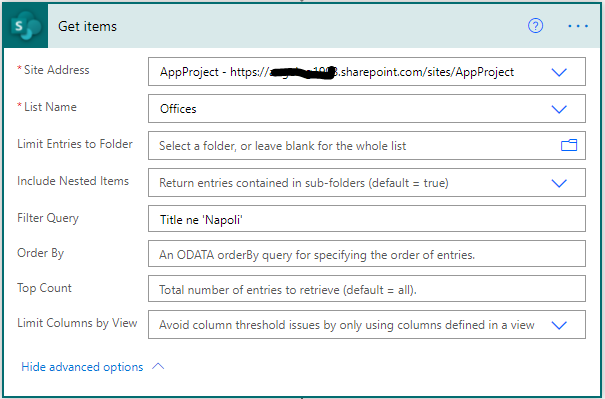
Best approach, is write a Filter Query to retrieve only items you need. Basically you should write a formula like this: fieldname operation value. 

  • As fieldName you must use iternal field name of SharePoint (Write me a comment if you need a post on this argoument).
  • Operation available are:
    • eq (Equal to)
    • lt (Less Than)
    • gt (Greater Than)
    • ge (Greater than or Equal to)
    • le (Less than or Equal to)
    • ne (No Equal to)
  • Value: value to find, date and string must be inside ‘

We can use also logical operator like “and” and “or

Let’s see some example (I show query and result on Excel sheet):

Filter “eq”

Result:

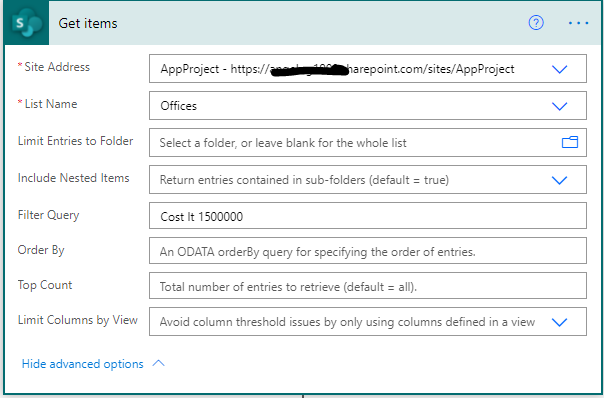
Filter “lt”

Filter “lt”

Result:

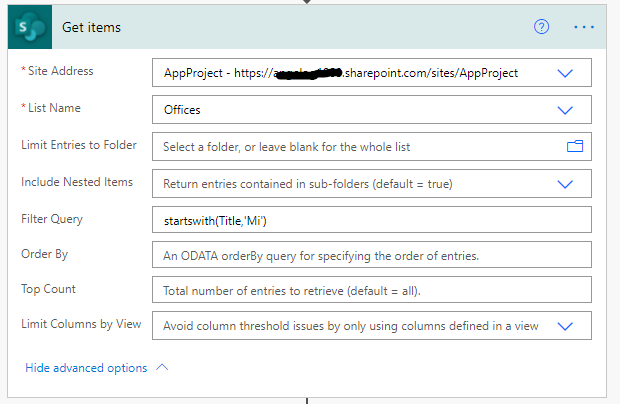
Filter Query with Functions

You can also use functions for your filter query.

  • endswith
  • startswith
  • substringof
  • ….

The syntax is: functions(fieldName, value)

An Example:

Result:

I hope it help you

CategoriesPower Automate

Power Automate – Try Catch

Hi, Today I want to explain how to implement “try-catch” (and “Finally” also if you need). It’s very simple…basically you should add “scope” , put actions inside, add another “scope” to manage error…let me show:

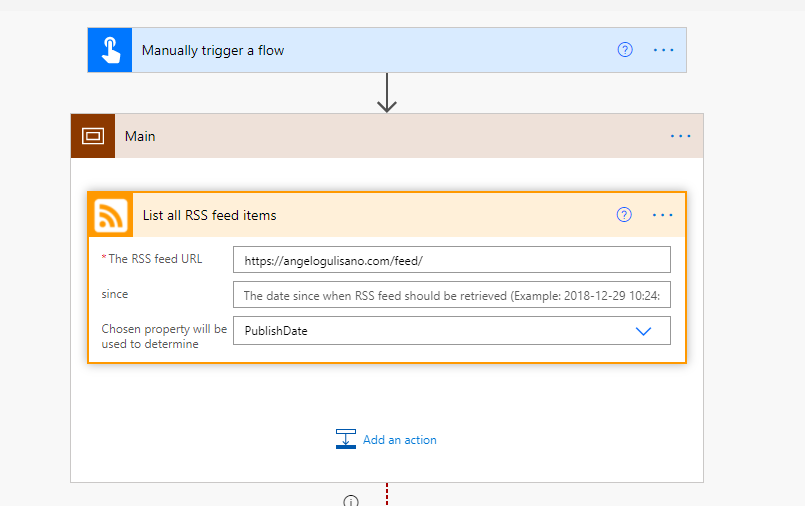
1) Add “Main” scope with your actions inside:

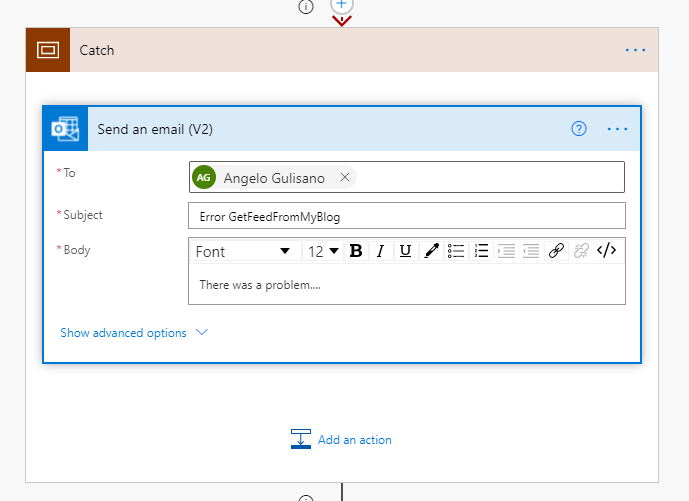
2) Add another scope. I called it “Catch” …it contains some actions to execute if  error in “Main” scope should occur:

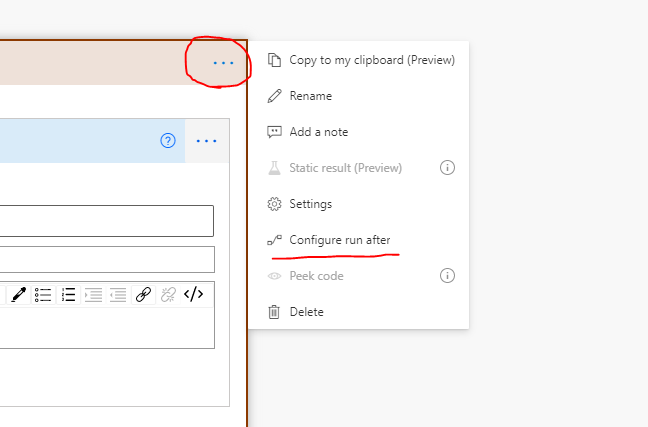
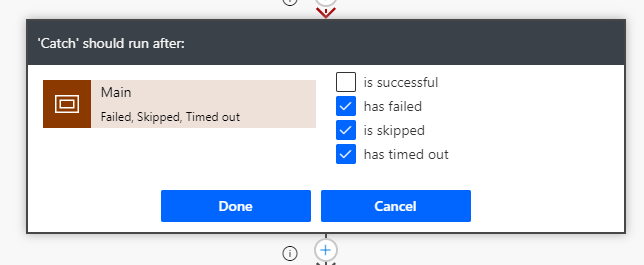
Now, we must configure “Run after” on this scope to execute it in case of error:

If you want , you can add also “Finally” scope to execute some actions in any case…your flow should be appears like this:

That’s all! Personally I use these scope to write log in case of error and success also.
Thanks

My Agile Privacy
This website uses technical and profiling cookies. Clicking on "Accept" authorizes all profiling cookies. Clicking on "Refuse" or the "X" will refuse all profiling cookies. By clicking on "Customize" you can select which profiling cookies to activate.
Warning: some page functionalities could not work due to your privacy choices: