Hello, here really simple post to explain how to create a SharePoint site without Microsoft 365 group associated.
Create Site
Follow there instructions:
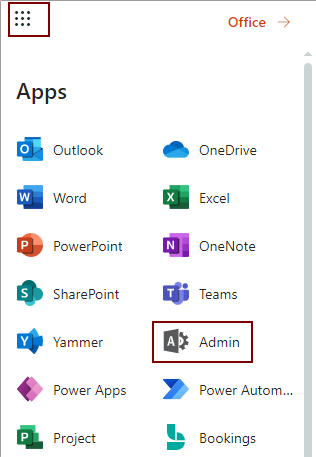
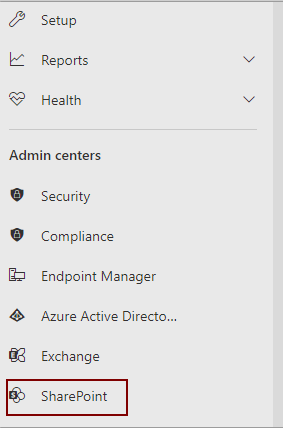
Clicck on App Launcher and then on “Admin”. Then click on “Expand all” , SharePoint and “Active sites”
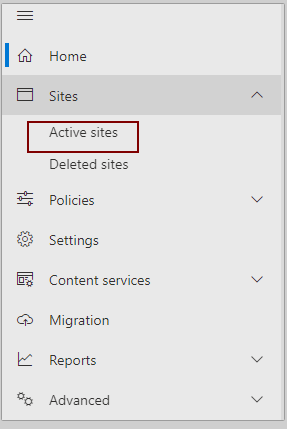
Then we can create site:
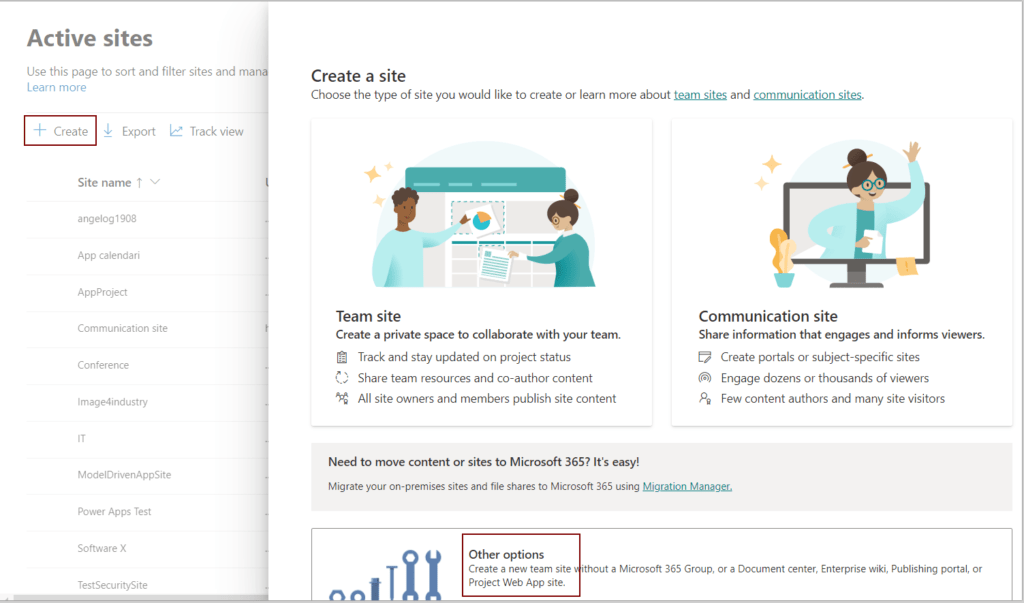
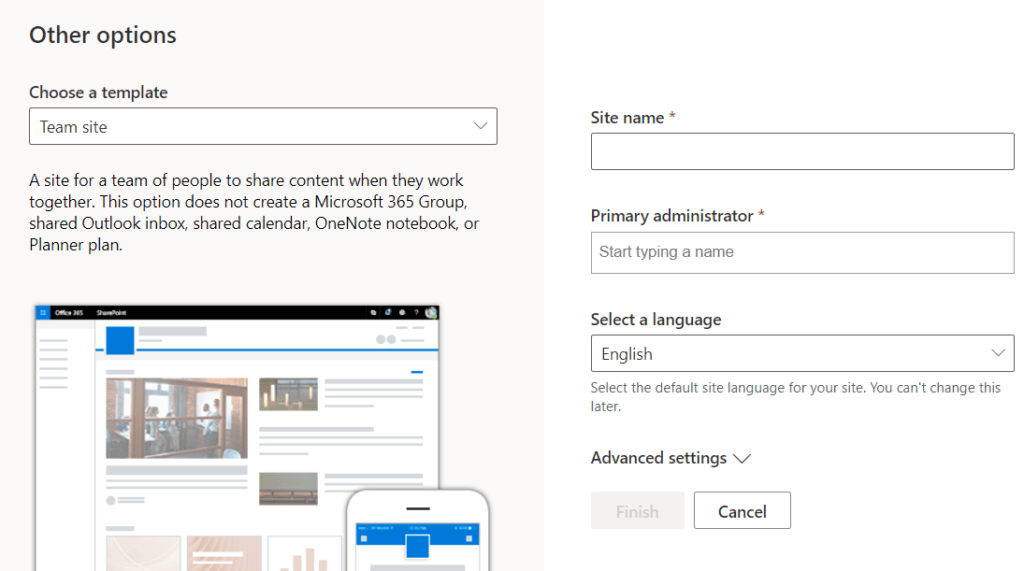
Click on Create and “Other options”:
Now we can create our site:
Considerations
Why we should create site with no M365 group? If we don’t need Outlook, planner or Teams associated but just need a SharePoint Team Site. Just to remind…to do that, we should be are SharePoint Administrator.
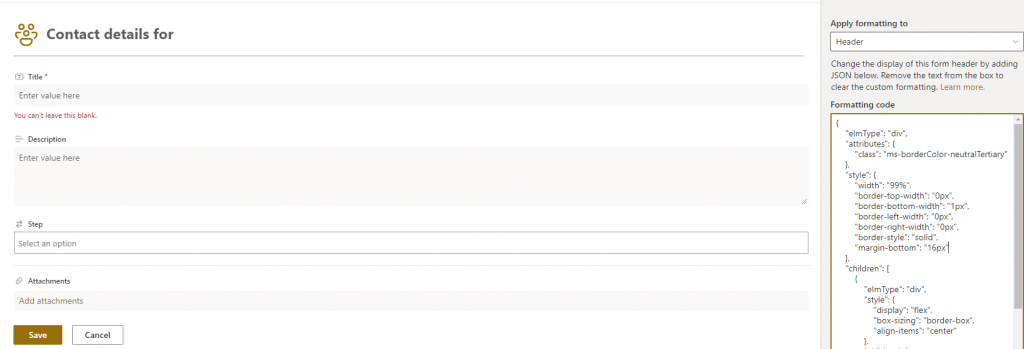
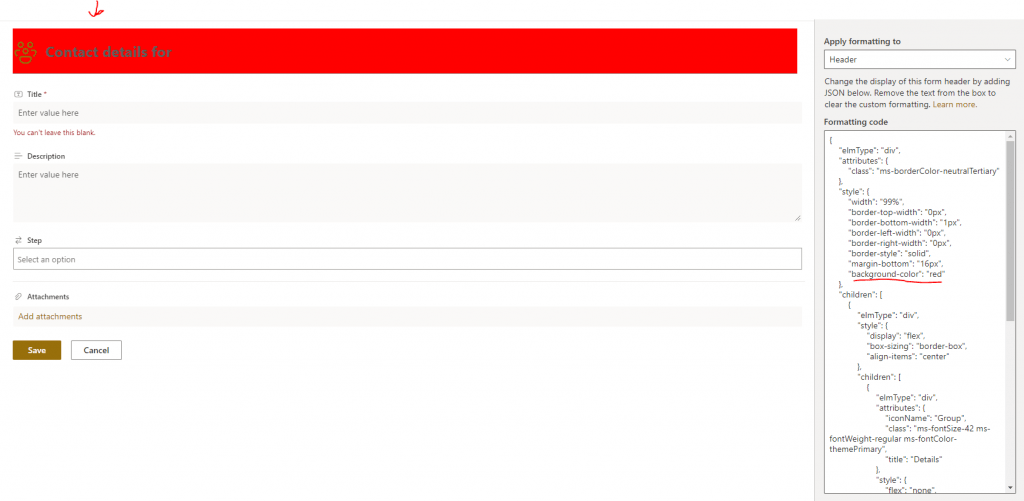
Some people asking me, “How can I find witch section I’m modifing? I’m not expert” , an Idea is : Add background color red to style to indentify section:
BeforeAfter
Not beautiful to see, but simple to identify 🙂
Body customization
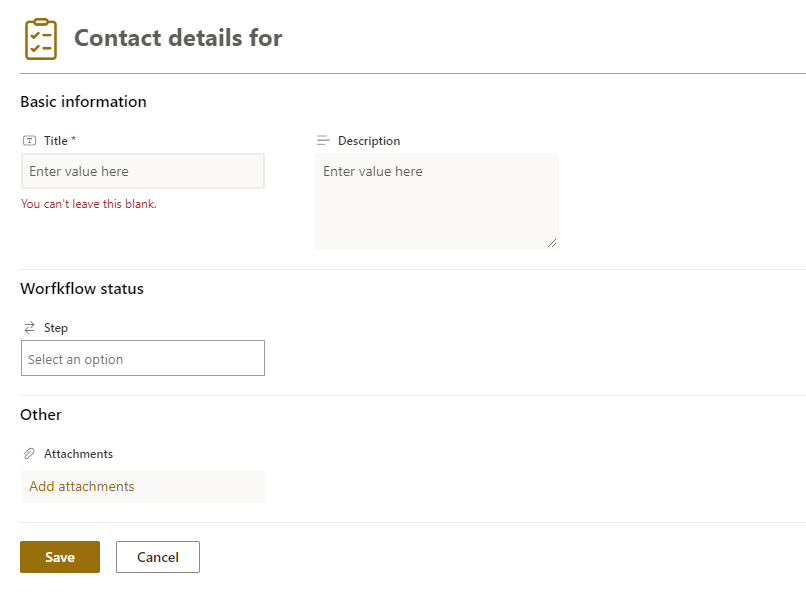
To customize Body, you should simply define Sections and fields, in my case:
Hello, This is one of a series of post where I want to help you to improve your experience with SharePoint Online. This article,I’ll explane how you can ask to SPO to inform you whene anyone makes change to your documents.
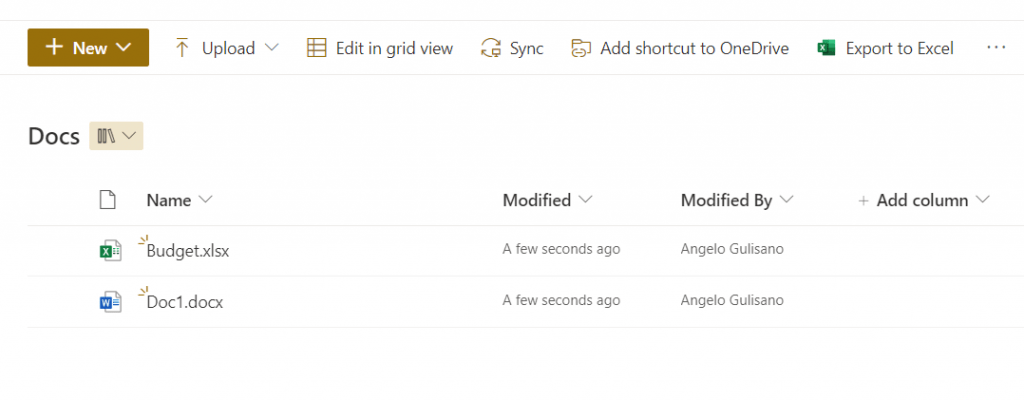
Document Library
We have SharePoint site, and a document library called “Docs” where we collaborate with our collegues (PS: Do you know Co authoring? See this link)
Simple SharePoint Document Library
Basically We don’t want go every day on our document library to check if our collegues has make change on documents…So how can SharePoint help us?
Alerting
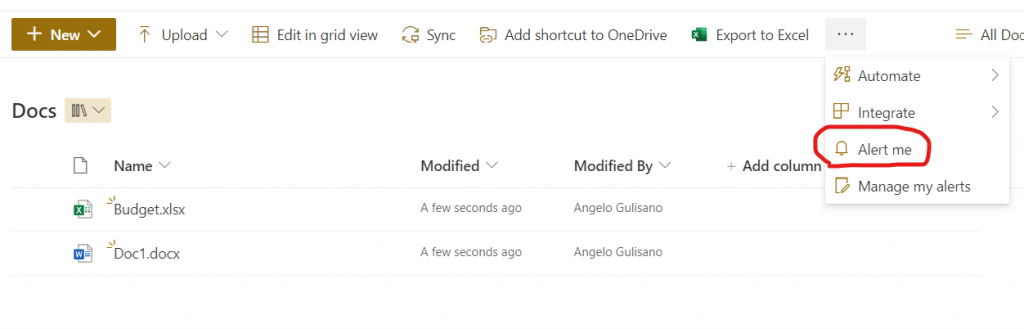
Simple ,As I usually try to explain…:-) One way is configure an Alert on Document Library (Or Lists). Go to your DL, and looking for “Alert Me” on Ribbon:
Document Library – Alert Me
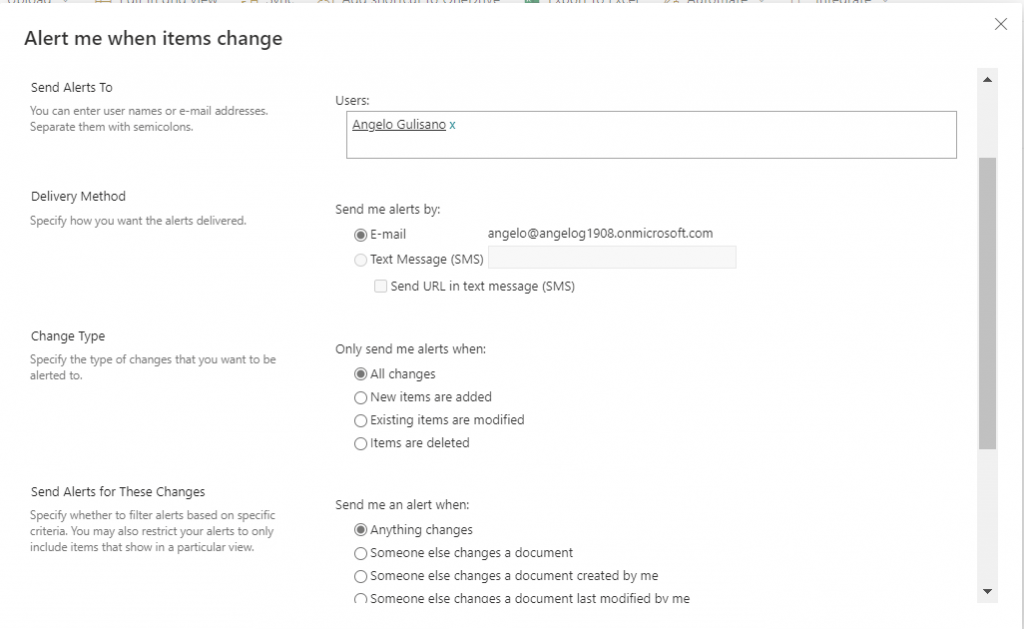
Next Page page ask us a series of parameters to configure Alert. In Order:
Title: Title of the Alert (also included in subject mail).
Send Alert To: People to receives alert.
Delivery method: Choose if you want receive mail or SMS.ù
Change type: Very important. The changes typology that trigger the alert. For Example Item modified, or Deleted.
Send Alerts for These Changes: Useful to restrict alert, for example you can get alert only for document created by you.
When to Send Alerts: How frequently you want to be alerted? My suggestion , generally, is Daily recap to limits numers of mails.
Configure Alert Options
Considerations
This is really simple way. Another option is create a Power Automate flow with appropriate trigger. I hope this is usefull for you.
Hello, new Post Today. We’re going to understand how to use Patch function with SharePoint list. For this Example I used a “Task List” who contains text , choose , lookup and numeric columns.
That’s all! If we want to update an existing record? You must get it and pass to patch function instead Defaults(). In this case, I used Lookup function to retrieve record to update:
If you’ve ever developed a custom Web Part for SharePoint, and “Failed to load components” message occures for guest users, here you can find possibile solution to fix it.
SPFx Failed to load component guest users
I develop a SPO Webpart…it run correctly but when my customer share site with guest user, it give us and error:
Something like this:
[SPLoaderError.loadComponentError]:***Failed to load component "12345-c123-a1be27-223a-xxxx0"(MyWebpart Name).
Possible fix path
A possible problem is guest users can’t acess to ClientSideAssets library on AppCatalog site, so one way is:
Enable external sharing on AppCatalog site
Break permissions on ClientSideAssets library and give reading permission for guest users
If don’t work, you can try also to restore inherits permission and put guest users inside readers group of app catalog site. In this case, guest can Access to all site resources as reader, but if it work you can continue investigate on problem.
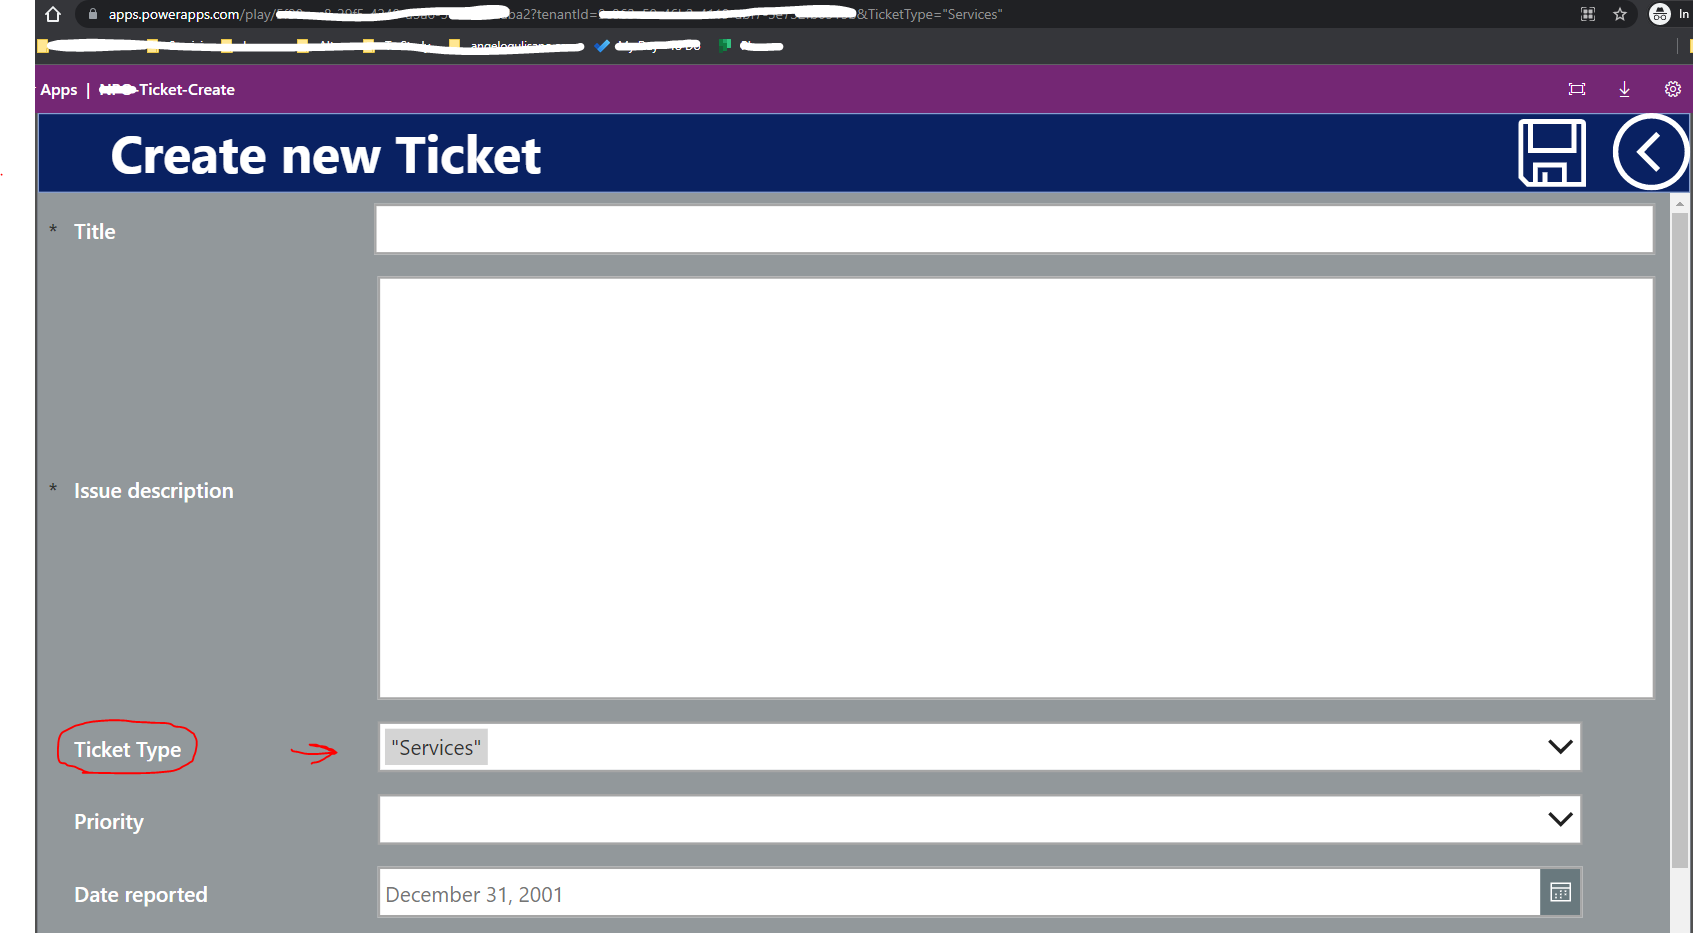
Today, let’s understand how to filter SharePoint Items, by lookup column, from Power Automate flow.
FILTER BY LOOKUP COLUMN
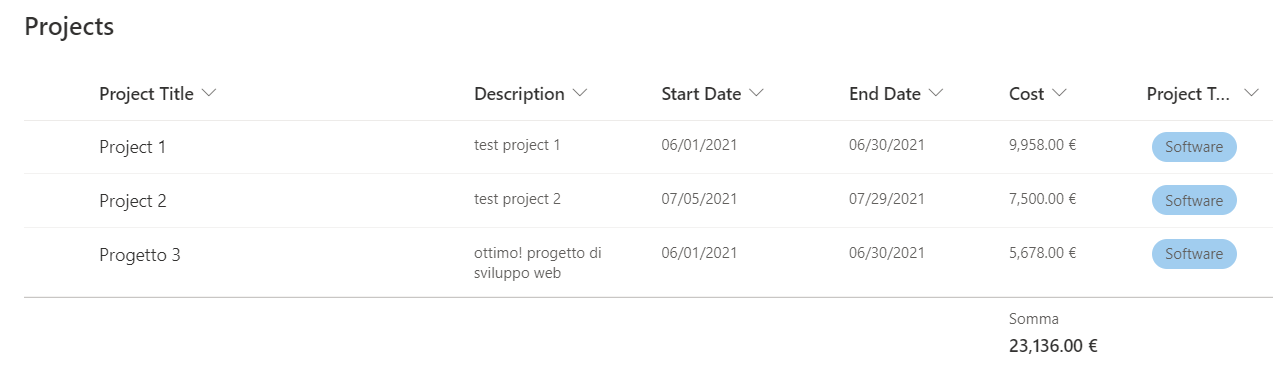
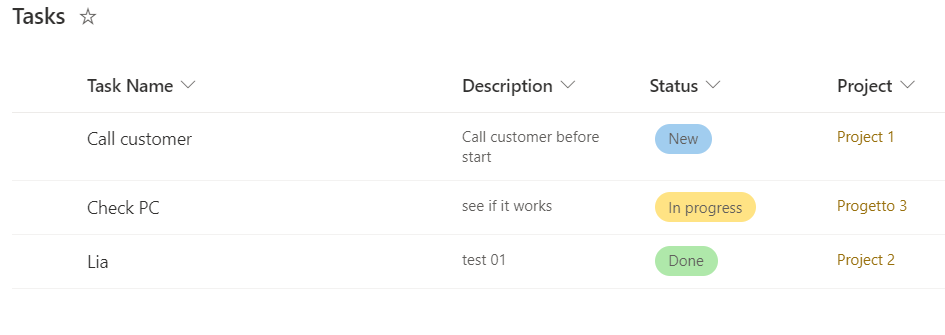
In this Example, I created two lists: Projects and Tasks. Every tasks has lookup to project.
And Tasks:
As we can see , we have “Project” column. This is our lookup column.
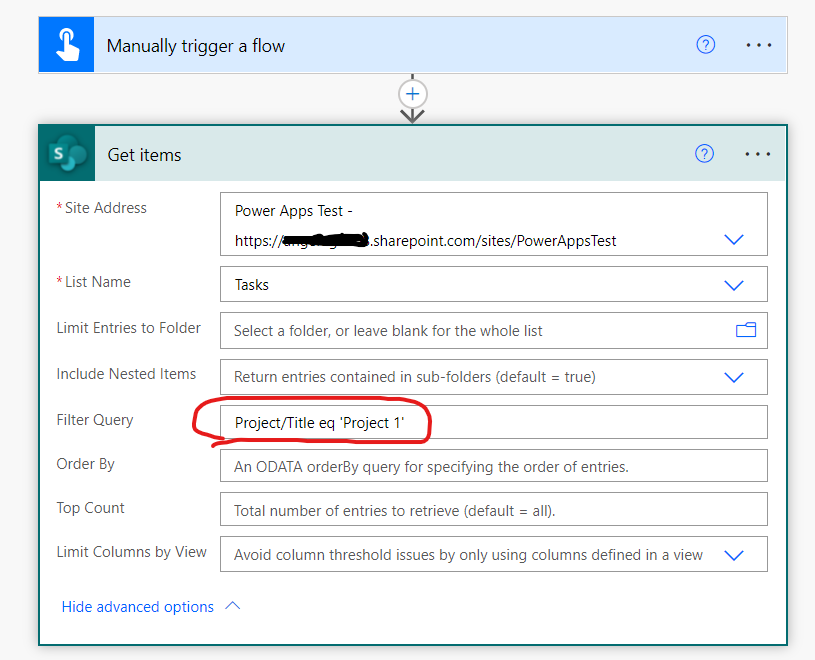
Create a flow
To to this example I create a Simple flow wiht manually trigger (keep mind…this is just an example…). My flow has one Actions (“Get Items”). Let’s see how to filter task by Project. One way is filter by title column of lookup (In this case I used Title). Another options is filter by Lookup ID.
Code to copy, filter by Value
InternalFieldName/Title eq ‘Lookup Value’
Or, filter by
internalFieldName/Id eq ‘Lookup Id’
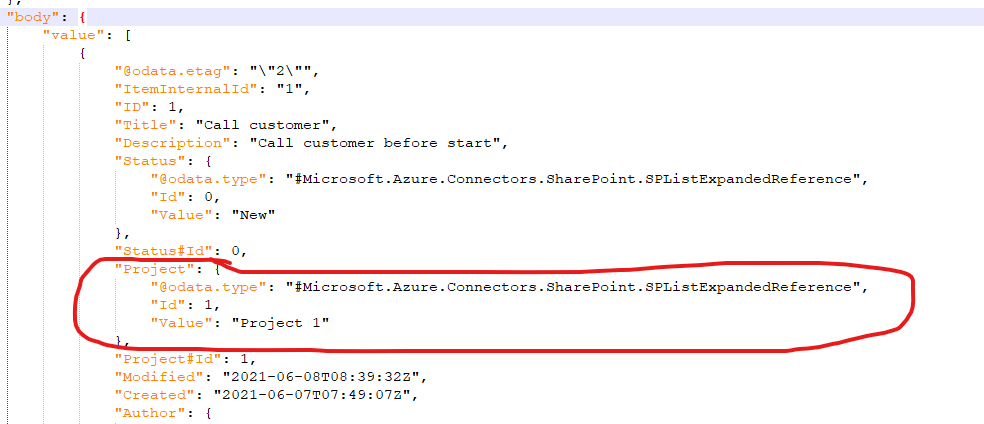
Let’s see our flow:
Result: It get me one task, associated with “Project 1” .
Have a nice day!
If you want to understand , in general, how to filter Items in Power Automate, click this link.
Let’s learn how can we passing parameter to our Canvas Apps.
QUERY STRING PARAMETER
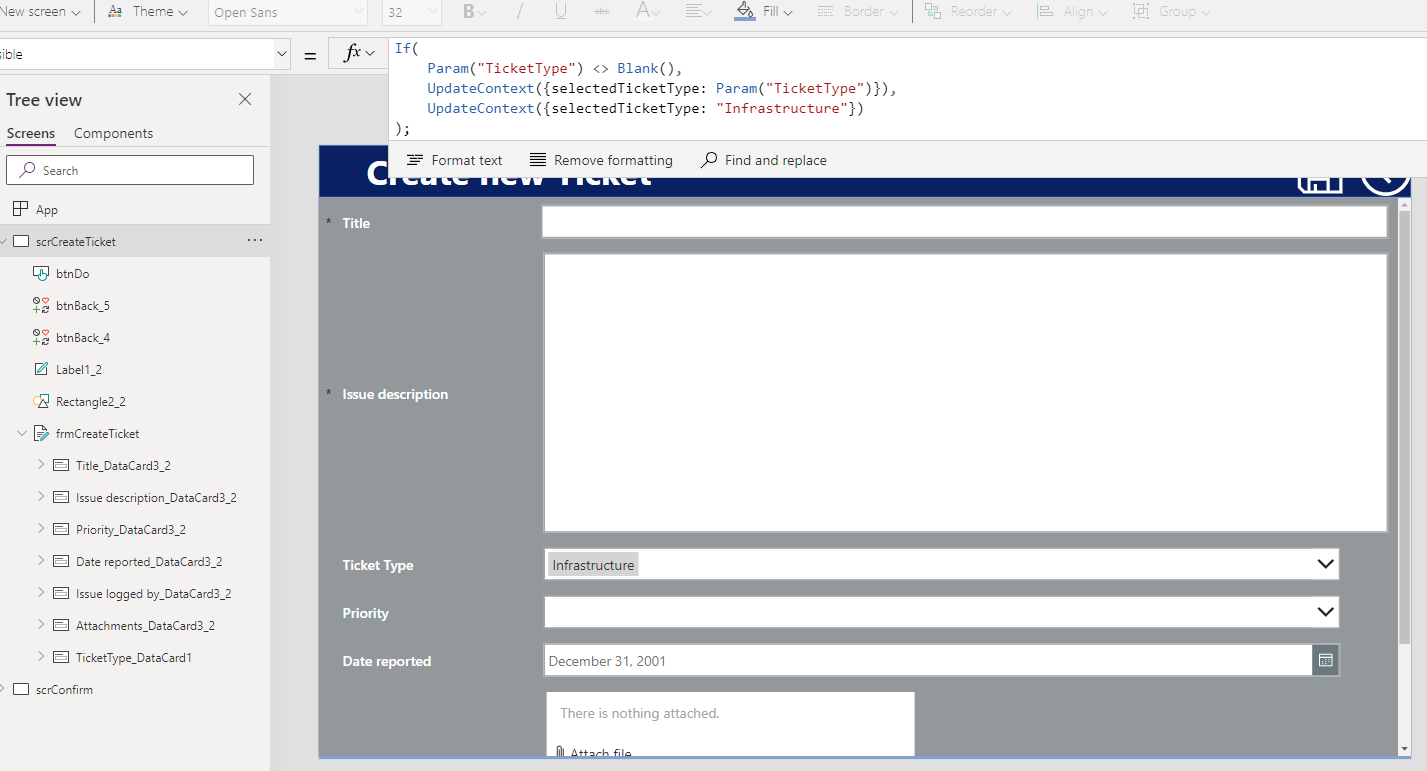
In this Example, I built a simple app to write a ticket in SharePoint List. In this case , I need to pass (from “external”) a parameter to our App, to set Ticket Type. My choose are:
Infrastructure
Software
Services
To achievement this, we should use “Query String” and Param Function. Query String is part of url , used to passing data to application.
Step 1 – Get query string from App
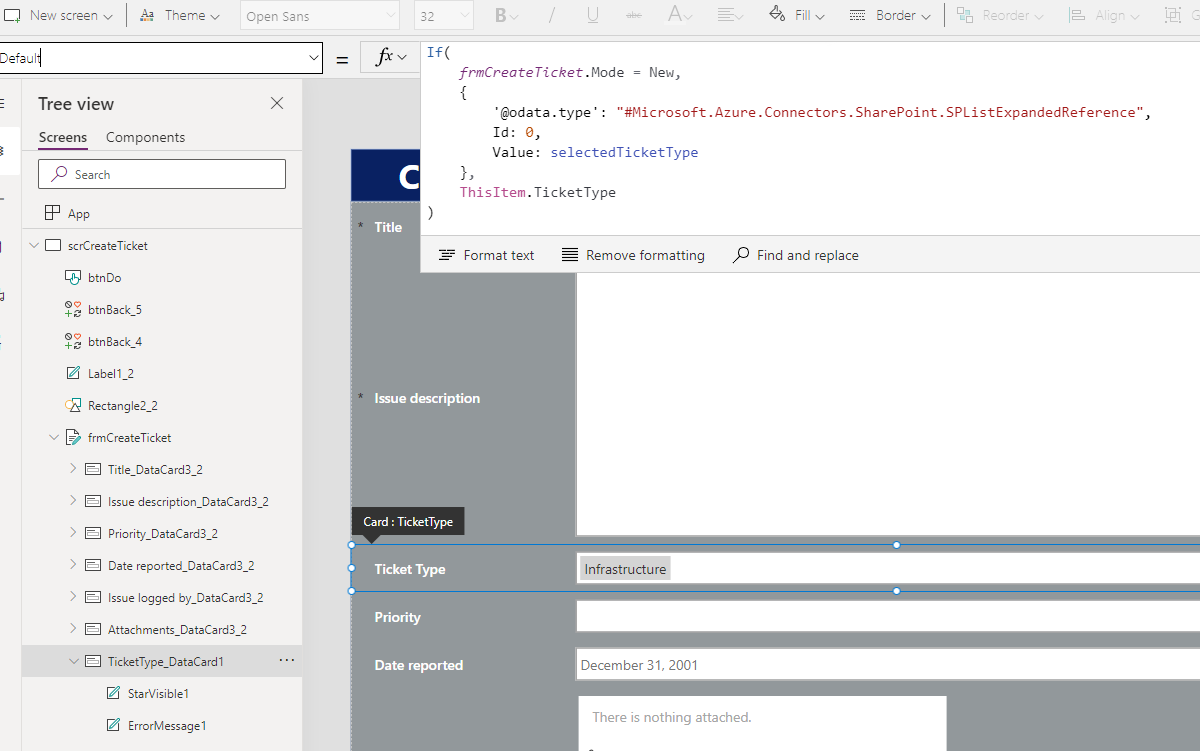
To get query string, I used param function in OnVisible event of my Screen to get date and store it on local variable. I can’t use “On Start” event of app because UpdateContext is only available while you are currently on a screen. When the OnStart code is executed no screen has loaded yet.
In my Example, I used a Form with SharePooint list as Datasource . My field “Ticket Type” is Choose field. To set value as default, I set Default property of datacard, only if the form is in “insert mode”. Why? because if we are in view or in edit, we need to see data of item, not our parameter. So:
Don’t worry, in the most of case you can recover it. Let’s see how, with simple powershell command. As I usually write, if you know what you do , the script is:
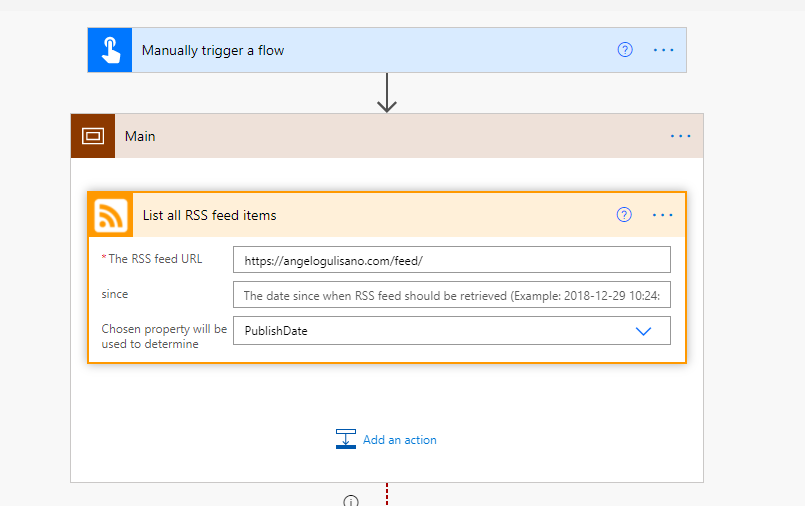
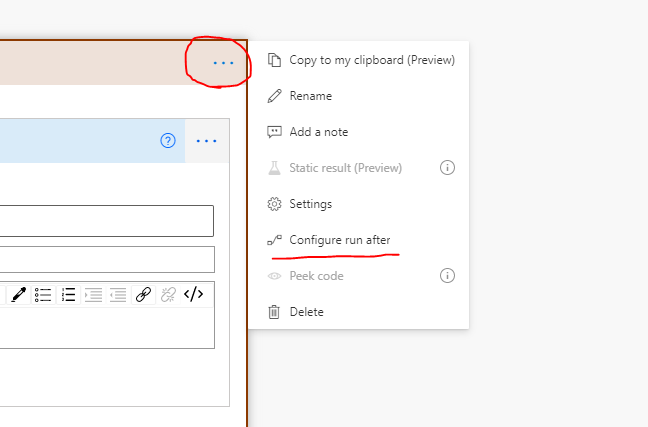
Hi, Today I want to explain how to implement “try-catch” (and “Finally” also if you need). It’s very simple…basically you should add “scope” , put actions inside, add another “scope” to manage error…let me show:
1) Add “Main” scope with your actions inside:
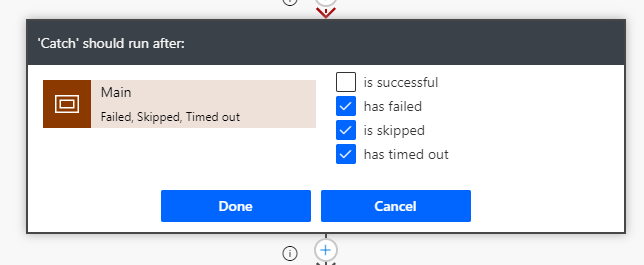
2) Add another scope. I called it “Catch” …it contains some actions to execute if error in “Main” scope should occur:
Now, we must configure “Run after” on this scope to execute it in case of error:
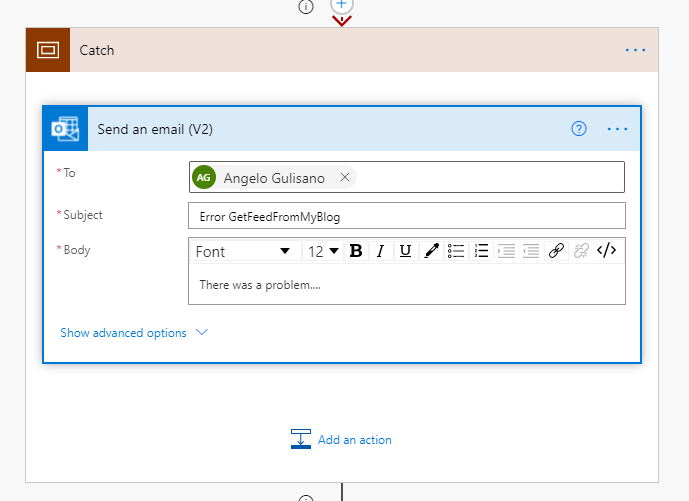
If you want , you can add also “Finally” scope to execute some actions in any case…your flow should be appears like this:
That’s all! Personally I use these scope to write log in case of error and success also.
Hi! let’s see a simple way to show name of day of week. There isn’t “built in function” get name, but we can use Weekday(Date) function to get numer of day and use it to show name:
“Are SharePoint Lists better then Excel Files?” or “Why shloud I use a SharePoint list intead Excel Files?”
These are 2 of the most asked question of my customers/students.
First of all, in my opinion there isn’t “best technology” or best “solutions” for all problems. There is more appropriate solution for your problem (or budget 🙂 ), so the “key” is: know different options to choose the most appropriate.
With these premises, let’s me explain some reasons why, personally, generally I prefer SPO List, intead Excel files.
List item versioning. SharePoint can store N versions on your list item, so you can see differents beetwneen versiones and restore previus version of item. Isn’t this cool?
Set item level permissions. You can decide , for each list item, who can see or edit it.
Different views. You can create different views of list. Users can create personal view with filters ,group or sort by columns.
Save author, last modified user, created date , last edit date. Automatically, for each rows.
Better integration with Power Automate & Power Apps, so your simple list becomes part of business process.
This website uses technical and profiling cookies. Clicking on "Accept" authorises all profiling cookies. Clicking on "Refuse" or the X will refuse all profiling cookies. By clicking on "Customise" you can select which profiling cookies to activate.
Google Analytics is a web analytics service provided by Google Ireland Limited ("Google"). Google uses the collected personal data to track and examine the usage of this website, compile reports on its activities, and share them with other Google services. Google may use your personal data to contextualize and personalize the ads of its advertising network. This integration of Google Analytics anonymizes your IP address.
Google reCAPTCHA is a SPAM protection service provided by Google Ireland Limited. The use of reCAPTCHA is subject to the Google privacy policy and terms of use.